
What does iPoint’s integration with Portal allow me to do? ![]()

There are two primary functions that this integration offers:
- Import items from Portal into iPoint’s Items module, linking them and allowing for automatic updates for selected data points from Portal
- Import approved Proposals created in Portal into iPoint’s Proposal module, helping to move all of your company’s sales operations into the iPoint ecosystem
How do I connect iPoint and Portal?
Before you can do anything with Portal in iPoint, we need to get the two systems connected.
Log into iPoint as an administrator for your organization, and go to Settings > Integrations > Portal. From here, you’ll need to provide your username and password for your Portal account, and then click “Get API Key”. This will retrieve the info from Portal that we need and then clear your credentials from memory, making things completely secure!

Want to keep your Proposal Number from Portal?
Great, because you can! There is a quick check box in Settings>Integrations>Portal that will append, or tell iPoint to keep and utilize those Portal Proposal reference numbers rather than re-numbering them to keep the information consistent.
.
.
.
Items from Portal
From Settings>Integrations>Portal, you can manage which item attributes you’d like to sync when import items into the Items module. The first check boxes on the left are what data points you’d like iPoint to pull in from Portal when an item is initally pulled in. Then boxes on the right are the data points you’d like iPoint to auto update when Portal makes a change.
These selections are not set in stone by any means and can be modified if necessary by an iPoint system admin within your company.
Proposals from Portal ![]()

From your dashboard, click Proposals > Options > Advanced > Fetch Portal Proposals. This will open a window where you’ll be able to search for existing Portal proposals, filter by status, sort and import.
What does this import actually do?
Proposals can be quite long and complex. Understanding what we look for and how we import them can help you troubleshoot when things go awry. Here’s what we’re doing behind the scenes, in chronological order:

Connecting to Portal
We need a secure, live connection to Portal’s servers to get your proposal details. We use the API key we generated from your credentials earlier to establish the connection, and only alert you to this if something goes wrong. If it does, double check that your credentials are still accurate, and give Support a call if you continue having issues.
Check for Duplicates
We use Portal’s unique ID to track proposals you import and verify we don’t accidentally do twice the work. We take Portal’s ID and search the proposals you have in iPoint to make sure it doesn’t already exist. If it does exist, you will receive a prompt so you can confirm you really want a duplicate created.
Setting Required Fields ![]()
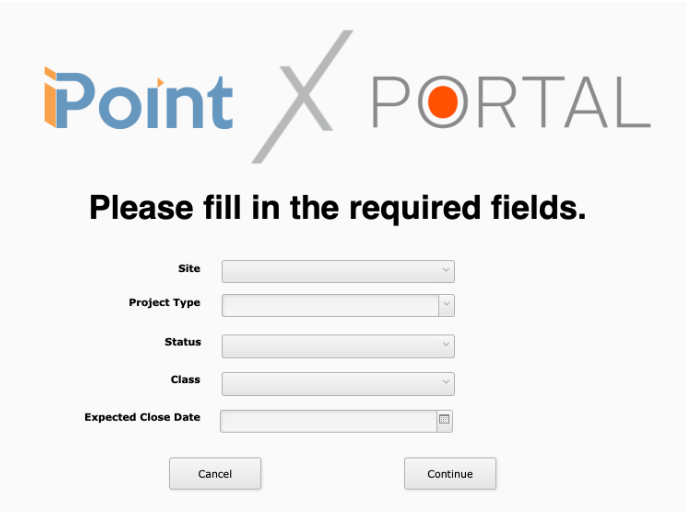
Depending on your company’s settings, you may be required to input certain information before we can continue the import. The settings to enable these can all be found in Settings > Module Settings > Proposals > Proposal Settings Options:
- Always Require Site
- Require Proposal Type
- Require Proposal Status
- Require Proposal Class
- Expected Close Date Date
Getting List of Items from Proposal
Here we take a look at the proposal in Portal, so long as the proposal wasn’t declined by the client (we don’t support importing declined proposals.) We’re looking through every area and the options within to get a list of items in each. The general hierarchy looks like this:
- Area 1 >Option 1 > Item A > Item B >Option 2 >Item A >Item C
- Area 2
…. And so on
For each item, we’re looking at the item “type” to see if it is one of three types: Labor, Custom or Standard. For all items, we look at the name field to determine the name we’ll use in iPoint, and then look at the description if it’s empty.
- Labor Items
If an item is marked as labor, we look to see if the item’s name already exists in iPoint’s labor phases. If it does, we use the associated labor cost in iPoint for the proposal, but pull in the price you’ve entered into Portal. Please note that iPoint only supports one labor rate per labor phase, so the first one we see is what we’ll use for the entire proposal. If you’re using different rates, they really should have different names. We will create new rates if we are not able to match to a labor phase name exactly. All labor, regardless of how it’s shown in Portal is added as it’s own line item when pulled into iPoint.
- Custom Items
First, we try to figure out the name of the custom item. We turn to the item’s model number first, and if that’s empty, we look at the item’s brand field and then description to use as the name instead. We then look to see if that item exists in iPoint’s database based on the name AND part number. If it does, we pull that matching item. If it doesn’t we use a single item called “Portal Custom Item” from your items module, and add to this proposal. When adding it to the Proposal, iPoint overrides the item name and part number so that it looks correct, but it is still tied back to the Portal Custom Item which is a non-inventory item.
- Standard Items
If the item is simply marked as a “Part” in Portal, we add its Portal ID, see if you’ve already linked Portal’s item to an item in iPoint (see “Importing Items” to understand why this is awesome). Link the item to one in iPoint if you haven’t already done so.
If the item exists in iPoint and Portal, but they aren’t linked together yet, we match based on Portal’s Model field against iPoint’s Item Name or Part Number fields. We will show you the item in iPoint and ask you to confirm that’s the correct item. If the match was incorrect, we skip importing this item and ask you to update the model’s name in iPoint to prevent this accidental match before reimporting the proposal. We ask if you want to update the item information from Portal and you have the following options:
Getting Customer Info ![]()

We start by pulling the customer’s first and last name from Portal’s proposal, as well as the contact type (e.g.: individual, company). If there’s no first name, the process stops here – it’s required! Otherwise, we go to the Contacts page and try to find the customer in iPoint’s database.If we don’t find a match, we’ll ask you to either create a new contact or choose from existing contacts in case Portal had the contact by “Joe” but iPoint had “Joseph”. If there was a match, we’ll ask you to confirm it is correct, and if it’s not you’ll have the option of creating a new contact or choosing from existing contacts here as well. Unless you hit “cancel”, we’ll keep prompting for a client until one is picked or created – without one, we cannot import the proposal properly!
Tax Rate
We grab the tax rate from Portal, and then attempt to find it in iPoint’s tax rates by matching on the percentage rate (ignoring the hidden ones). If we can’t find it, we’ll let you know and prompt you to create a new rate and give it a name – you’re only able to add a new tax rate if you are an iPoint System Admin.
Adding Percentage & Fixed Discounts
We look at Portal’s proposal for percentage-based discounts on parts and add it to the newly created proposal as a discount modifier in iPoint for that percentage.
For fixed amount discounts (found in Portal in Financial Summary>Addt’l Parts Discount), we add a custom line item called “Additional Parts Discount Item” (which is really just your Portal Custom Item again) and set it equal to the discount.
Adding Areas
Any area in Portal will be brought into iPoint as a Locations. These Locations are added to the Proposal only, they are not added to your master Location list.
Adding Location Summary
Portal offers a field called Client Description – when we pull that field into iPoint we use it for the Location Summary (Scope).
Adding Scope of Work
Portal has a field named Project Description that will pull into iPoint as the Scope of Work.
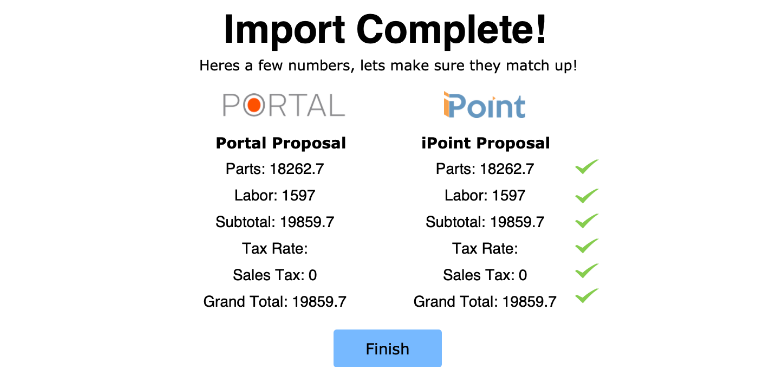
Import Complete
We made it! The proposal has been imported. You’ll now see a window telling you as much and comparing the totals between Portal’s data and what iPoint calculated and added to the newly created proposal. You’re looking for green checkmarks!