A Custom Group Summary (CGS) report is a detailed report of specific item details for each equipment group. This report can be used on its own or added to a proposal package.
Each page in the group summary can include a customized image and scope as well as details about specific items in that group. There are three main areas to focus on setting up for this report.
Custom Group Field Name
CGS uses custom fields which are set up in Settings > Module Settings > Items.

There are a number of default Custom Group Field Names that utilize basic details from the proposal document. If your Group Summary list is blank, you’ll want to press the Initialize Custom Group Summary button to insert the default fields. These fields include Quantity, Manufacturer, Category, Type, Location, Item Name, 4 Custom Fields, and the Description.
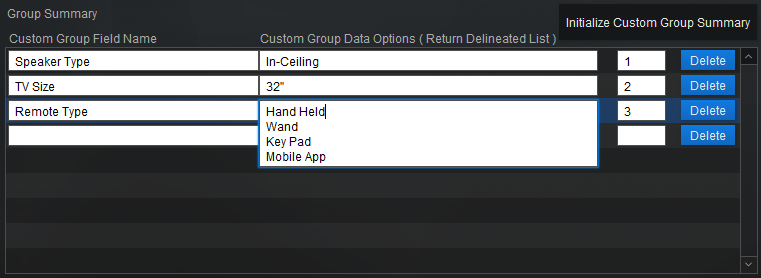
You can then build your own Custom Group Field Names by entering a field in the last blank text box. This becomes the field header. Then, in the Custom Group Data Options, you will enter the options to choose from. Each option would be entered on a new line by hitting the return key between each item. The purpose of this list is to predefined what options are available rather than randomly typing things in during the proposal build. This lets you standardize your report options.
So your list might look like this.
- Speaker Type
- In-Ceiling
- In-Wall
- Book Shelf
- Subwoofer
- TV Size
- 32”
- 42”
- 50”
- 55”
- 65”
- 75”
- Remote
- Hand Held
- Wand
- Key Pad
- Mobile App
Notice in our sample to the right, you can see the different Remote Types entered as individual lines in the Custom Group Data Options field.
As with many of the lists in iPoint, you can choose the Sort Order by placing a number in the sort field (next to the Delete button). The list of Custom Group fields will be sorted by number order. If two fields have the same number, those fields will then be sorted alphabetically.
Item Report Setup
The fields created in settings are available to add to your individual item detail in the Items > Item Detail > Report Setup.
In order for an item to be included in the Custom Group Summary report, you’ll need to define what Custom Group summary the item belongs to. In our illustration to the right, you’ll see we have opened the 12W6V3-D4 12” Sub Driver.
- On the Report Setup tab
- Check the
Include In Custom Group Summary box – this will make this item available on the CGS.
- Next, we choose a Field Name – in this case, we selected Speaker Type and then selected the option Subwoofer from the Data Options.
- Now, when this item is used on a proposal with a Custom Group Summary Report, it will be displayed in the list of items.
To finish setting up speakers for the CGS, you’ll want to open every speaker in your item list and define these options.
And you’ll repeat these steps for TVs and Remote Types, as well as any other categories you’ve chosen to create.
Pop Up List Builder
Finally, the Proposal Group itself will need to be configured for a group summary. This is done in Settings > Pop Up Lists > Proposal Group list.
- Open the Proposal Group Pop Up List
- Let’s start with our televisions. So I’m choosing the Display Devices Proposal Group.
- There are two pieces we need to define, the Summary Report and the Image & Scope

The Summary Report button opens a pop-up window where you define what information is placed on the Custom Group Summary report. There are 3 settings
- Field Count determines how many fields you want to show on the report. You can choose 3, 4, or 5 fields
- Sort On tells the report what field you will sort the list on.
- Category
- Each Line Item
- Item Name
- Location
- Type
- Data Fields the number of fields available is determined by the _Field Count* entered above.
- The first row of the data is a Title field where you enter the specific verbiage you want to be displayed in the header of the list. For example, we have Qty as a field, but the header should say Quantity. So we’ll type the full word in here.
- The second row is where you select which data field to use. The dropdown menu will show the fields you created in the Custom Group Field Names section described above

The Image & Scope button opens a popup where you can put the default details about the particular Proposal Group
- Group Image holds an image that is 8” wide by 2” tall. Create this image in your favorite graphics editor and place it here by right-clicking in the image box and select Insert Image. Navigate to the image on your computer to insert it here. This image should be either .png or .jpg file format. Note: If you leave the field empty, it will collapse on the printed report so there is no wasted space on the page.
- Group Scope is a text field where you can type a description of the Proposal Group. Just like other text fields in iPoint, you can format the text by highlighting a text string and then right-clicking to reveal Font, Size, Style, and Format options.
Setup Complete
Once these settings have been finalized you can run the report for a particular proposal by going to Proposal > Reports tab”:https://ipointsolutions.net/manual/1/en/topic/proposal-reports-custom-group-summary or included in a printed Client Proposal.
To view a sample of the Custom Group Summary report as it might appear in a proposal, click here.
Video
For additional information, watch the Custom Group Summary Report video here:


