The Time tab displays all of the sales and administrative time that has been logged against the job. This list also displays any entries created while this Sales Order was still a Proposal. This portal functions similarly to the Project Time portal on the Project tab, except that it only shows time logged on Proposals and Sales Orders, not Projects and Work Orders.
- Note**** This Feature should only be used with 1 iPoint window open. iPoint automatically logs you out when you leave a Sales Order, so by having 2 or more windows of iPoint open and clicking in another instance of iPoint you will be logged out of the Sales Order.
The Total Design Time will display the total hours worked by checking in and out of proposals and sales orders. You’ll also see:
– this icon means that there is a memo associated with this time entry
- In – the start date and time of the entry
- Out – the end date and time of the entry
- Time – how much time (in hours) was spent during this entry
- User – the initials of the user who logged the time
- Type – where the time entry came from
- Proposal
- Sale Order
Clicking on any time entry opens a pop-up window with Time Details. In this window, you will be able to edit Time In, Time Out, Labor Item, and Memo. You can also delete a time entry here as well. Of course, you have to have the appropriate permissions.

Use the green Check In button to start the time entry for your work on this sales order. You will be prompted to pick a Labor Item to signify what type of work you are doing.
Now the system will track your time working and add another entry into the Design Time portal.
You’ll notice the green button has now turned to a red Check Out button. Click this button when you are done tracking time. This will conclude the time tracker and complete the entry.

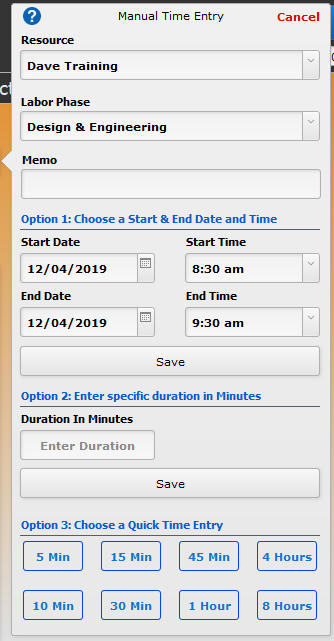
Did you forget to track time yesterday when you were working on the Sales Order? No worries! Just click the Manual Entry button for three different options to enter your time.
First, you’ll need to pick a Resource (name of the user) and a Labor Phase. And if you want, you can enter a Memo, too.
- Option 1 – Choose a Start Date and Time using the entry fields. iPoint will calculate the amount of time you spent.
- Option 2 – Enter the number of minutes you spent working on the job. iPoint will add that amount of time on an entry for today.
- Option 3 – Pick a preset Quick Time Entry to add that amount of time to today.
.
.
.
.
.
.
.
.
.
.
.
.
.
.
.
.
.
.


