Header
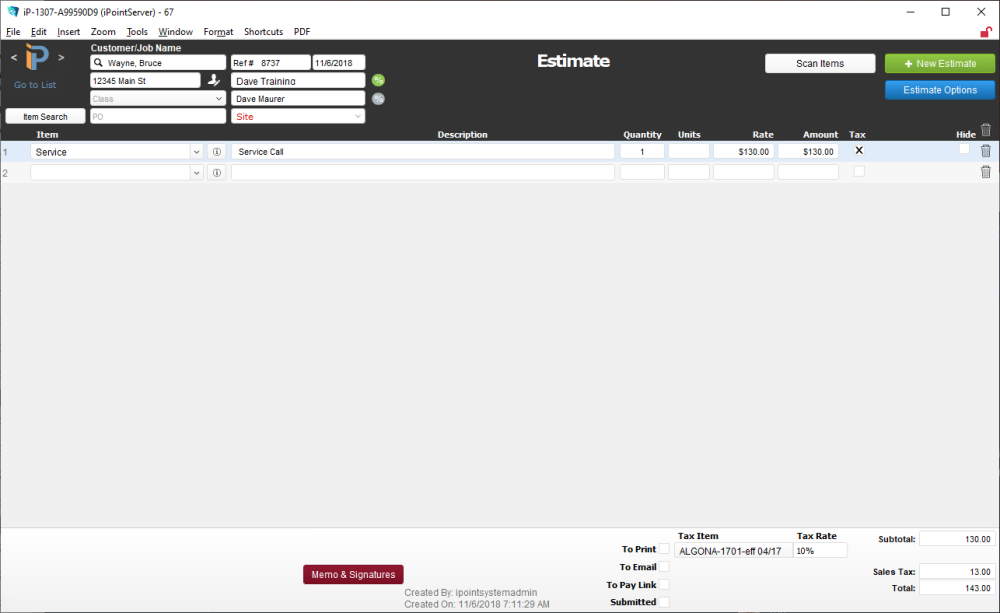
The estimate header contains:
- Customer/Job Name – the name of the customer or customer/job that the estimate is written for
- Address – the primary, bill-to address for the customer
Contact Details – click this button to open a pop-up window with more customer addresses and contact information. You can also navigate to the actual customer record in CRM in this pop-up window.
- Class – if your company uses classes to assist with reporting purposes, you can assign a class to the estimate here
- PO – should your customer provide you with a Purchase Order number, you can store that here
- Ref # – this is the unique serial number of the estimate – auto-generated by the system
- Date – the date field shows the day that the system created the invoice. You can manually adjust the date as necessary.
- Sales Person – use the dropdown to select a salesperson. This field will be filled by default with the name of the user creating the estimate.
- Sales 2 – use the dropdown to select a secondary salesperson.
Commission – if there is commission calculated on this estimate, you’ll see a green percentage icon. If no commission is calculated, the icon will display grey.
- Site – If your company utilizes Multi-Site Locations, you’ll be able to define what store or location this estimate is related to.
– Click this button to add items by using the standard item search functionality
On the right side of the header, you’ll find:

Click the Scan Items button to activate your barcode scanner so you can scan UPC codes to add a product to the estimate.

The New Estimate button opens a blank estimate ready for you to enter data.

The Estimate Options button opens a new window where you can perform several magical actions.
Body
The body of the estimate provides the following details:
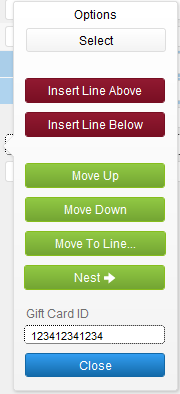
- Line Number – this seemingly innocuous number is actually pretty powerful! Click the number to open options so you can:
- Insert a line above this line
- Insert a line below this line
- Move the line up one space
- Move the line down one space
- Move to Line – so you can stipulate where you want the line to move
- Nest makes the item an accessory of the item above it. Note: you can only have one layer of parent/child relationships.
- Item – the item number of the item. You can use the dropdown list to add a new item or use the Item Search button in the header to find just the right part.
- Leave the item field blank to use the line as a comment field. You’ll be able to write whatever you want in the description field.
Item Details – click this button to see additional details about the item, as well as another place to perform an item search.
- Description – the description is taken from the Item master. However, you can click on this field to edit the description only on this estimate.
- Quantity – how many of the items are you proposing to sell the customer?
- Units – the unit of measure for the item (e.g., each pair, foot, or hour)
- Rate – what is the sales price of a single item
- Amount – the total Rate times the Quantity
Tax – is the item taxable? If this box is checked, it will be included in the sales tax calculations at the bottom of the estimate.
- Allocation field – click on the white field to request or allocate the part to this estimate
Hide – if the line is an accessory (child) to another part (parent), it can be hidden on the printed estimate. When an accessory is hidden, the price is rolled into the parent price.
Delete – click the trashcan to delete the individual line on the estimate
Estimate Footer
The bottom of the estimate provides information about several items.
- Memo & Signatures – click this button to enter memos regarding the estimate or capture customer and salesperson signatures (Only available on iOS devices).
- Created By – the name of the user who created the estimate as well as the time stamp
To Print – check this box to make it available for bulk printing
To Email – a check in this box makes it available for bulk emailing
To Pay Link – not used with estimates.
Submitted – a check in this box indicates the estimate has been sent to the customer, either via email or by printing it
- Tax Item – use the dropdown to define or change the sales tax rate. This will automatically fill based on the customer’s default tax rate. If the customer doesn’t have a default tax rate, iPoint will instead enter the default company rate.
- Tax Rate – shows the percentage of the chosen Tax Item
- Subtotal – this is the value of all goods and services entered on the estimate
- Sales Tax – any line item marked as taxable will be multiplied by the tax rate, and the total sales tax is displayed here
- Total – the subtotal of all items and services plus the sales tax
iPoint Version:
9.05
Last modified:
19 Jul 2021


 – Click this button to add items by using the standard

 Delete – click the trashcan to delete the individual line on the estimate