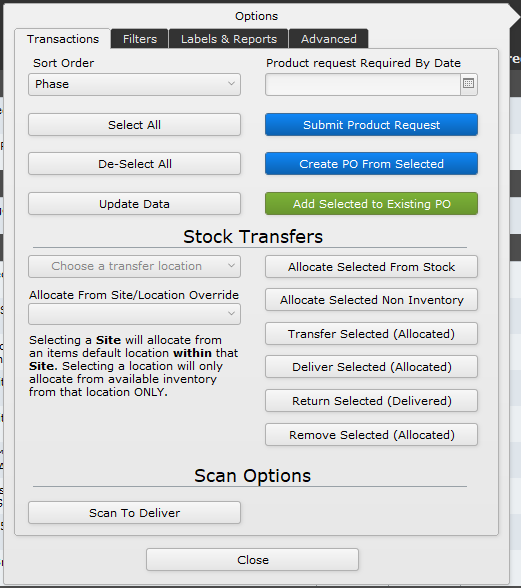
Clicking the Options button on the Product Manager presents a number of different options available to you. These options are spread out across four tabs and each tab is described in detail here.
Transactions
The transaction tab is where you will perform actions in bulk. Most of these features are available on the Details button on the individual line items in Product Manager. But this is where you will come to do things in bulk.
- Sort Order – Use this dropdown to reorganize how items are displayed on the Product Manager list.
- Phase – groups products together based on the labor phase assigned to each item
- Phase/Manufacturer – first sorts by labor phase and then groups the products together by Manufacturer as listed on the Item Details
- Manufacturer – groups products based on the Manufacturer
- Manufacturer/Phase – first sorts by Manufacturer and then groups the parts by labor phase
- Vendor – uses the Default Vendor, listed on the Item Details, to organize the items. This is typically the order used to create POs directly from the Product Manager.
- Vendor/Phase – groups product together by the manufacturer and then sub-sorted by labor phase
- Phase/Vendor – first sorts by labor phase and then groups the items together by Default Vendor
- Location – organizes the list of parts based on the location where they are being installed
- Location/Manufacturer – groups products together by location and then sub-sorts by Manufacturer
In order to complete the various options here, you first need to check the Select box on multiple items in the Product Manager. There are a number of ways to accomplish this.
- Manually check the box on each line you want to select.
- Check groups of boxes. To do this, on the Product Manager each section header has + / – symbols above the select checkboxes. Clicking + checks each box in that section. The – unchecks the boxes for items in the section.
- Here on the Options button you can select all items displayed by clicking the Select All button. Conversely, the De-Select All button un-checks every box. These buttons are powerful tools when grouped together with the filters you can set on the Filters tab. Filter the list to only display a few items and then use the Select All or De-Select All buttons to only affect the filtered items.

This button updates the quantity in the Ordered, Allocated, and Delivered fields on the Product Manager list. Usually, these numbers will be automatically updated so you won’t have to worry about this button. However, there are certain unique situations where the update script can’t run due to multiple windows being open. For example, if you order an item and then have both the PO and the Product Manager open in separate windows, the Product Manager won’t be updated when you receive the PO because the PO screen is still active. In that instance, you’d want to manually update the quantities.

Clicking the Submit Product Request button moves all checked items onto the Purchase Request Manager where the purchasing agent and warehouse staff can allocate the product from inventory or place the items onto a Purchase Order. In order to process a product request, enter a Product request Required By Date to let other staff members know when the product is needed for installation. Once the request is submitted, you can enter Special Instructions for Purchase Request which will appear on the Product Request Details of the PRM and on the Product Request tab on the Sales Order.
iPoint will not allow you to request an item twice. So if you have checked an item that has previously been requested, ordered, allocated, or delivered, a duplicate product request will not be made.
Note: There is an option setting in Settings > Module Settings > Proposals > Sales Order (tab) to Allow Product Requests WITHOUT Due Date.

If you have the correct permissions, you can create a purchase order directly from the Product Manager by clicking the Create PO From Selected button. If you do not have permission to create POs, this button will not be displayed.
Note: There is a new option available in Settings > Module Settings > Beta > Other that allows you to have the purchase order duplicate the sales order number. So, if your Sales Order number is 12AB345 and you create a purchase order, the PO number will be 12AB345-1. The second PO you create from the sales order will be 12AB345-2, and so on. – New in 10.0804
Items that have already been ordered, allocated, or delivered, will not be re-ordered.

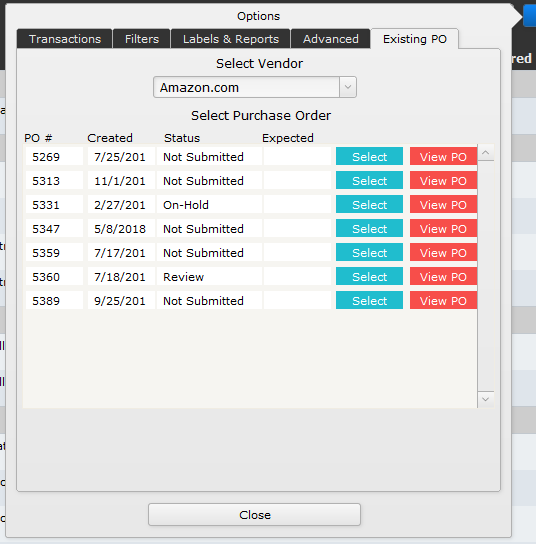
Sometimes you might already have an existing purchase order that has not yet been submitted to the vendor and you’d like to add the selected products to that PO. This is the button for you!
- Click the Add Selected to Existing PO button. You’ll be presented with a window showing available POs by Vendor.
- Choose the vendor from the dropdown list and you’ll see a list of purchase orders that have not been marked Submitted.
- Click the Select button. iPoint will add the selected item(s) to the purchase order you chose. A confirmation dialogue box will open over the top of the purchase order so you can review the PO.
Stock Transfers
You can allocate, transfer, deliver, and return items in bulk here instead of one-by-one on the individual line detail buttons.
In almost every transfer situation, you need to first tell iPoint what location you are moving the items to. Choose an inventory location from the Choose a transfer location dropdown. Once chosen, you can perform one of the following actions. If you forget to select a transfer location, you will see a reminder prompt to choose a location.
Allocate From Site/Location Override If your company has multiple locations and has enabled the Multi-Site Inventory in Settings, you will have another option available to define where inventory is coming from. Here’s why you need this option.
Each item in your database can be assigned to a default inventory location. Let’s assume you have a particular widget in the warehouse, a couple in your service van, and another widget on the showroom floor. When you allocate parts for a sales order, iPoint will pull from the default location. In our example, the warehouse is the default inventory location. This means that allocating the part won’t steal a widget from the service van or the showroom floor.
Now, let’s add another site to the example. There is a warehouse for both the Salem store and the Bend store. Each site (store) can have a default inventory location. Well, the Bend store is out of Widgets but the Salem site has a bunch of them. By setting the “Allocate From Site/Location Override” to Salem: Warehouse, the Bend project manager can allocate the available widget from the Salem warehouse to a job at the Bend store. Pretty slick, right?
Well, let’s take this one step further. In our example, if Salem: Warehouse is chosen, iPoint will only allocate Widgets from the Salem warehouse. However, if the Bend project manager selects Salem, without defining a specified warehouse or sub-location, then iPoint will look for available inventory in the Salem Warehouse, the Salem Service Van, and the Salem Showroom.
And remember, we are only talking about available items. If the Widget is allocated to a job in Salem, it cannot be allocated to the Bend job without first un-allocating the part from the Salem job.

The Allocate Selected from Stock button will take existing, available inventory out of the default location (or the Site/Location Override defined above) and allocate it for this job.
For example, we have 2 locations, the warehouse, and a service van.
- There are 0 widgets available and 3 widgets on hand in the warehouse.
- There are 2 widgets available in the van.
- The warehouse is the default inventory location for widgets, as defined on the Item Details.
- We are trying to allocate 1 widget for this job.
Clicking the Allocate Selected from Stock button will not allocate any product in this situation because there are no widgets available in the warehouse. On-hand inventory is not available because, while it is physically in the warehouse, it has been allocated to another job.

This button works a lot like the allocate stock button with one major exception. Since we do not keep track of non-inventory item quantities, the software isn’t looking for default warehouses or available counts.
What is important to know is that allocating non-inventory parts does require this separate button. You can’t allocate inventory and non-inventory items with one button click.

The Transfer Selected button is used to move allocated items from one location to another.
Typically this would be used to transfer product from the staging area to a technician’s van or from a rack build location to the staging area after the rack has been assembled. If you are simply moving stock from location to location, you will want to work in the Inventory module with the Transfer Request or in the Item module on a specific item’s stock tab.

This is the button used to deliver products to the customer.
In order to deliver products, they first must be allocated, either on an item by item basis on the Product Manager list, or by using the allocation buttons described above.
In a normal scenario, the technicians will be marking items delivered on their work order when they physically transfer the product from their van into the customer’s home. But some companies mark the items as delivered when it leaves the warehouse. So a warehouse staff member or product manager will use this button to mark the product “delivered” as they hand it to their technicians.

Sometimes items that have been delivered to the customer come back to the warehouse. This is often the case if the product is marked as delivered when handed to a technician. Uninstalled parts will come back to be delivered on the next scheduled work order.
When returning a product you are required to enter a memo. After entering a return note, iPoint returns the product into an allocated state so that it can either be delivered later or removed from the sales order.
Note: Returning items in bulk is an all-or-nothing deal. Let’s say you have delivered 100 feet of wire to your customer, but only want to return 50 feet. The Return Selected button will return all 100 feet of wire. To only return 50 feet, you will need to use the Details button on the individual wire line item so you can specify that only 50 feet are being returned.

Removing items is done when parts are no longer needed for the job or the parts are needed on a different job sooner than on the current sales order. Clicking the Remove Selected button initiates a popover window where you will need to make one of three choices:
- Permanent – click this button to remove the part from the Product Manager. The part(s) will be added to the Change Order > Added & Removed Parts tab where they will need to be added to a change order.
- Stock – use this button when you need to “steal” parts from this job to be used on another job. This part then reappears on the Purchase Request Manager so that purchasing and warehouse staff know to replace the “stolen” part(s).
- Cancel – never mind… you didn’t really want to remove the selected parts. No harm. No foul.
Scan Options

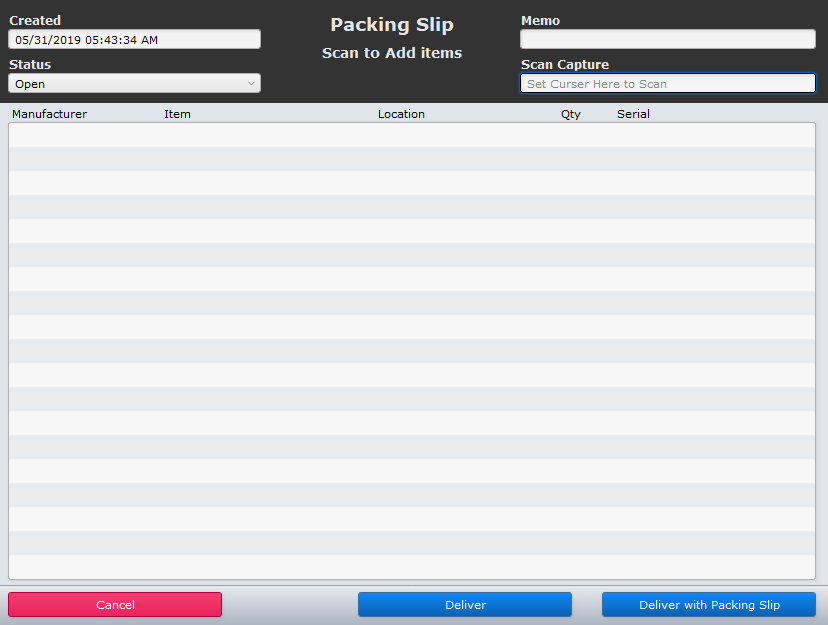
When you connect a barcode scanner to your computer, you can use it to scan the UPC of the part to mark it as delivered.
- Click the Scan To Deliver button to activate the scanner.
- The Packing Slip opens
- Scan the UPC code of the items to be added to the packing slip.
- Once everything is scanned, use the buttons at the bottom of the form to Deliver the product, moving the items out of inventory and marking them as delivered to the customer.
- The Deliver with Packing Slip button delivers the product, as in step 4 above, but also opens the Product Delivery Form (aka Packing Slip) for you to print.
- You can modify the Status of the packing slip based on Open, On Hold, or Delivered. Using one of the delivery buttons will automatically set the packing slip status to Delivered.
- Feel free to enter a Memo regarding this delivery, if you want.
- The Created Date is automatically generated by the software for your reference. This is not an editable field.
Click here for links to the iPoint recommended, third-party equipment.
Filters
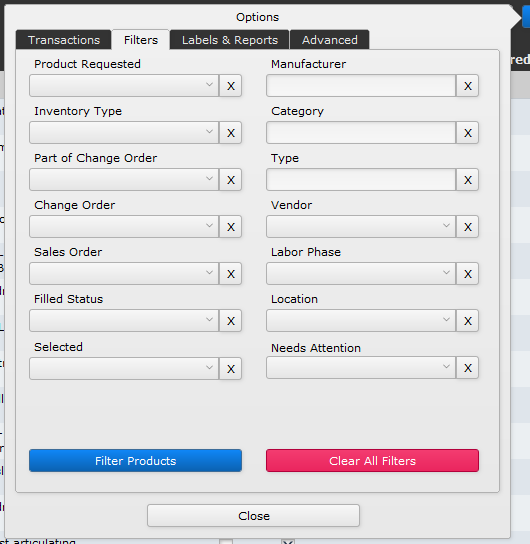
Filters are the best way to reduce a large list of items on the Product Manager to a smaller list of the individual parts you want to find. Each of the filters listed can be used in combination with each other. Once you’ve filtered the list, you can perform actions on the displayed products by going back to the Transactions or Labels & Reports tabs.
Here is an explanation of each filter.
- Product Requested – True filters the item list to show only items that have been requested and have a check in the Req’d box. Flase shows only products that have not been requested.
- Inventory Type – use this to find Inventory or Non-Inventory parts.
- Part of Change Order – False will return only items that were on the original proposal/sales order. True shows only items that were added by a change order.
- Change Order – select the name of a change order to only show parts added on that particular change order. The options on this dropdown box will be populated with the change orders on this sales order.
- Filled Status – Filled displays all products that have either been put on a purchase order, allocated, or delivered to the customer. Not Filled shows items that still need to be ordered, allocated, or delivered.
- Selected – Hide will hide any item that has a check in the Select box. Show Only shows just the items that have a check in the Select box.
- Manufacturer – pick a manufacturer in the dropdown box to display only products made by that company.
- Category – select a category of products to be displayed. The categories available will be limited to categories associated with the chosen manufacturer.
- Type – Select a type of product to be displayed. This list will be limited to types that match the category chosen.
- Vendor – pick a vendor name to show only parts that can be purchased from them. This is defined by the Default Vendor on the Item Details.
- Labor Phase – find items based on the specific labor phase selected.
- Location – show all products for a specific room or location of the project.
- Needs Attention – True shows any item where the total quantity ordered, allocated, or delivered does not equal the total quantity sold. False shows items where the quantity sold is equal to the total of the ordered, allocated, and delivered.

When you have finished entering the various filter parameters above, click the Filter Products button. The Product Manager list will now show only the parts from this sales order as you filtered them.

Click this button to clear all the filters and return the list back to showing all parts.
You can also clear individual filters by clicking the X at the end of each individual filter line.
Labels & Reports
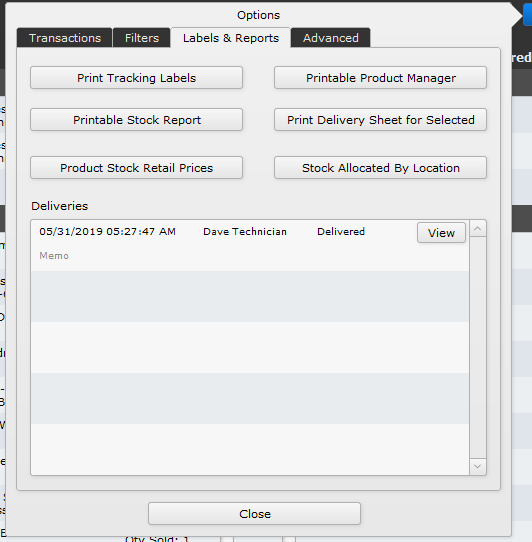
This tab presents a number of reports and labels that can be printed with specific regards to this sales order.
Tracking Labels are placed on equipment to identify them as allocated for a specific job. These labels are typically printed during the purchase order receiving process. But you might need to print labels for the existing stock that has been transferred from the warehouse to the staging area. Or you might need to print labels for a product that has been “stolen” from another job and allocated to this job. This is where the magic occurs.
- When you click the Print Tacking Labels button you will be prompted to print labels for All items, Staged items, or Selected items, where the select checkbox has been ticked.
- Next you will be prompted to pick the type of label you are printing, In-Line or Sheet labels.
The Tracking Labels are customizable in Settings > Module Settings > Items and can include a QR Code, which makes it easier for technicians to scan the items they transfer to their van and deliver to the customer. Tracking labels are only printed for items that are allocated to a job in iPoint.

The Product Manager Stock Report shows every product on the job and indicates the status of the product; requested, ordered, staged, and delivered. This is a printable version of the Product Manager. Click here to see a sample.
Under the Options button on the report, you can Print, Save, or View PDF.

This button prints a modified Product Manager Stock Report that shows the retail prices rather than the cost of the items. The status of the items only show ordered, staged, and delivered. The requested checkbox is not printed. Click here to see a sample.
Under the Options button on the report, you can Print, Save, or View PDF.

The Printable Product Manager includes sorting functionality, where the previous two buttons have predefined presets for what information is printed.
Under the Options button on this report, you have the ability to sort and filter in a number of different ways. This report is the same report you can print from Reports > Sales Order > Item Stock Summary except that it is pre-set to print only items for this sales order. More details on printing this report are available in the Reports module section of the manual.

This button creates a delivery sheet that you can have your customer sign to acknowledge the delivery/receipt of items. There is space for the customer to initial each individual line item as well as sign and date the bottom of the report.
- Select the items on the Product Manager that will be delivered to your customer by placing a tick in the Select checkbox.
- Go to Options > Labels & Reports and click the Print Delivery Sheet for Selected button
The Options button on this report gives you the opportunity to Print, Save, View PDF, or Email the report to your client. You also have the option to Hide Prices by clicking the checkbox.

The Stock Allocated By Location report is extremely useful for warehouse staff as they pull product to stage for the job. The report lists every part on the Product Manager and displays available and on-hand quantities for each location in your company as well as the number of product on order.
Items are grouped together by Manufacturer and will match the order listed on the Product Manager when it is sorted by Manufacturer as well.
The Options button on the Stock by Location report provides additional filtering methods, including
- Manufacturer
- Category
- Type
- Stock Location
- Item
- On Order
- Date End
- Date Start
Note: Using the Date Start will make this report show just the stock transaction that occurred between the Date Start and the Date End. Meaning, this report will no longer show the totals for an item, instead, it will show any adjustments made during that time period.
The report can be printed, saved, PDFed, or exported to Excel.
The Update Inventory Data button updates the quantity in the Ordered, Allocated, and Delivered fields on the report. Usually, these numbers will be automatically updated so you won’t have to worry about this button. However, there are certain unique situations where the update script can’t run due to multiple windows being open. For example, if you order an item and then have both the PO and the report open in separate windows, the report won’t be updated when you receive the PO because the PO screen is still active. In that instance, you’d want to manually adjust the quantities by clicking this button.
Deliveries
At the bottom of the Labels & Reports Options window is a list of all deliveries that have been made. As products are delivered, iPoint creates a Product Delivery Form, also known as a packing slip, showing the exact parts that were delivered. Print this report and send it with the technician or delivery person who is taking the items to your customer. The customer can then initial each line and sign the document indicating they took receipt of the delivered goods.
Advanced
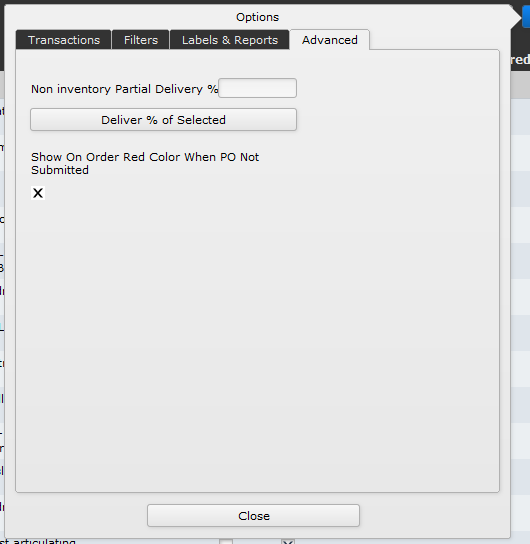
- Non inventory Partial Delivery % – Enter a numeric value in this field to partially deliver all non-inventory items on the Product Manager. Once a percentage value is entered, click the Deliver % of Selected to initial the partial delivery process.
If you have 100 feet of wire on your proposal and wire is a non-inventory item, then you can select the wire line item on the Product Manager by placing a tick in the Select box. Then, here on the Advanced tab, you could deliver 40% of the wire.
Another example for use of this feature is if you use third-party design software to purchase shades or automation controls. The vendor’s software takes the project you’ve entered and converts it to a custom shade order. The total value of this order is $3,750 and represents a myriad of parts and pieces, many of which are custom, one-time purchases. In iPoint, use a generic item, for this example will call it “Shades,” and enter quantity 1 of Shades on your proposal with a cost of $3,750. Because this is a large custom order, the parts are shipped in multiple shipments and received at different times throughout the course of the job.
So, when the first batch of parts comes, let’s say it represents $1,250 in cost, you’ll come to this advanced option and enter 33% to have iPoint deliver that portion of the generic “Shades” item.
This can only be done with non-inventory items since we are not physically keeping track of how many units are in inventory.
Show On Order Red Color When PO Not Submitted – Earlier in the manual we talked about the items on the Product Manager that have been placed on a purchase order. Just because they are on a PO doesn’t mean that the PO has been sent to the vendor yet. This option, turned on by default, highlights the items on a purchase order that has not yet been sent to the vendor by coloring that number red. If you clear this check box, the number in the Ordered column simply lets you know that the item is on a purchase order. You won’t know if it has been submitted to the vendor yet.


