The Email tab is where you tell iPoint how to send an email on a user’s behalf. iPoint can send proposals, sales orders, and invoices to customers. And purchase orders can be emailed to vendors.
There are four sub-tabs where you can enter email details.
General Settings
- Email Display Name – this is typically the user’s name, but could also be a generic description, such as “Accounting” for someone in the accounting office. Your email service might show only part of your name. To display your full name, enter it here. (i.e. User Name)
- Email Address – This defines how your email program will display your email address. (i.e. user.name@mailservice.com)
Auto BCC Self – With this box checked, iPoint will blind carbon copy the email to the user who is logged in when the email is created. This is a great option to keep copies of the emails you send to clients and vendors.
- Signature – When iPoint sends an email on your behalf it can include a signature. Enter your signature here. Note: When using an email program like Outlook or Apple Mail, this Signature file might not work as the email client can have a signature entered directly into that application.
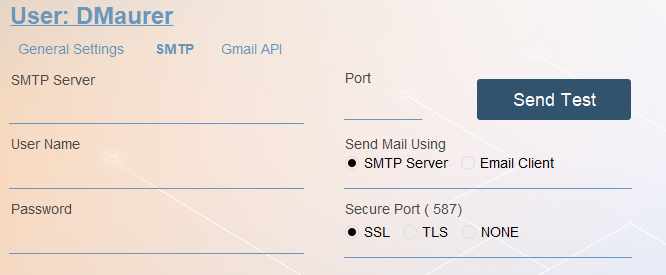
SMTP
Set the third-party email program parameters on the SMTP tab.
- SMTP Server – The specific address of your provider’s email server. (i.e. smtp.office365.com)
- User Name – The username required to log in to your email web client.
- Password – The password required to log in to your email web client.
- Port – A port number is a way to identify a specific process to which an Internet or other network message is to be forwarded when it arrives at a server. Your email provider will be able to provide Port information.
- Send Mail Using
- If you use a web-based email program, like Office 365, Yahoo Mail, or a myriad of other providers, click the SMTP Server radio button. Selecting this option will open an email window within iPoint where you write the email message, and then send it to the recipient using the SMTP settings set here.
- If you use an email client on your computers, such as Microsoft Outlook, Apple Mail, Mozilla Thunderbird, or some other third party app, click the radio button next to Email Client. Selecting this option will cause iPoint to open your default email client and attach a PDF file of the purchase order, invoice, or proposal that you created. Using an Email Client, you can ignore the rest of the settings on this screen.
- Secure Port ( 587 )
- Choose the email security protocol as defined by your email provider by choosing the appropriate radio button for SSL, TLS, or NONE.

Once all SMTP settings are complete, you should be able to click the Send Test button and verify that the entered settings function properly. Enter a destination email address and email subject. iPoint will send the email through your SMTP provider. A pop-up window will tell you if the test was a success or if it failed.
Gmail API
If you use Google’s Gmail as your email program, click on the Gmail tab to authorize
- Click the Sign In With Google button to begin.
- iPoint will open an authorization pop-over window where you can enter the user’s Gmail credentials.
- Click the Allow button on the “Grant iPoint LLC permission” window to verify you want to let your Google Account communicate directly with iPoint.
- Once authorized, the Google sign-in De-Authorize Gmail. This is how you can revoke Gmail access to the user’s account.
Once your Gmail account is authorized, the Gmail tab will display a list of emails sent through iPoint. Clicking on an email will open a preview window of the email sent, as well as any attachments that were included in the email.
Note: When sending an email using the Gmail API, Gmail will set your “from” name as your Gmail address. (e.g. support@ipointsolutions.net). In order to get Gmail to use your name (e.g. iPoint Support) instead of the address, go back to the General Settings and define your Email Display Name (e.g. iPoint Support) and Email Address (e.g. support@ipointsolutions.net). The email address you use on the General Settings tab MUST match the email address you used to authorize the Gmail API tab. If the email addresses do not match on both fields, Gmail will continue to display your address as the name rather than the name you provided. – New in 9.1123
Outlook API
If you use Microsoft’s Outlook as your email program, click on the Outlook API tab to authorize
- Click the Sign in to Outlook button to begin.
- iPoint will open an authorization pop-over window where you can enter the user’s Outlook credentials.
- Once authorized, you can revoke Outlook access to the user’s account by selecting the De-Authorize Outlook button.
Once your Outlook account is authorized, the Outlook tab will display a list of emails sent through iPoint. Clicking on an email will open a preview window of the email sent, as well as any attachments that were included in the email.
.
.
.
.


