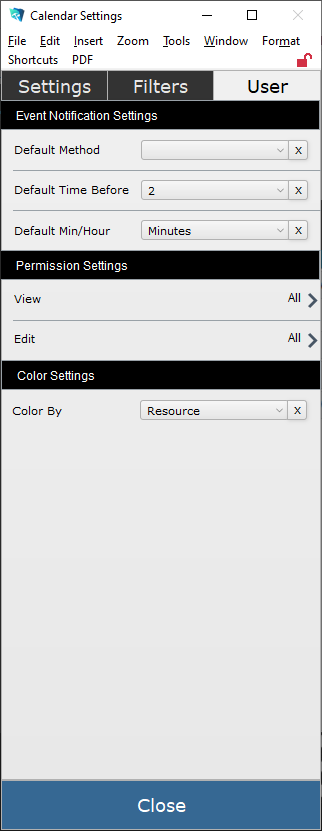
The gear icon at the top corner of the calendar opens several options for displaying the calendar. Keep in mind that these settings are user-specific. So the changes you make to your settings will not affect your co-workers’ view of the calendar.
The third section of options is User settings. These settings define defaults when using the calendar.
Event Notification Settings
Events come with a helpful reminder so that you don’t miss that important client meeting. Use these settings to create a default notification anytime an event is made for you, no matter who creates it. If you have edit permission, you can also modify this on an event-by-event basis.
- Default Method – tell iPoint how you want the reminder notification to be sent – these methods are defined by your system administrator in Settings > Users > Contact Info
- Text – the notification will be sent in a text message
- Email – you will receive an email with the reminder
- Slack – the reminder appears in your Slack channel
- Default Time Before – this works in conjunction with the Min/Hour setting below. Choose a number to define how much time before the event starts the notification will be sent.
- Default Min/Hour – what unit of time is used?
- Minutes – sent xx minutes before the event based on Default Time Before number.
- Hours – the notification is sent xx hours based on the number set in _Default Time Before.
Permission Settings
Define the default permissions for the events you create
- View – who can view your event? Place a star next to the name of any individual who should be able to see the event. Users without permission will only see an event with Busy as the description instead of the details others can see.
- Edit – who can edit your event? Put a star next to the users who should be able to modify your event on the calendar. Be sure to include yourself. Otherwise, you won’t be able to alter your events!
Note: If no users are selected, the permission is set to All, meaning anyone can see or edit the event.
Color Settings
Events and work orders on the calendar are color-coded, and you can decide what colors you prefer.
- Status – each work order status has a color defined by your system administrator.
Choose this option to have the work orders’ colors based on the status set by staff and technicians.
- Resource – each user can have a specific color assigned to them in settings.
Use this option so you can see what events are assigned to specific users based on the color of the calendar event.


