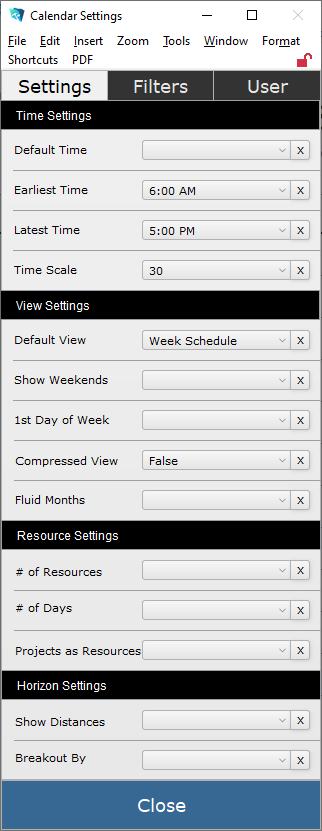
The gear icon at the top corner of the calendar opens many options for displaying the calendar. Keep in mind that these settings are user-specific. So the changes you make to your settings will not affect your co-workers’ view of the calendar. And once you have defined the settings, they will stick until you change them.
The first section of options is Settings.
Time Settings
- Default – first time displayed on the calendar. Set to 3 am, for example, to hide the hours of midnight to 3 am.
- Earliest time – when the calendar opens, it will start displaying at this time. Set for 7 am, the calendar shows 7 am as the first time, even though you can scroll to see an event at 5 am.
- Latest time – the last time displayed on the calendar
- Time Scale – defines how much time is displayed in each hour
- Choosing 60 will cause the calendar to display hour increments
- Selecting 15 will make the calendar display quarter-hour increments
View Settings
- Default view – which calendar view is displayed when the calendar is opened. Go to the Viewing Options for a complete description of each view.
- Show Weekends – do weekends appear on your calendar?
- True – Saturday and Sunday will be displayed
- False – Only weekdays will appear on the calendar
- 1st Day of Week – determining whether Sunday or Monday is the first day of the week displayed on the calendar. If you are hiding weekends, this setting doesn’t really do anything.
- Compressed View – this setting applies only to a list view or monthly view
- True – events and work orders displayed only show the first line of the title
- False – the entire details of the event are displayed
- Fluid Months – determines how many weeks are displayed in the monthly view
- False – forces six weeks to be displayed. Days will maintain a consistent height on the calendar, and the view will shrink event details to make all six weeks visible without scrolling.
- True – days will expand or collapse to show the complete details of events. You will need to scroll to see the whole month.
Resource Settings
These settings affect the Resource calendar. On the iPoint calendar, each user or employee is a resource.
- # of Resources – defines how many resources are displayed simultaneously. Companies with many techs may choose to show a limited number of resources so that the detail for each work order is visible on the screen. Depending on the size of your computer monitor, showing all technicians at once may make the calendar entries unreadable. If there are more resources than the number selected here, you’ll navigate backward and forward on the calendar to see the entire list of resources.
- # of days – how many days are displayed at once. By default, only one day is shown. Choosing this option changes the default.
- Projects as Resources – this feature is not utilized by the iPoint calendar and can be disregarded.
Horizon Settings
These settings affect the Horizon calendar.
- Show Distances – how much time until today?
- True – displays the number of days from today that the event takes place. This is the default setting.
- False – does not show the number of days
- Breakout By – groups events and work orders based on the selected criteria.
- Nothing – no grouping takes place
- Resource – entries are grouped by the user listed on the work order or event
- Status – the work order status groups horizon calendar entries
iPoint Version:
9.05
Last modified:
10 Sep 2021


