From time to time, you might find it necessary to connect iPoint to a different set of QuickBooks. For example:
- You have been using QuickBooks Online and have decided that the QuickBooks Desktop product might be a better fit for the way you do business.
- You’ve been using QuickBooks for decades and your file has gotten too big. An Intuit professional has told you that you need to start a new QuickBooks file.
- The owners of your company have sold the business, and the new owners are starting with a fresh set of QuickBooks reflecting their business.
- You’re set of books is hundreds of years old and so cluttered you can take it anymore, so you are starting with a fresh set of books.
Here is the short checklist of steps you need to take to make the switch.
- Setup a new set of books with chart of accounts, tax rates, and tax codes.
- Note: Best Practice is to make sure that your chart of accounts, tax rates and tax codes are the same in your new set of QuickBooks as they are from the old set.
- If your new QuickBooks must have a different chart of accounts or tax rates, refer to the Known Issues section below.
- In iPoint go to Settings > Quickbooks > Registration and click the Clear QuickBooks References button.
- Connect iPoint to QB
- If your new QuickBooks is Desktop: Settings > QuickBooks > Registration.
- If your new QuickBooks is Online: Settings > Integrations > QuickBooks Online.
- Pull Chart of Accounts: Go to Settings > QuickBooks > Chart of Accounts and push the Get Chart of Accounts button.
- Sync Other Lists: Go to Settings > QuickBooks > Lists and push the five blue Sync buttons to pull in their corresponding data.
- Get your Data (Customers, Vendors, and Items) entered into Quickbooks. You have two options, so choose the one that best fits your situation.:
- If you are using the information in iPoint to populate QuickBooks (so your new set of books is completely blank and you are doing a fresh start), you want to PUSH your data:
- Push Customers: Go to Dashboard > CRM > Customers > Options > Actions > Sync All with QuickBooks button
- Push Vendors: Go to Dashboard > Vendors > Options > Sync All with QuickBooks button
- Push Items: Go to Dashboard > Items > Options > Views > QB Sync List > Push All Items from iPoint to QB button
- If you entered your data directly into QuickBooks (like if QB imported info from your old set of books to the new set of books), then PULL your data from QB into the iPoint holding area.
Note: iPoint will link to QB data if the names are exactly the same. (John Smith will tie to John Smith. But Jon Smith will not tie to John Smith)- Go to Settings > QuickBooks > Customers and click the Get Contacts from QuickBooks button. – Once the sync has been completed, push the Match QB Contacts to iPoint Customers by Name button.
- Go to Settings > QuickBooks > Vendors and click the Get Vendors from QuickBooks button. – Once the sync has been completed, push the Match QB Vendors to iPoint Vendors button.
- Go to Settings > QuickBooks > Items and click the Get Items from QuickBooks button. – Once the sync has been completed, push the Match QB Items to iPoint Items button.
- If you are using the information in iPoint to populate QuickBooks (so your new set of books is completely blank and you are doing a fresh start), you want to PUSH your data:
- Brand New to QB? Brand New QB File? This is how to do your initial starting Inventory balance in iPoint (when you are syncing all items to QB as non-inentory). We strongly recommend that you work with your CPA on this to see exactly where they want it, (commonly Inventory is Debited, and the Credit goes to either prior period inventory adjustments or retained earnings). Click here to see how to!
.
You are done! QuickBooks and iPoint are now synced and you can go about your regular duties!
Known Issues
Listed below are the primary known issues encountered when switching to a new set of QuickBooks. Click on a specific issue to expand the step-by-step instructions on how to resolve it.
- Invoice created in an old set of QuickBooks but the payment was received in a new set of QuickBooks
- If you created an invoice in your old set of QuickBooks and received the corresponding payment in your new set of QuickBooks, you might experience sync issues.
The solution is to:
- Manually enter the payment into iPoint and QuickBooks.
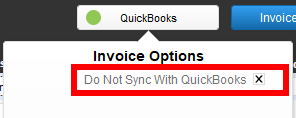
- In iPoint, mark the payment and invoice as “Do Not Sync With QuickBooks” – a checkbox under the QuickBooks button.
- This will ensure that you don’t try to sync the payment that was manually entered, effectively creating a double payment in QB. Of course, if it isn’t syncing in the first place that isn’t really an issue, is it
- However, checking the “Do Not Sync” box will also turn that pesky orange QB sync dot green… displaying that all is well with the world!
- This will ensure that you don’t try to sync the payment that was manually entered, effectively creating a double payment in QB. Of course, if it isn’t syncing in the first place that isn’t really an issue, is it
- I don’t want the same chart of accounts in my new QuickBooks that I had in my old QB
- Setting up a new chart of accounts will affect how iPoint pushes financial information to QuickBooks. Obviously, if we are trying to push a transaction to an account number that no longer exists things just won’t work right.
As a result, you’ll need to make sure iPoint knows about your new account numbers and understands how to use them. So here is what you’ll need to do:
- Create a new Chart of Accounts in QuickBooks – Complete the set up of your new COA in QuickBooks.
- Pull your new Chart of Accounts into iPoint – Go to iPoint > Settings > QuickBooks > Chart of Accounts (tab) and push the blue Pull Chart of Accounts button.
- This will update your account numbers in the iPoint database.
- Adjust the default linked accounts – To the right of your chart of accounts list are a number of default accounts. Be sure to update the dropdown in each of the eight default settings to match your new COA.
- Update the item account numbers in iPoint – Pulling the new COA from QB does NOT change the GL account settings on each of your items! You’ll need to go through every item in the Items module and update the QuickBooks account references! You must do this BEFORE you resync your items to your new QuickBooks.
- Make sure you update all items with the new GL Account details.
- Note: It is important that you update every item in the item database with the new GL accounts
- Important: Verify that every item has its COGS, Income, and Asset account details adjusted to the new COA.
- Do you get the idea that making sure the item accounts match the new accounts from your new set of QuickBooks is important? We hope so!
- Sync your items to the new QuickBooks – Once the accounts on each item have been updated in iPoint, you are good to sync your items into the new QuickBooks. Jump back to the top of this page and complete the push to QB defined in step 6a.
- More information about Tax Rates
- When you are moving from one set of QuickBooks to another, we break the link to each tax rate in the old set of QuickBooks. You’ll see that the iPoint list of Tax Rates (Settings > QuickBooks > Lists) shows each tax rate printed in red. That means there is no link between iPoint and QuickBooks.
Then, when you connect to your new set of QuickBooks, iPoint is going to attempt to match the red tax rates to the tax rates in the new QB. If there is an exact match iPoint will reconnect the two rates. You’ll see the red tax rate is no longer listed in red.
However, you might find some tax rates that are still listed in red. That means that the existing iPoint tax rates do not match anything in the new set of QuickBooks. You’ll need to do the remapping exercise described below so that customers’ transactions push correctly to QB. If you neglect this step, your transactions between iPoint and QuickBooks will be out of sync!
- Tax rates have changed between the old set of QB and my new set
- A change in tax rates affects how you charge sales tax to your customers. When the rates change, iPoint needs to be aware of what is going on.
For example, in the old QB our sales tax was listed as MN – 6.375. But in the new QB file it is called Minnesota – 6.525. Not only was there a rate change, but the name changed as well.
As a result, the new tax rates have to be mapped to our customers in iPoint:
- Enter the new tax rates in QuickBooks – Follow the Intuit process for adding tax rates into the new QB file.
- Sync the new rates to iPoint – Go to Settings > QuickBooks > Lists and push the blue Sync Tax Rates button
- This will add a bunch of new tax rates into iPoint.
- Remap the tax rates – Here you will assign new tax rates to your customers based on their old tax rates.
- In the Tax Rates list (Settings > QuickBooks > Lists) click on one of the OLD tax rates [In our example, you would choose MN – 6.375.]
- Choose the new replacement tax rate from the dropdown list [In our example, you would choose Minnesota – 6.525.]
- Click the Step 2. Update Customers button – This will replace the tax rate for all customers that match the rate in 4a above with the new rate in 4b above.
- Repeat this process until all the old tax rates have been changed.
- Note: This step only changes the tax rate for each of your customers. It does not adjust the rates on existing Proposals, Sales Orders, or Invoices. You’ll need to make those changes manually on each document.
- Hide the old tax rates – Click on each of the old tax rates to open the Options and place a check in the Hide this tax rate box.
- We are not deleting the old tax rates, just hiding them from view. This will keep them from being selected again in the future.
- This step is important because the old rates still appear on existing Proposals, Sales Orders, and Invoices. You’ll need to go back to each of those documents and manually update them.
- Now that you have updated your customers in iPoint with the current tax rates from Quickbooks, you can return to step 6 of the checklist at the top of this page.
- iPoint does NOT support syncing inventory to QBO
- Check out this link.
.


