
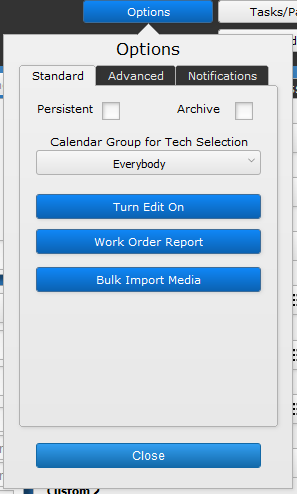
Just like every other module in iPoint, the Options button on the work order provides additional things you can do with the Work Order. Let’s take a look at each of the available choices.
Standard tab
![]() Persistent – Checking this box makes the work order to continue over a prolonged period of time.
Persistent – Checking this box makes the work order to continue over a prolonged period of time.
Let’s say that the work order was scheduled for January 1st and the persistent checkbox is checked. At midnight, the work order scheduled date will automatically change to January 2. Then, again at midnight on the 2nd, the scheduled date will automatically change to January 3. This will continue until the Persistent checkbox is cleared.
How in the world is that helpful? This is a great option for internal work orders. Each technician could have an internal work order where they track their shop time and training time. Every day, that work order will be available on their calendar because it rolls over to the next day at midnight. Now every day, the internal work order is visible on their calendar.
Some people prefer a persistent work order to a multi-day work order. Multi-day work orders show at the top of the calendar and it can be easy to miss that time has been blocked out today. Where a persistent work order can be set from 10 am to 3 pm, for example, and every night at midnight the work order will appear on the next day’s schedule from 10 am to 3 pm.
![]() Archive – Once a work order is done, checking this box will archive it and remove it from the list of active work orders. This is helpful to keep your list of work orders smaller and only showing work to be completed.
Archive – Once a work order is done, checking this box will archive it and remove it from the list of active work orders. This is helpful to keep your list of work orders smaller and only showing work to be completed.
Archiving a work order can also happen when a Sales Order or Project is archived. You will be given the option to archive associated work orders.
Remember, we don’t delete work orders as they maintain the history of the work we’ve completed. Archiving is the way to go!
Calendar Group for Tech Selection – This dropdown offers you a list of calendar views ( setup in Settings > Module Settings > Calendar ). Changing this dropdown changes the names of available technicians in the Technician assignment field on the work order to those individuals who are assigned to the specific calendar.
Turn Edit On – This is a legacy feature that is no longer used in iPoint. As Obi-Wan would say, “This is not the feature you are looking for.”
 Work Order Report
Work Order Report – Click the Work Order Report button to generate a paper copy of the work order. This is useful for technicians who are not iPoint users, such as subcontractors. Or, you might also use this report when the location your technicians are working has no internet access.
Once you’ve run the report, you can customize it using the Options button.
Hide Check the appropriate box to hide:
- Pictures
- Notes
- Task Description
- Task Status
- Estimated Time to Complete and Actual Time to Complete
- Stock Numbers
- Completed Tasks
- Signature Lines
- Hide End
Show Check the appropriate boxes to show:
- Sales Rep
- Project Manager
- Time Logs
Sort Order from the dropdown, choose how to display the tasks on the Work Order Report
- Manufacturer
- Name
- Location
- Status
- Priority
- Phase
- Head End
- Special Notes
Once you have completed the options, you can Print, Save to your computer, View PDF, or Email the report by clicking the appropriate button.

The Bulk Import Media button allows you to load multiple pictures into the work order at a time. Typically you would go to the Media tab of the work order details and Add New Media one at a time. But sometimes you might have a number of photos already captured on your hard drive. Simply click this button to select the directory where the images are stored. All the images in the folder/directory will be uploaded into the Media section of the work order where you can then edit the Description, Task, and Location details.
 Work Order Advanced Options
Advanced tab

The Customer Items Report lists all of the products sold to the customer for the job related to this work order. The report provides a number of details about the product, including.
- Type of equipment
- Manufacturer of the product
- Item number
- Location where the part was installed
- Qty sold
- Warranty details
- Serial #
- Installation Date showing who completed the task on what date.
- There is also a blue Hide link. Clicking this link will cause the associated item to be excluded when the report is printed.

Remember that work orders created simultaneously from the project will be linked to each other. This makes it easier to update time, notes, and other details on all linked work orders simultaneously. If you do not want the work order to be linked any longer, click the Un-Link Work Orders button to break the association. You’ll notice that the Linked Work Orders section of the work order details no longer has other work orders displayed.
Unlinking work orders does not remove them from the project. So parts delivered and tasks completed will still show across work orders.

This button doesn’t need much explanation. Click it, and the work order is gone! Of course, you have to have the appropriate permissions set by your system administrator. Oh, and don’t forget… delete is forever. There are no “take-backs.”

If your company has multiple stores or sites, this option will be available to you to select the Site where this work order originates from. Selecting a site here will cause parts to be pulled from that location. This is to keep you from having the California store take parts from the Texas store.
 Work Order Notification Options
Notifications tab
If your company uses customer work order notification to tell a customer that a technician will be coming to visit them, this tab will be available. From here you can Disable Customer Notifications so that this individual work order doesn’t generate notifications. You can also see a log of when notifications were sent to the customer for this work order.
.
.
.
.
.
.
.
.
.
.
.
.
.
.
.
.
.
.
.