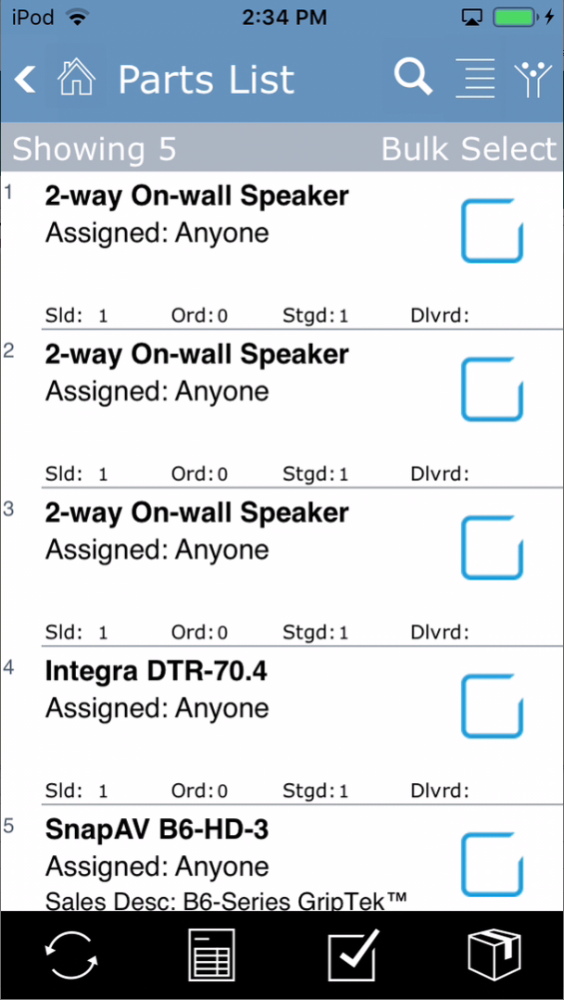
The parts list provides a list of all the parts scheduled to be delivered and installed on this work order.
At the end of this page we’ll also look at:
Item List
Each item has the following details.
- Manufacturer & Part Number – this is pretty self-explanatory. Note: The manufacturer name can be hidden using the Filters, described below.
- Assigned – each item and the corresponding task can be assigned to a particular technician to complete. By default, parts are assigned to Anyone.
- Accessory – if the item is an accessory to another part, the parent part will be listed. Additionally, accessories will be indented and printed in plain text, while parent or primary items will be displayed in bold text.
- Sales Desc – when the salesperson adds a note for the technicians on the proposal or sale order, that note can be displayed here. Note: The sales description can be hidden using the Filters, described below.
- Part Status – at a glance, a technician can see the status of the parts
- Sld – this number represents the number of items sold
- Ord – a number in this column indicates that the part is still on a sales order
- Stgd – a number indicates that the part has either been staged or allocated from inventory or received on a purchase order.
- Dlvrd – this field is filled when the product is marked delivered to the customer
Note: parts could be in all three stages. For example, if the customer bought 200 feet of wire, but only 100 feet of wire was available in the warehouse, Sld would show 200, Ord would show 100, and Stgd would show 100.
Select – the checkbox is used to mark a part for delivery
Sort the List
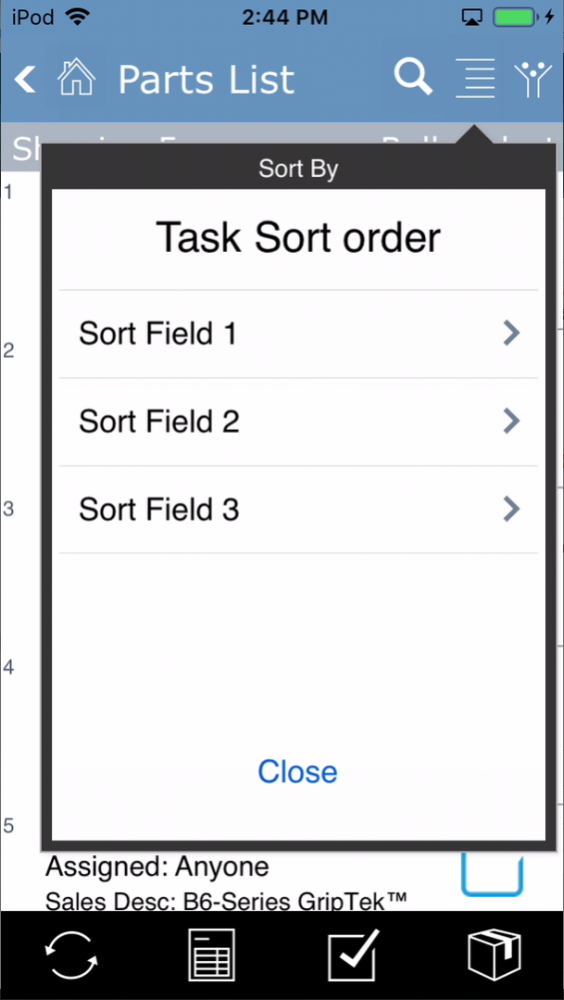
- Click the hamburger icon to open the Sort List.
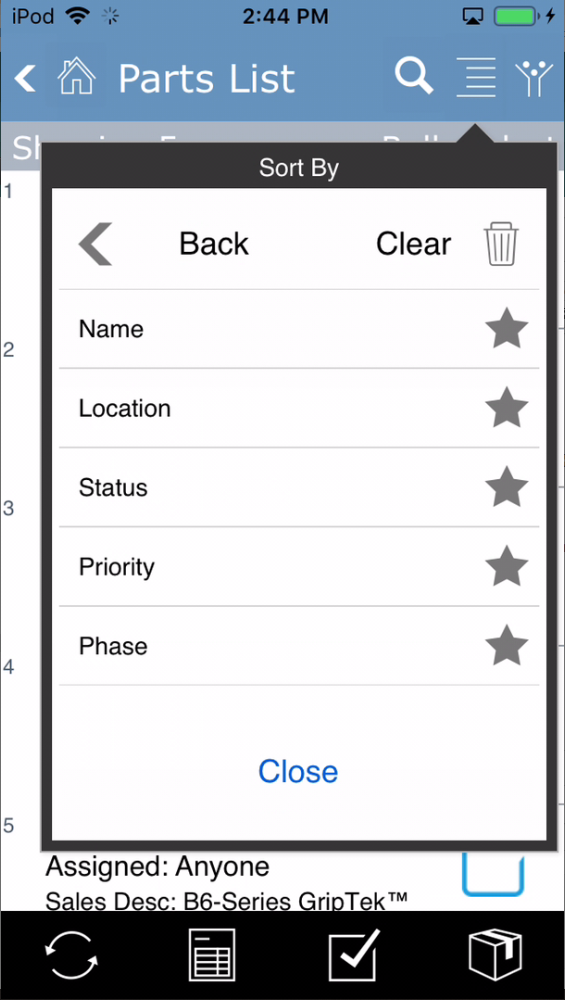
- Then tap one of the Sort Fields to define what the sort field will be. The Sort By options will automatically adjust based on the parts in the list.
- Place a yellow star next to the filter you want to apply
- Repeat the process if you want to add a second or third filter
- Click Close to re sort the list based on the entries made
Filter the List
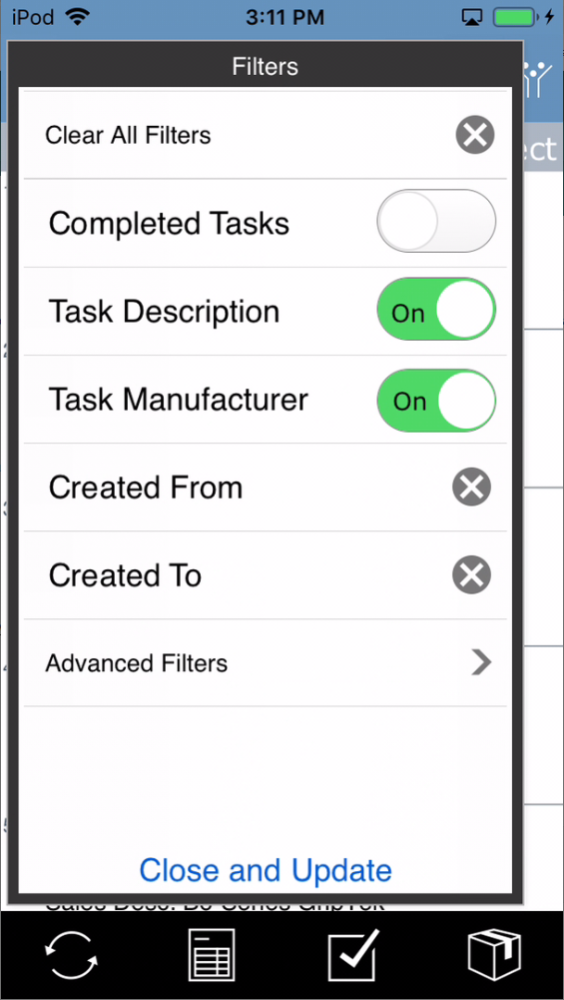
Filters will add or remove information from the part list as well as show only specific parts.
- Completed Tasks – by default, parts that have been delivered, either on this work order or on linked work orders, are hidden from view. However, if you want to see those parts, turn on the Complete Tasks.
- Task Description – by default, sales descriptions are not displayed on the parts list but can be viewed in the Part Details. Turn this option on to display the description.
- Task manufacturer – normally the parts list shows part numbers. If you find it helpful to have the manufacturers’ names listed, you can turn this option on.
- Created From & Created To – entering dates in these fields will limit the parts list to only parts added to the sales order during the date range entered
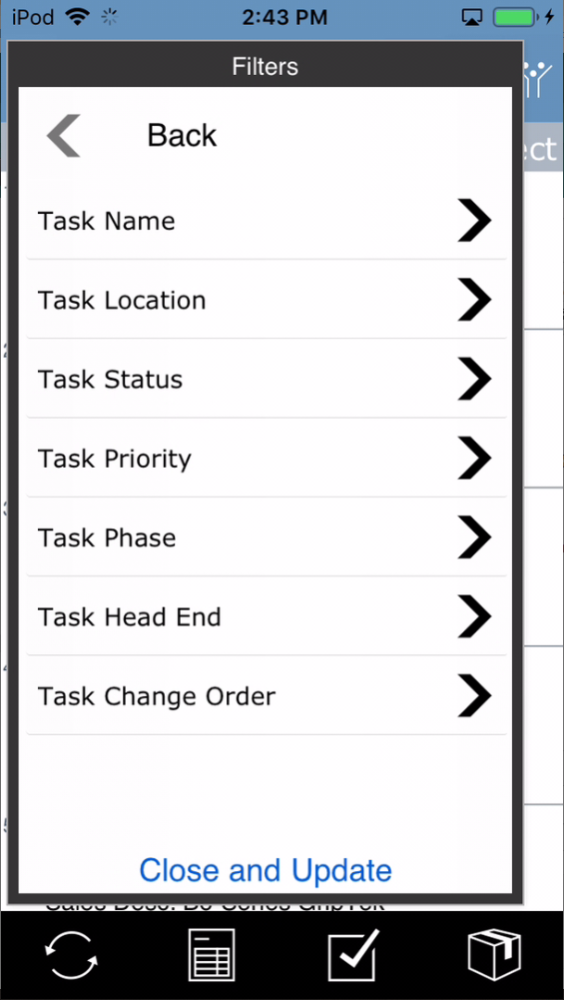
- Advanced Filters – tap here to open more filters to choose from. Because every part has an associated task on work orders, we use the task details to filter the parts list.
- Task Name – the name of the task is often the name of the part, but it could be something else
- Task Location – this is the room or location where the part is going to be installed
- Task Status – the task status changes based on work being completed. Use this filter to find only parts with a specific status.
- Task Priority – if your company prioritizes parts and tasks, you can sort using this field
- Task Phase – parts should have a labor phase assigned to them. Use this filter to find parts that match a particular phase
- Task Head End – if a part is assigned to a head end, this filter may be helpful
- Task Change Order – you can view items added to the job on a change order by selecting the specific change order
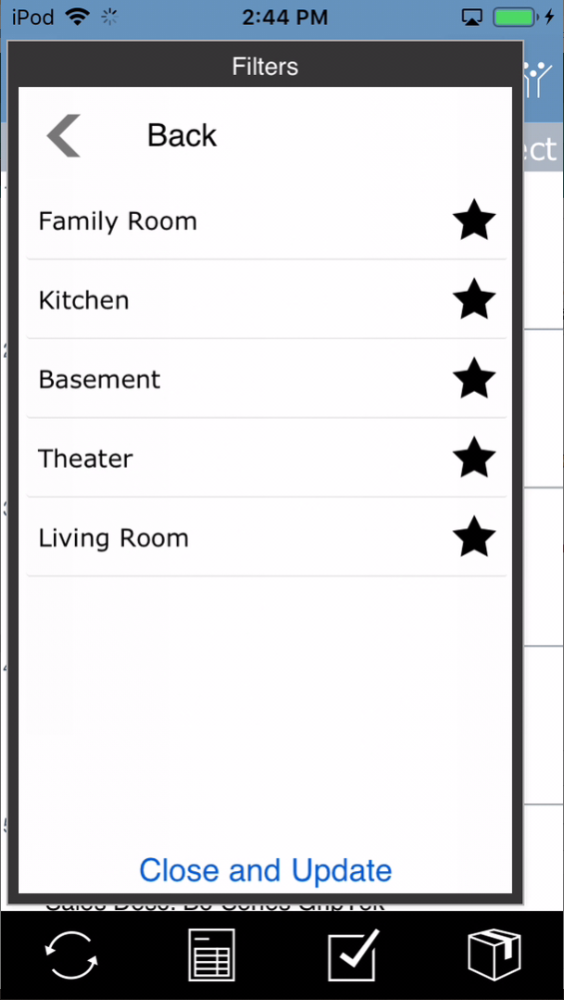
- Selecting a filter presents additional options to filter by
- These filter options will be based on the available parts on the work order.
- Choose the filter by tapping to add a star. You can select multiple filters if you want.
- Tap Close and Update – to apply the filter to the parts list
Part Details
Tap on any part in the Parts List to open more information about the part. The part details should provide you with everything you need to know to install the item and are broken up into several sections.
The gears icon at the top right corner of the part details screen provides options for this part.
- Add Replacement Part – this button allows you to add additional parts to the work order. This has the same function as the Add & Request Parts section of the work order.
- Delete This Added Part – removes the part from the work order. This only applies to items added on the Project or Work Order and will not work for parts added through the Sales Order Process.
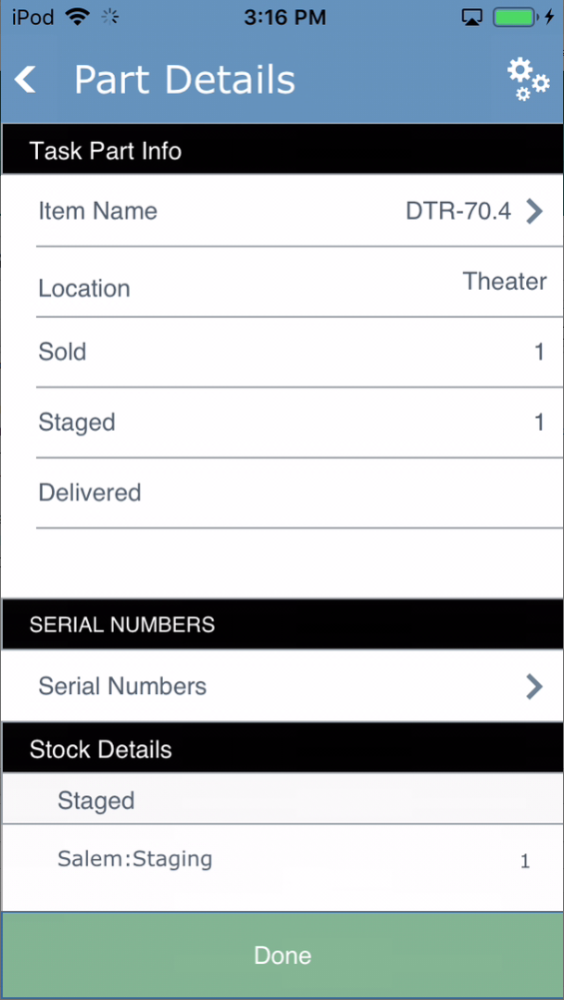
Task Part Info – shows the details about the associated task.
- Item Name – the name of the part
- Location – where the part is to be installed. This is usually a room in the house but could be different, based on how the salesperson set up the original proposal.
- Sold – the number of this part that was sold to the customer for this location
- Staged – the number of parts that have been allocated
- Delivered – how much was delivered?
.
.
.
.
.
.
.
.
.
.
.
.
.
Return Parts
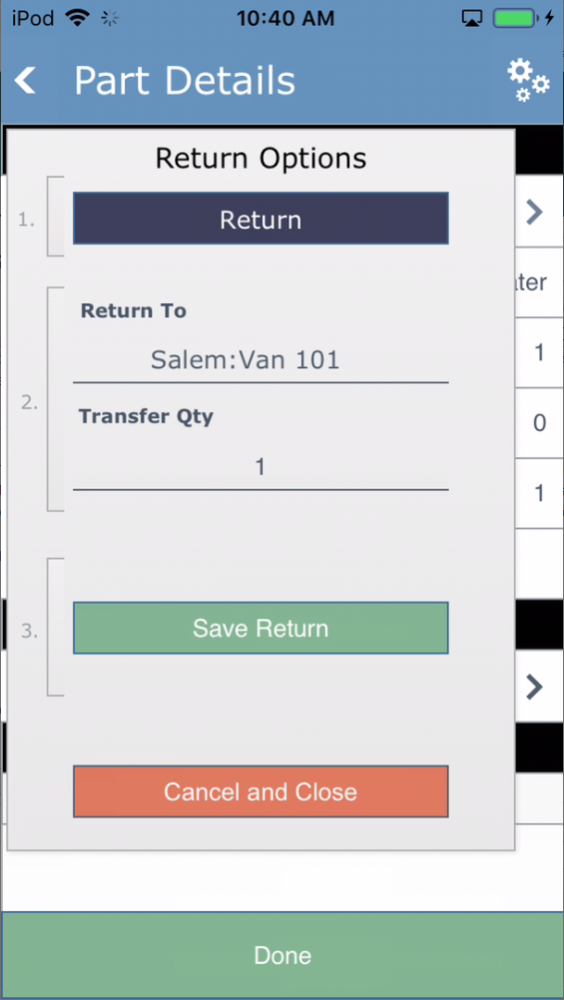
Tapping on the Delivered field opens a window where you can return products that have been delivered.
- Tap the Return button
- Choose the location where the inventory is being returned to
- Enter the quantity to be returned. For example, if you delivered 100 feet of wire, but the technician used only 65 feet. Enter 35 to return the unused wire.
- Once all fields have been entered, the screen will display the Save Return button.
- You will be prompted to Create a Return Memo where you are required to enter a brief explanation for the return.
.
.
.
.
.
.
.
.
.
.
.
.
.
.
Serial Numbers
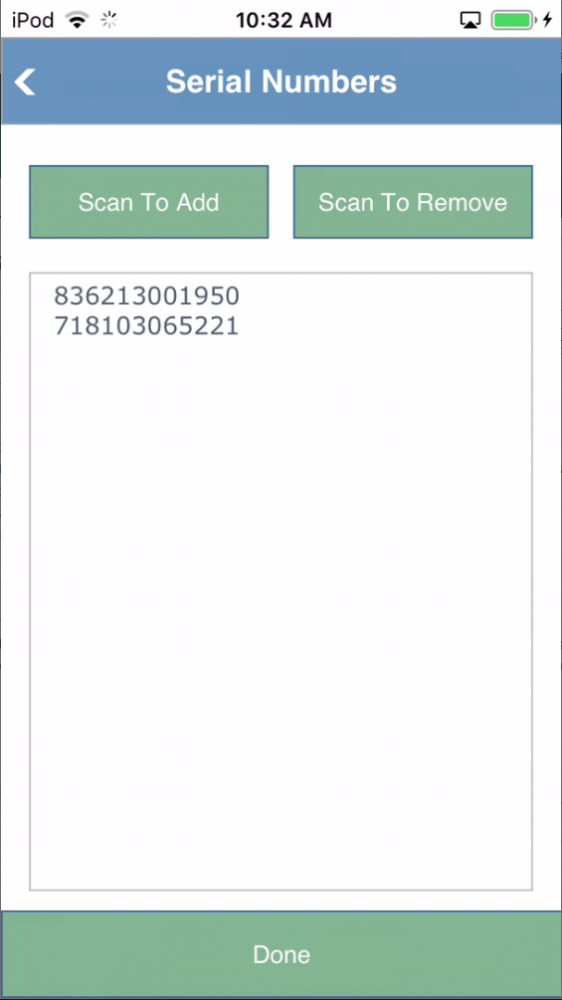
Serial Numbers – serial numbers will be displayed here. Those serial numbers could have been entered when someone received the parts on the Purchase Order. They can also be entered by warehouse staff during the staging process. Tapping on the serial number field opens a window to manually type in serial numbers by tapping in the Enter Serial Numbers field to activate the keyboard.
- Scan To Add – click this button to activate your iOS device’s camera. Then you can scan the serial number barcode to enter it quickly. Scan multiple serial numbers one at a time by tapping the Scan to Add button between each scan.
- Scan To Remove – click this button to scan serial numbers removed from the list.
.
.
.
.
.
.
.
.
.
.
.
.
.
.
Stock Details
Stock Details – provides a list of where the inventory is staged. The inventory for this part could be staged in multiple locations, and if it is, you will see multiple locations listed.
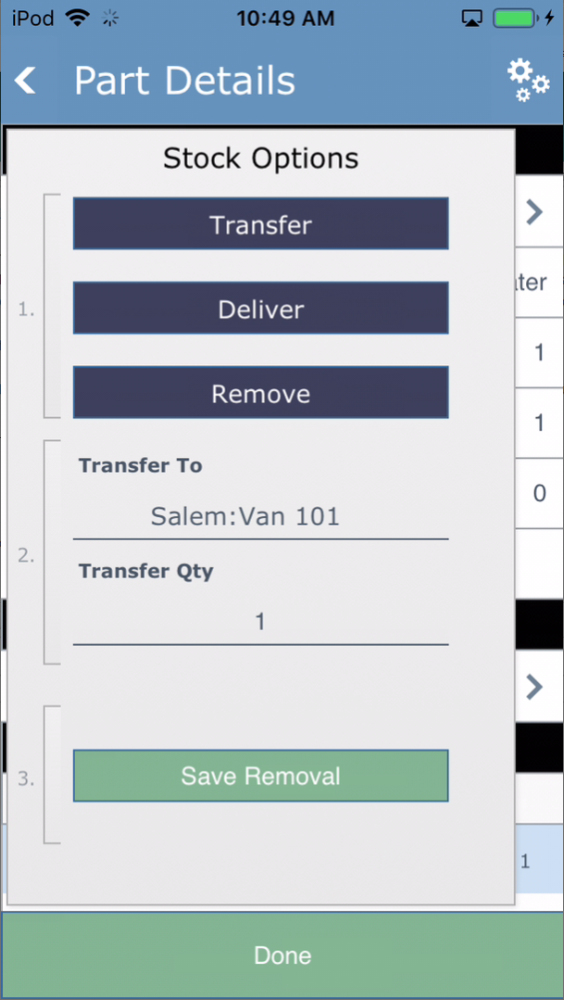
Tap on a specific Inventory Location to reveal multiple options.
- Transfer – use this button to move inventory from one location to another. For example, you may want to take the inventory out of the warehouse and place it in a particular van. Or maybe a technician is passing off the part to another tech so that you can transfer from one van to another.
- Transfer To – enter the location to where the part is being moved
- Transfert Qty – enter the number of parts being transferred. You do not have to transfer all of the items, just like we stated in our wire example above.
- Save Transfer – click the button to commit the move from one location to another.
- Deliver – use this button to do a partial delivery. Normally you can check the item on the part list and deliver it completely. But if you sold multiple parts and only one is being delivered, use this option to do a partial delivery.
- Transfer Qty – enter the number of items being delivered.
- Set as Delivered – click the button to do the partial delivery.
- Remove – this button takes the part off the work order and transfers it back into store inventory.
- Transfer To – tell iPoint where the item is being moved to
- Transfer Qty – how many of the items are being removed from the work order?
- Save Removal – commits the removal as defined above.
Note: This option is only available for parts added to the work order directly. If someone added the part through a sales order, you must complete the removal there.
Additional Details
This section tells more about the part
- Part Number – the manufacturer’s part number
- Manufacturer – the name of the manufacturer
- Category – the category is used for searching and filtering products
- Type – the type field refines searching and filtering options
- Picture – the image of the item

Click the Done button to close the Part Details.
Delivering Parts
Delivering the parts on a work order can be done in four ways. Let’s look at each option.
Check to Deliver
- Go through the parts list and place a checkmark in the box of every part to be delivered
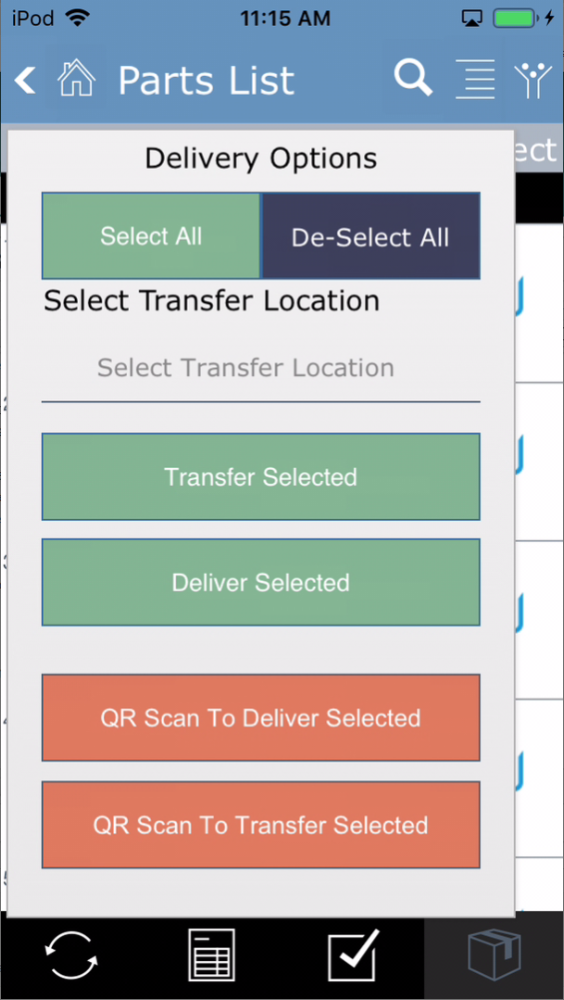
- Tap the parts box in the QuickLinks bar to open the Delivery Options window
- Note here you can choose to Select All or De-Select All These buttons check or uncheck all the items on the part list. This is not recommended! For accuracy purposes, it is better to check every part to ensure you aren’t missing anything.
- Tap the Deliver Selected button
- You’ll notice that you can use this same process to transfer parts from one location to another. Use the dropdown to Select Transfer Location to move the parts and then tap the Transfer Selected button.
Scan to Deliver
The best way to deliver products is to use the QR labels printed by the warehouse team and affixed to the appropriate boxes of products. QR codes on equipment are unique to the job, location, and phase of each part. So scanning is the best way to ensure that parts are delivered to the intended customer and not accidentally grabbed from the wrong job pile.
- Tap the parts box in the QuickLinks bar to open the Delivery Options window
- Tap QR Scan To Deliver Selected
- Point the camera of your iPhone or iPad toward the QR code of the item to deliver. Once the QR registers, the item will be delivered
- Continue scanning QR codes until all the delivered product is complete.
- If the scanned QR code does not match the product listed for this work order, a warning prompt will let you know, and you can’t deliver that product.
- Again, warehouse staff can use QR Codes to transfer products as well. Use the dropdown to Select Transfer Location where the parts will be moved to and then tap the QR Scan To Transfer Selected button to activate your camera. Keep scanning until all product is transferred.
Note: At this time, QR Scanning is only available on iOS devices and is not compatible with Android, Windows, or other mobile platforms.
Partial Delivery
Delivering Selected and QR Scan to Deliver will deliver the entire line. But if you only want to deliver some of the quantity sold, use the process described above in Part Details.
Task delivery
By design, every part has an associated task. This is done so that multiple people can complete the work on the job site. So, for example, a delivery driver can mark the product as delivered when it is dropped off at the customer’s house. But a technician marks the task complete when the part is actually installed.
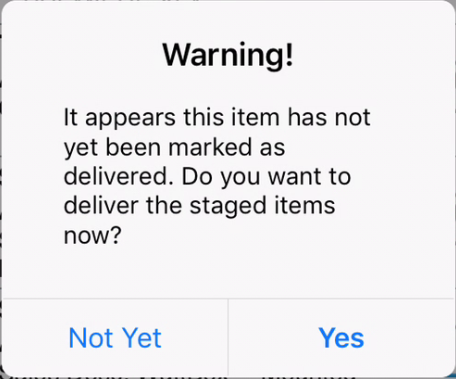
However, many companies have delivery and task completion done simultaneously. To activate this option, go to Settings > Module Settings > Work Orders and place a check in the Warn On Task Complete if Items Not Delivered checkbox.
With this setting enabled, completing a work order task will open a prompt where the part can be marked as delivered or left for another user to deliver the part.
Note: This option only works if the product is allocated.
.
.


