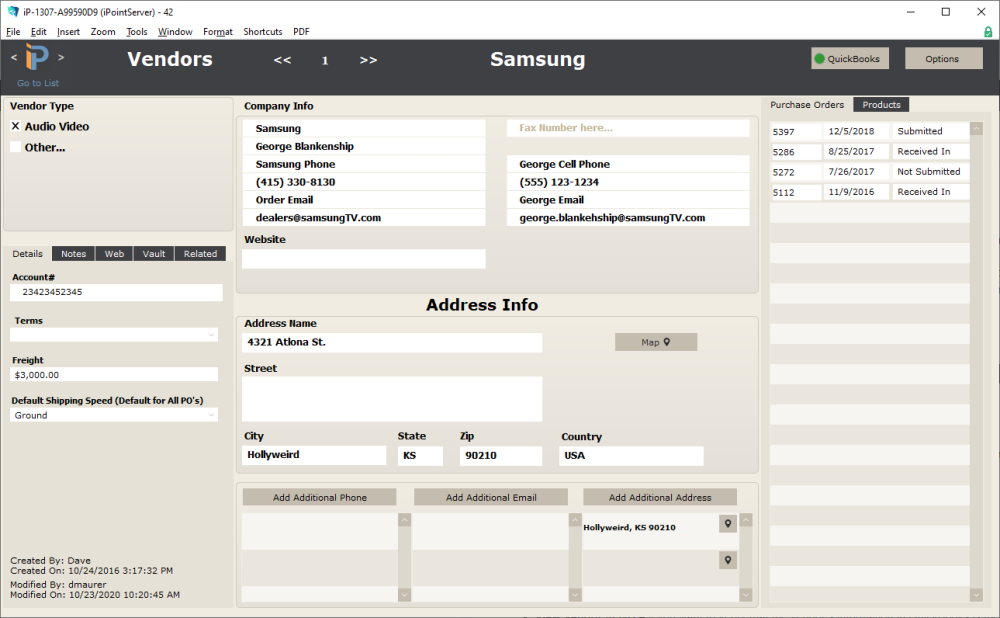
The Vendor Details screen shows a lot of information about the vendor. Let’s start in the middle of the screen.
Company Info
This is the primary details for your vendor.
- Company Name – enter the name as it appears on the invoice
- Primary Contact – this will likely be the name of your sales representative
- Main Phone Description – because the phone number can be anything, add a title of what the main phone number is
- Main Phone Number – the primary phone number to contact the vendor. Likely the main switchboard.
- Primary Email Description – enter a title or description for the primary email address listed below
- Primary Email – typically, this is the email address where you send your orders
- Fax Number – enter the digits so that you can send a fax to the vendor
- Second Phone Description – describe what the second phone number is
- Second Phone Number – the digits of the secondary phone number
- Email 2 Description – give a title to the 2nd email
- Email 2 – the second email address you want to track
- Website – the address where you’ll find the vendor on the interwebs
Address Info
The address displayed in the center of the Vendor Details is the primary address. – the fields are pretty self-explanatory.
- Address Name
- Street
- City
- State
- Zip
- Country

The Map button will open the primary address in Google Maps using your internet browser.
- Add Additional Phone – store as many phone numbers as needed by clicking the Add Additional Phone button. Enter the phone Description and Phone Number.
- Add Additional Email – add additional email addresses by clicking the Add Additional Email button. Enter the phone Description and Emal.
- Add Additional Address – store more addresses for the vendor by clicking the Add Additional Address button. Use the map pin icon (
) to open the address in Google Maps using your web browser.
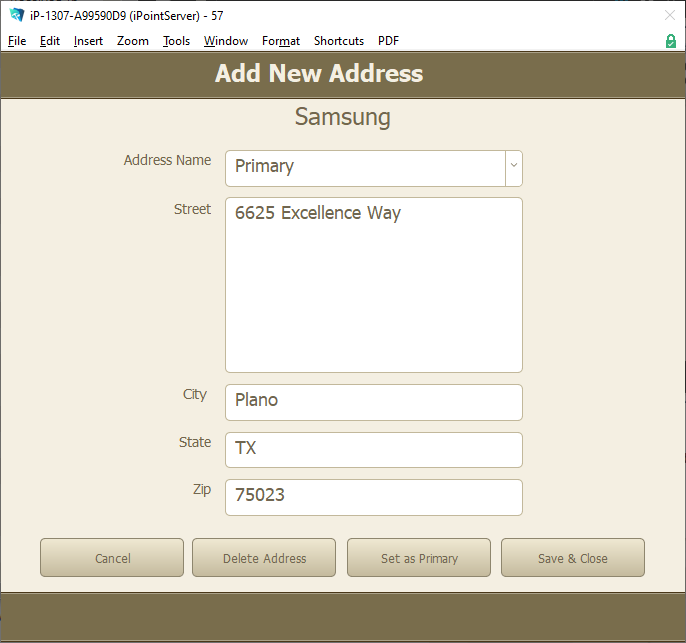
- Address Name – specify what the address is for
- Enter the Stree, City, State, and Zip
- Cancel – close the Add New Address window without adding or changing the address
- Delete Address – make the address go “buh bye”
- Set as Primary – elevate the displayed address to the Primary Address shown on the main screen of the vendor details
- Save & Close – save any changes made on the new address window (either as a new address or editing an existing one)
Note: Clicking on any additional contact detail will open a pop-up window where you can edit the information.
.
.
.
Vendor Type
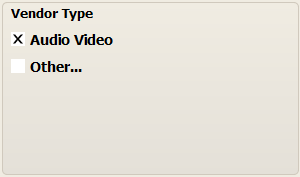
On the left side of the Vendor Details is a Type section. Place a check in the boxes of the corresponding vendor types. This is used for sorting the Vendor List.
When your company is brand new, there will only be a single vendor type of Other…. To create a new vendor type follow these steps:
- Place a check in the Other… field
- A pop-up window will open
- Type the name of the new vendor type
- Click OK
- The next time you open a vendor, the type you created in step 3 above will be available to select for other vendors.
- Repeat these steps on different vendors to create more types.
Note: You can assign multiple vendor types to a vendor, but only the first type will be utilized when sorting the list of vendors.
Want to delete a Vendor Type? You’ll need to follow these instructions:
- Open the Vendor Module
- Choose Type in the dropdown list in the header
- Make sure you include archived vendors in your search (Options > Show Archived)
- Scroll through the list of vendors to find those that match the Type you are searching for
- Open each vendor and clear the checkbox for the Type you want to remove
- Once all matching vendor types have been removed, the Type will no longer be available as an option in the Vendor Details.
Details Tabs
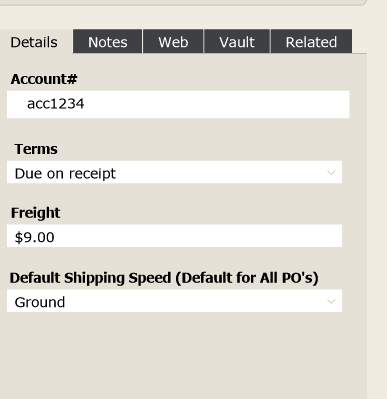
The details tab is where additional information about the vendor is stored.
- Account # – your account number with the vendor is used on Purchase Orders
- Terms – the dropdown list of terms defines how long after invoice receipt the payment is due
- Freight – this dollar figure is used on purchase orders to calculate how much more needs to be purchased to receive free freight
- Default Shipping Speed – used on POs to stipulate how fast the product will be shipped. This is a default and can be modified on individual POs.
- Created By – the name of the user who first entered the vendor into the Vendor Module
- Created On – the date the vendor was first added
- Modified By – the name of the user who last modified the vendor record
- Modified On – the date and time of the most recent modification to the vendor record.
.
.
.
Notes
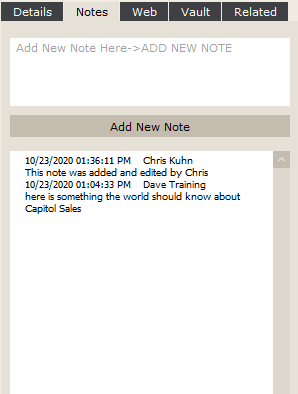
The Notes tab is a repository of notes about the vendor. Any note added is visible to all iPoint users.
Creating a new note is as simple as entering text in the Add New Note field. Once entered, the note populates into the notes section below the entry field.
The notes field shows the notes in date order, with the newest note displayed first.
- Date & Time Stamp – the date and time that the note was entered into iPoint
- User Name – the name of the person who added the note is shown
- The Note – here are the details of what was displayed.
All of the notes are displayed in one continuous text string and can be edited by clicking in the Note field.
.
.
.
.
.
.
.
.
Web
On the Web tab you can store additional web addresses. The big advantage to storing website URLs here is that you can simply click the GO button to open the web page in your default browser.
- Website – type in the address of the website
- Notes – put any kind of note about the address, maybe a title
- Go – push this button to go to the associated web page
- X – the delete button makes the web address disappear!
At the bottom of the list of web addresses is an empty record. Just type in new web details to add another website to the web list.
.
.
.
.
.
.
.
.
.
Vault
The Vault tab is another place where you can store vendor-specific notes, images, and details.
The vault tab differs from the notes tab in that it can be restricted by permissions (Settings > Permission Sets > Vendors) Users with permission can see the documents stored in the vault. Without permission, the user will not be able to open and view the vault.
The vault has five components:
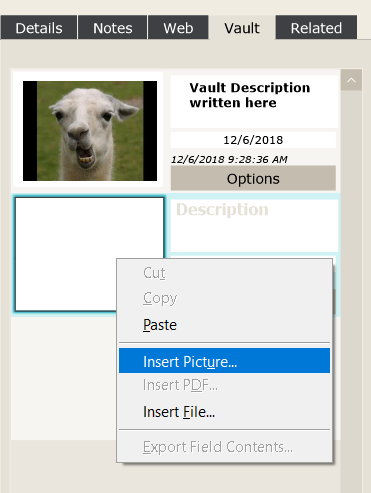
- Document – a thumbnail of the document or file that is store in the vault. Right-click on the document to cut, copy, or paste it.
- Details – this is a text box used to describe what the document is. Double-click in the details to edit the text.
- Date – the date of the file. Double-click in the date field to edit it.
- Time-Stamp – displays the date and time the document was added to iPoint
- Options – use the options button to Insert a File, Preview the document, or Delete it.
Hint: Another quick way to add a document to the Vault is to right-click in the document field which opens a list of options where you can Insert Picture or Insert File.
.
.
.
.
Related
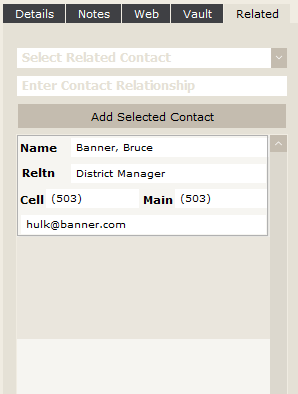
The Related tab is where you define other important contacts within the vendor. Each vendor displays:
- Name
- Reltn – the relationship of the contact name to the vendor
- Cell – the cellphone number of the contact
- Main – the primary phone number
- Email – where you send emails
Adding a new related contact can be done in one of two ways.
- Use the dropdown list to find an existing contact in the CRM database
- Enter how the contact is related in the Enter Contact Relationship field
- Press the Add Selected Contact button
- If the contact is not already in the iPoint CRM, just enter the name as you want it to appear in the Select Related Contact field
- Enter the relationship of the contact
- Press the Add Selected Contact button
- A new window pops up where you can enter further details
.
.
.
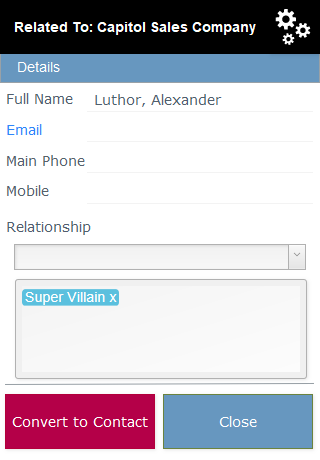
Adding a new contact, or clicking on an existing related contact opens the Related Contact Details window showing:
- Full Name
- Email address
- Main Phone
- Mobile phone
- Relationship – choose from the dropdown of previously entered relationships, or enter a new one
- Relationships – a list of multiple relationships. Click the X at the end of a relationship to delete it.
Use the Conver to Contact button to add the related contact to the permanent CRM Contact list.
If the contact is already in the CRM list, the button will change to Go to Contact Record. Pressing this button will open the contact record in CRM where additional details can be reviewed and/or edited.
The Gears in the upper right-hand corner of the Related Contact Details is where you’ll find the Delete Relationship button.
.
.
.
.
.
.
.
.
.
Purchasing Tabs
On the right side of the vendor screen are two tabs document the purchases and products associated with the specific vendor.
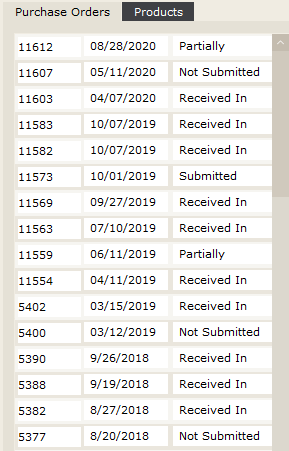
Purchase Orders
The Purchase Orders tab shows every PO that has been generated for this vendor and includes:
- PO Number
- PO Creation Date
- PO Status
Clicking on a specific PO opens the Purchase Order window.
Products
The Products tab displays all items in the Item module that list the vendor as the Default Vendor. Clicking on an individual item in the Products list opens the corresponding Item Details window.
Note: Alternate Vendors are not included in this list.
.
.
.
.
Buttons
At the top right corner of the Vendor Details window are two buttons.
QuickBooks

The QuickBooks button allows you to adjust how the vendor appears in Quickbooks. A green dot on the button indicates that the vendor has been synchronized to QuickBooks. An orange dot on the bottom means that something has changed on the vendor record since it was last synced to QB.
You have three QB options:
- Push Vendor to QB – use this option to perform the initial sync of the vendor into the QuickBooks database
- View Vendor in QB – push this button to open the vendor record within QuickBooks. If you are using QuickBooks desktop, you must have QB open on your computer and have the correct permissions within QuickBooks.
- Clear QB Reference – occasionally it is necessary to break the link between a vendor in iPoint and the vendor record in QB. This is where the magic happens.
- Close – so you really have four options – but this one just closes the QuickBooks button.
Options

The Options button is where you can:
- Archive a vendor. Place a checkbox to hide the vendor from the active vendor list. Remember, it is not a good idea to delete vendors, because you’ll lose all your historical data.
- New Vendor – push this button to create a new, blank vendor record where you can enter the details of a new company
- Delete Vendor – again, we don’t recommend this button, unless there is no history for the vendor. This is a permanent delete, there is no “undo”
- Close – use this button to close the Options pop-over


