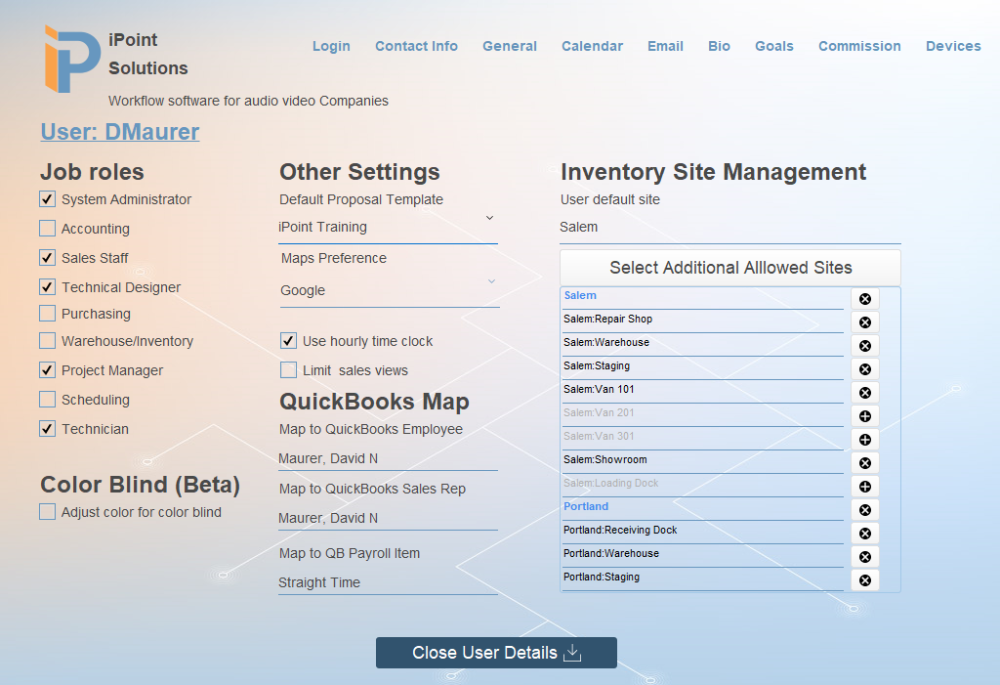
The General (tab) adds granular user functionality and affects how the user appears in various modules.
Job Roles
System Administrator
Checking this box will enable a user to access the Settings Module.
If you leave this box cleared, they cannot modify anything in the settings module.
The System Admin checkbox also:
- allows the user to edit time on a Work Order.
- grants the user access to modify the taxable rate on a proposal for modifiers.
Accounting
A tick in this box designates this user as an accounting team member.
Sales Staff
A tick in this box makes the user appear in the Sales drop-down lists used in the software.
Technical Designer
A tick in this box places the user in the Technical Designer drop-down list on proposals, sales orders, projects, and work orders.
Purchasing
A tick in this box defines the user as an individual responsible for ordering products.
Warehouse/Inventory
A tick in this box designates that this user is responsible for receiving products and moving inventory throughout the system.
Project Manager
A tick in this box places the user in the Project Manager drop-down list on proposals, sales orders, projects, and work orders.
Scheduling
A tick in this box indicates that this user is responsible for scheduling technicians on work orders.
Technician
A tick in this box includes the user in various Technician drop-down lists throughout iPoint. Additional technician list availability can also be set using Calendar Groups, described below.
Color Blind
Adjust color for color-blind – a tick in this box adjusts the colors on the QuickBooks sync indicators to make them more visible to those who experience color vision discrepancies. – New in 10.0609

Other Settings
Default Proposal Template – iPoint has the capacity to have multiple proposal templates (set up in Settings > Custom Templates and used when printing Proposals and Sales Orders.) A company might have separate Commercial and Residential templates. Or there might be a different template for different office locations. By selecting the Default Proposal Template, iPoint can automatically use a specific template for each individual user. This template can be changed during printing as needed.
Maps Preference – Throughout the software are links to open an Internet map for each address. From this drop-down menu, a user can choose whether they want their maps to be opened in Google Maps or Apple Maps.
Use hourly time clock
This checkbox will turn on the hourly time clock button on the iPoint dashboard. The hourly time clock tracks the user’s overall time worked during a workweek and is separate from the work order check-in time.
Limit Sales View
A tick in this box will restrict the user to only see Proposals and Sales Orders where the user is marked as the salesperson, hiding proposals and sales orders for other sales staff members. This setting does not restrict access if the user is marked as the Technical Designer or Project Manager. By default (with a clear check-box), all users can view all sales documents, provided they have been granted permission to view those two modules.
QuickBooks Map
This section defines how this user is tied to various data elements in QuickBooks. This is typically used when utilizing QuickBooks Payroll so that you can sync hourly work order time from iPoint into QB timesheets.
- Map to QuickBooks Employee – from the dropdown menu, select the corresponding employee as defined in QuickBooks.
- Map to QuickBooks Sales Rep – use the dropdown menu to pick the corresponding QuickBooks Salesman.
- Map to QB Payroll Item – pick the QuickBooks Wage Item that matches the employee’s wage in QB Payroll.
Note: These QuickBooks items are set up in QuickBooks and pulled into iPoint when you Pull Chart of Accounts in Settings > QuickBooks > Chart of Accounts.
Inventory Site Management
If your company has multiple locations, you can assign Users to work in a particular Site. Additionally, you can grant access to specific sub-locations within a Site. Using these settings you can restrict a technician to only have access to his van and the warehouse he works out of, for example. Or you can let salespeople only see what is available in their store’s warehouse and not what is available in other Sites.
Note: This section will be blank if the Multi-Site Inventory is not activated.
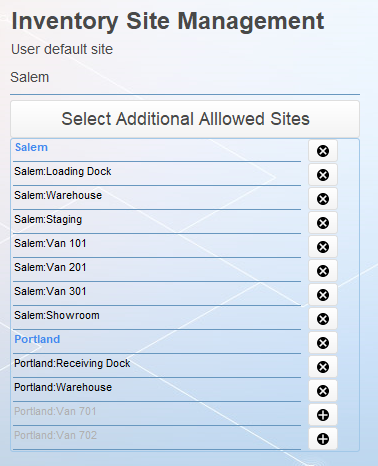
- Users Default Site – from the dropdown menu, pick the primary location where this user works. Once you’ve selected a Site, a list will populate showing all of the warehouse locations for that Site.
- Sites listed in Blue Text are separate stores. All sub-locations are listed in black underneath their respective Sites.
Click the black X button to deny the user access to that specific warehouse location. If a location displays in grey text, the user won’t have the ability to transfer inventory in or out of that location.
Click the black + button to grant access to the warehouse. If a location displays in black text then the inventory can be allocated or transferred in and out of the location by that user.
Users with access to a Site but not access to a sub-location can still view inventory quantities. They just won’t be able to make adjustments to locations where they don’t have access.

If a user has access to more Sites than their assigned default Site, click the Select Additional Allowed Sites button to reveal a pop-up list where you can choose other sites. Once the Site has been added to the list, use the + and X buttons to modify what kind of access the user has.


 Click the black X button to deny the user access to that specific warehouse location. If a location displays in grey text, the user won’t have the ability to transfer inventory in or out of that location.
 Click the black + button to grant access to the warehouse. If a location displays in black text then the inventory can be allocated or transferred in and out of the location by that user.