The main graphics tab affords you the opportunity to customize the visual look of the proposal itself.
Graphics
There are four graphical elements to every template.
- Header – this will appear at the top of every page
- Divider 1 & 2 – these images will separate groups of data on the proposal. Proposals can be sorted by a combination of Locations, Groups, and Phases. The primary sort will be denoted by the first divider bar, while the secondary sort will be broken apart by the second line.
- Footer – this graphic appears at the bottom of every page.
Each graphic container has specific dimensions listed below to help you create appropriately sized images.
- Header image should be 580pt wide by 72pt high
- Divider images should be 580pt wide by 28pt high
- Footer image needs to be 580pt wide by 40pt high
Create the graphic images in your paint or photo editing software. Images can then be copied and pasted, drag and dropped, or right-click into the area and select insert image to upload from your computer directly. Keep in mind that the resolution of these images should be 150 dpi to prevent excessively large PDF files for your reports.
Header Title Options
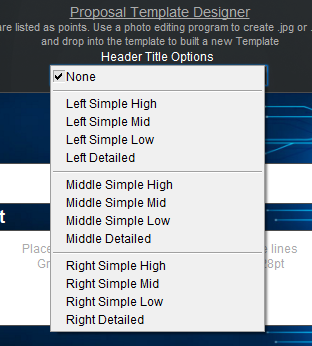
The header of your proposal can display details about the customer and proposal name. Using the Header Title Options drop-down, pick what information you want to be displayed and where on the header it should be positioned.
- The Simple option displays Customer Name – Proposal Title Revision: #
- Simple options can display text justified left or justified right. Choose the section you prefer to define justification
- Simple option can be displayed at the top of the header, centered in the graphic, or bottom of the header by selecting High, Mid, or Low.
- The Detailed option shows the Customer name, Proposal Name, and Proposal Address.
- Each option can be left, center or right-justified using Left, Middle, or Right.
If the header image is dark, check the White Text box so that the text appears white on the dark background. Leaving the checkbox unchecked will produce black text, useful on light background header images.
Text Customization
The text on each graphic element can be customized to better display in conjunction with the graphic elements installed.
Header and Footer To the right of each section is a checkbox that turns the font text white. If the graphic images for each section are dark, the black text won’t show up well when printed. Checking this box will turn the text white to make it visible against the dark background. Or, clear the checkbox to turn the text black against a white/light background image.
Divider Images have a bit more control over font size and color.
Click on the pen icon to the left or right of either divider bar to open a Color Picker window. Click on the drop-down box to select either a predefined color or choose a specific color using RGB numbers.
- The left pen icon controls description text displayed – this is either the Location, Group, or Phase of the section as defined in the proposal print options of each proposal/sales order.
- The right pen icon controls the color of the price being displayed.
To the right of each Color Picker Pen is a Sum Options button that adjusts the format of text displayed in each graphic bar.
- Left Side Text
- Enter a value in the Sub Total Font Size to change the font size of the description, which is justified left.
- Sub Total Indent Over Ride – entering a value here increases the amount of text indent before the description. This is useful when your divider image contains a graphic element and you want to ensure the description does not cover the image.
- Place a tick in the checkbox to Remove Bold formatting from the text displayed on the left portion of the divider bar.
- Right Side Text
- Enter a value in the Right Side Totals: Sub Total Font Size to change the font size of the price totals, which are justified right.
- Place a tick in the checkbox to Remove Bold formatting from either the Left Side Text or the Right Side Totals.
- General
- By typing the name of a font in the Font Override field you can choose your own font instead of the system-defined font for text printed in the divider bars. Keep in mind that the font you enter here must be installed on the computer printing the Custom Template in order to display that font.
Check Boxes
At the bottom of the graphic image, there are two additional checkboxes.
Hide Page Numbers will repress the printed page number at the bottom of each proposal page.
Hide Initials Line – by default iPoint creates a place at the bottom of each page for your customer to initial. Check this box to remove the initial line.


