

Yay!! It’s delivery day! The UPS man has delivered your goodies, and it’s time to start checking in those orders. First, check the packing slip – oftentimes, you will see your PO printed right on it and a list of what was delivered. Now it is time to receive the PO in iPoint.
First, let’s check the packing slip that came with the shipment. Next, look for the PO number so you can open the PO in iPoint. Did you get all of the items on the PO? Or is this a partial shipment? Those are important things to know because they will change how you receive the PO.
You have four ways to receive a PO.
Let’s look at each option individually.
Receive an individual item
- Our Purchase Order #11607 was for 20 in-ceiling speakers.

- However, we only received two speakers in this shipment.
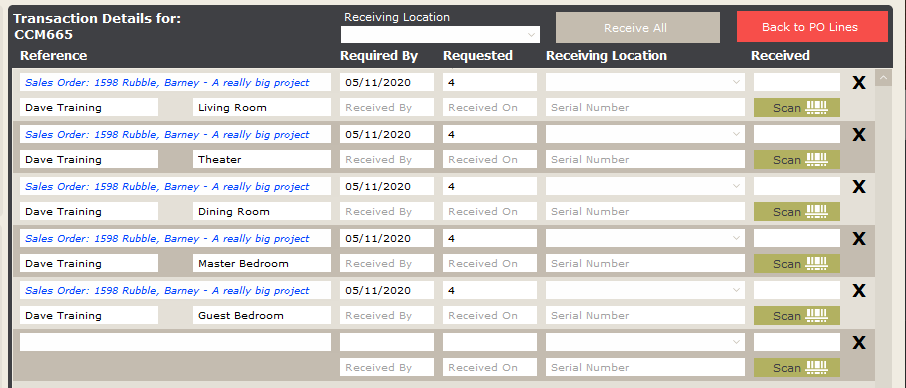
- So, we click in the Rec’v box to enter the two speakers. Doing so opens another window where we see that the salesperson actually ordered speakers for 5 different rooms of the house.
![]()
- First, we need to tell the software in what Receiving Location these speakers will be stored. Choose a Receiving Location from the dropdown menu at the top of the screen or on individual lines if they are being stored separately. If you forget this step, iPoint will prompt you before you can enter the quantity received.
- Next, we’ll decide where the speakers will be installed. We happen to know that the technicians will be working in the Guest Bedroom first, so let’s receive these two speakers there.
- Click in the Received box on the Guest Bedroom line and enter the quantity 2.
- Now click on the red Back to PO Lines button to go back to the main screen of the Purchase Order.
- There you have it! You’ve received the two speakers and allocated them for the Guest Bedroom of this job.
- Now you’ll want to go print some labels.

So, why is it important for us to stipulate what room the speakers are being received for? Because iPoint is an integrated system, the item receipt is recognized on sales orders, projects, and work orders. If we received the speakers in the Living Room, they would not be available on the work orders for the Guest Bedroom. You’ll want to communicate with the project manager to determine what room is going to be installed first.
Receive multiple items
- Our PO #5403 has several items for a lot of different jobs

- We have received all of the 1 Button Dimmer Light and the Samsung 60” TV, but the rest of the items were not part of this shipment.
- So, we click the checkboxes in front of the 3 line items we received (2 × 1 Button Dimmer Light and 1 x UN60F7500)
- Now, at the bottom of the PO, under the Bulk Receive section, we’ll select the Receiving Location where we are staging these items.
- If the items are to be staged in different locations, you will want to click the Reference button (Stock, Sales Order, Invoice, etc.) and define the individual staging locations for each item.
- Click the Receive Selected Lines button – iPoint will receive each selected line in full and stage them appropriately.

 PO Bulk Receive
Receive all items
This is the easiest way to receive a PO. But just because it is easy, we still want you to verify details!
- Open the PO in iPoint that matches the packing slip.
- If you received everything on the PO, make sure you know where to stage the items.
- If all the items get staged in the same place, choose the Receiving Location from the dropdown menu.
- If one or more items need to be staged somewhere special, click the Reference button (Stock, Sales Order, invoice, etc.) and define the individual staging locations for the special items.
- Or, if you want to use the default location for staging the items (as defined on the Item Details), don’t select any locations.
- Click the Receive All in Full button
Scan items to Receive
If you are set up to use a bar code scanner from the items module, you can receive the items by scanning them in.
- Open the relevant Purchase Order
- Select your Receiving Location
- Click Scan to Receive – a scanning window will pop up where you can then scan the bar-code on the item.
- Once scanned, the pop-up window will display the item you just scanned
- confirm the item name is correct
- confirm the quantity manually by typing in the quantity amount or by re-scanning the same item
- click Receive OR press Enter.
