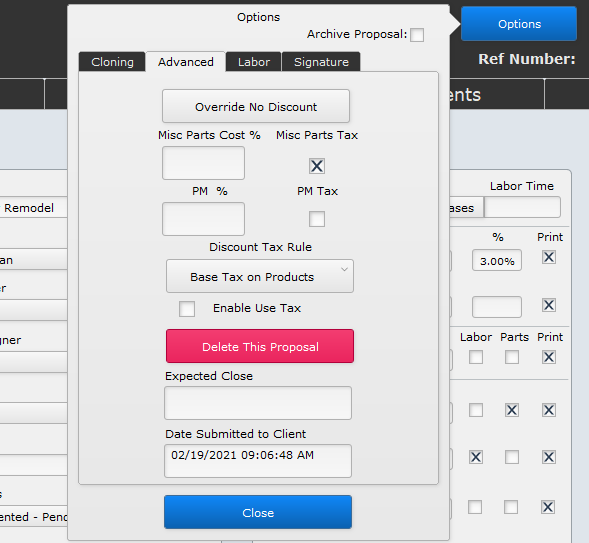
Click the Options button at the top of Proposal Details to open the Options popover window.
Archive Proposal – check this box to archive a proposal (or uncheck it to unarchive the proposal).
There are four tabs in the Options popover window. Each is described in detail below:
- Cloning (tab)
- Advanced (tab)
- Labor (tab)
- Signature (tab)
Cloning

Click the Clone this Proposal button to make a copy of the open proposal. Once the new proposal opens you will need to enter a customer name, as the clone doesn’t duplicate that information.

The Clone with Contact Info button makes an exact copy of the open proposal, including the customer details.

When you click the Enable Walkthrough Mode button, all cost, margin, and markup details are hidden from the proposal. This makes it possible for you to work on the proposal with the client looking over your shoulder without revealing your cost or margins to them.
This button is a toggle and changes to Disable Walk Through Mode. Just click that button to display the cost, margin, and markup information on the proposal again.

The Template Lock causes the proposal to be locked so no edits can take place. A locked template will display Locked As Template in the header so you know that this is a template.
Templates are a great way to build a proposal that you use over and over again for different projects. For example, maybe you are working for a production builder who is building an entire subdivision and they have asked you to provide a basic prewire install for each home. Since each of the homes is similar and requires the same products, you would build a template and then clone it for each of the different lots you will be working in.
Here is what happens when you create a template:
- The proposal is labeled Locked as Template in the header area.
- The Convert to Sales Order button is removed from the Proposal Info tab.
- The Options and Add Products buttons are removed from the Designer.
- A lock icon is displayed on the Proposal List.
- Users cannot make changes to the template.
To use the template for a new sale, go to Options > Clone and make a copy of the template. The new cloned copy is not locked and can be modified or adjusted for the specific client’s needs.
To Unlock a template, open the Options button again. The Apply Template Lock button now is a Remove Template Lock button. Clicking this button removes the lock and makes the proposal a normal proposal again.
Advanced
In the Advanced tab, you can set up more advanced options for this proposal.

Items can be marked as “not discountable” which means discount modifiers and physical adjustments to lower the price are not possible. With the correct permissions, clicking this button makes the non-discountable items capable of being discounted.

Once the Override No Discount button is activated, it turns into a blue Restore No Discount button. Click this button to restore the “No Discount” functionality on those items marked “No Discount”.
- Misc Parts Cost %: This field lets you indicate what percent of your Misc Parts modifier should be considered the cost. For example, if we had $1,000 for misc parts, then with 25 % going to cost, iPoint would calculate that the parts would cost $250. This Misc Parts Cost goes towards the cost of the parts of the whole proposal.
- Misc Parts Tax checkbox: You may choose to tax your Misc Parts by ticking this checkbox
- PM %: This lets you indicate what percent of your Project Management modifier is calculated as cost. For example, if we had $1,000 for project management, then with 20 % going to cost, iPoint would calculate that the project management would cost $200. This PM cost goes towards the labor cost of the whole proposal.
- PM Tax checkbox: You may choose to tax your Project Management fees by ticking this checkbox
- Discount Tax Rule dropdown list: This allows you to choose how you would like taxes applied when discounts are involved:
- Base Tax on Products: The tax liability is adjusted based on the taxable status of the part or labor items. iPoint recommends you choose Base Tax on Products.
- Non-Taxable: The tax liability is not affected by the discount
Note: You must be a System Administrator to use the Advanced Discount options on this tab.

The Delete this Proposal button deletes the proposal —- forever! There is no going back and all revisions of the proposal will also be deleted.
Note: iPoint always recommends archiving proposals, rather than deleting them. Archiving allows you to reference that proposal in the future. Deleting is permanent—as in hasta la vista, sayonara—all revisions are deleted and there is no undo.
Expected Close – This is a text field where you can enter the date you expect the proposal to be accepted by the customer. This information is used on Proposal reports.
Date Submitted to Client – this field is automatically populated with the date and time that the proposal status was set to Submitted. The submitted status is customizable by a system administrator in Settings > Pop Up Lists > Proposal Status.

Labor
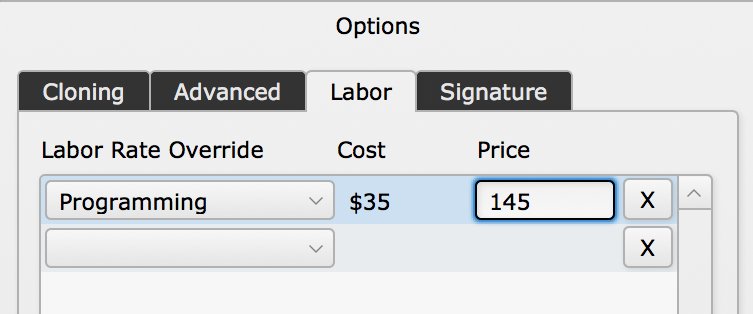
In the Labor tab, you can override a labor phase cost and price for this proposal. This means that even though a labor phase has a defined cost and price (as defined in Settings > Labor Phases) you can change those values for this proposal only.
Add a Labor Rate Override
To add a labor rate override:
- Choose a Labor Phase from the Labor Rate Override dropdown list
- Input the new cost for the labor phase in the Cost field
- Input the new price for the labor phase in the Price field
You can override the labor rate for as many labor or as few phases as you like and it will only affect this proposal. Unlisted labor phases will not be modified on this proposal.
.
.
.
Return Labor Rate to the Default
To return a labor rate to its default rate click in the Cost field and/or Price field and change the cost/price back to the default rate.
If you try to delete a labor rate override by clicking the X button to the right:
- An alert box will open saying “Please note that deleting a labor override will NOT revert your labor prices back to the original rates. To do this, simply type in the default rate into the override. Do you want to continue and delete the rate?
- Click the Not Now button to return to the Labor tab to change the rate back to the default.

Signature
In the Signature tab, you can add a sales rep or designer signature.
To add or update a signature:
- Click the Add/Update button
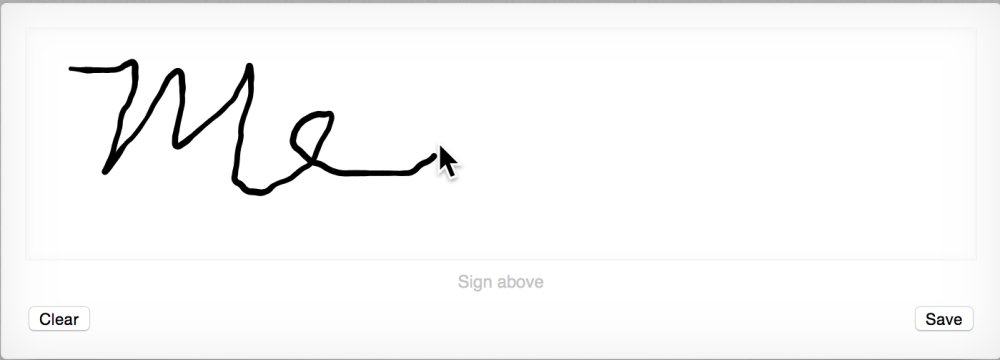
- Create a signature with your mouse in the signature pop-up window
- Click the Save button or click the Clear button to create a new signature
Alternately, you can right-click in the signature box and choose Insert Picture… This will open a computer search window where you can navigate to an image stored on your computer and use that as your signature.
Note: Updating the signature here also updates the Salesperson’s signature in Settings > Users > Username > Bio.


