Projects are where you manage the labor portion of the work completed in iPoint. From here you will schedule work orders and assign tasks to your employees to ensure that jobs are completed. Projects are used for new sales (work coming from Sales Orders) and for service calls. As a manager, you can use the Project Details to review work completed, parts added and delivered, expenses incurred, and other job details.
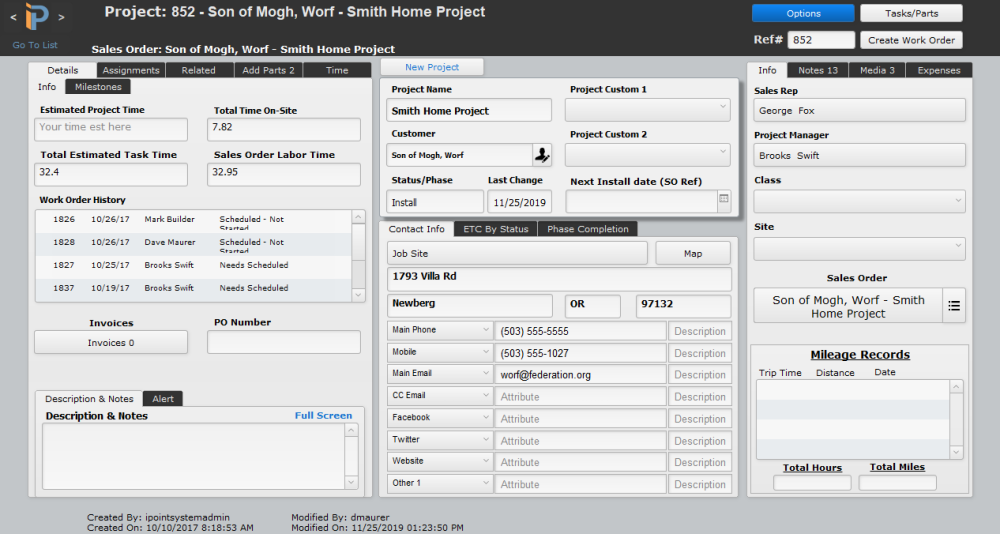
There is a lot of information here, so for the purposes of explanation we’re going to break the page into four quadrants: Header, Left, Center, and Right sections.
Header
Many of your navigation functions are located in the header.
- Click the iP logo to go back to the iPoint dashboard
- Use the arrows < > on either side of the logo to go forward one page or back one page, much like you would use on your web browser.
- The Go To List link is a shortcut to the Project list
Next, you’ll see the Project name which consists of the reference number – Customer Name – Project Name. The Sales Order name will be referenced if the project is tied to a sales order.
On the right side of the header you will see:

Archive – Once the project has been completed, check this box to remove it from the active list of projects. Remember, we don’t delete projects so we can maintain historical data.
- Turn Edit On – This is an old, legacy button that doesn’t do much. If you push it, you’ll be able to see a new Delete button on the Project itself. Kinda redundant since we have a delete project button right here on the options!
- Project Report – The Project Report provides a list of notes, media, tasks, time logs, and added parts associated with the project. This is the same report that can be attached to a project invoice in accounting. Click here to see a sample report.
- The report displays:
- Project Notes – notes added to the project independently of tasks
- Work Performed – a list of each task assigned to the project along with who completed the task, the task status, and any associated task notes.
- Time Logs – each work order clock in/out entry sorted by the date and then time as displayed on the work order
- Parts Added – a list of all the parts that were added to the project or the associated work orders.
- Task Report – This is a printable list of all the tasks for the project. This is the same report you can run from the Reports module ( Reports > Project > Task Report )
- Delete Project – With the correct permissions this button will delete the project.
Ref # is the unique serial number for this project.

Click this button to view a list of all of the parts on the project along with the associated tasks. Click here to see this section in the manual.
To create a work order associated with this project, click the Create Work Order button. Click here to learn about this process.
Left Section
The left side of the project provides basic details for the job.
Details (tab)
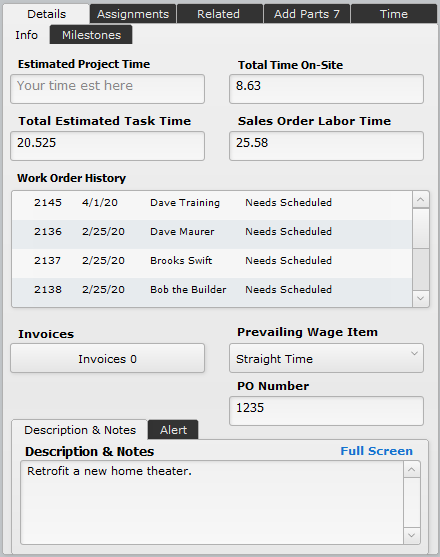
The top section displays several time elements:
- Estimated Project Time – this is a manually entered field where you as a project manager can enter what you think the total time of the job is going to be. This time entry is then displayed on the Sales Order in the Project tab.
- Total Time On-Site – this calculated field is the total time entered on the associated work orders.
- Total Estimated Task Time – Each part has an amount of time associated with it, either from the Item master or from an adjusted time by the sales team. This number represents the total time for all tasks that have been created on the Sales Order. Some parts may not have tasks created yet because they are part of a later phase of the job. So this number is only tasks that have been created.
- Sales Order Labor Time – This time represents all time associated with all items on the project, even if the task has not yet been created.
The Work Order History portal displays all of the work orders that have been created for this project. Here you will see:
A green dollar sign indicates the work order has been billed on an invoice.
- Work Order Number
- Date the Work Order is scheduled
- User assigned to the Work Order
- Work Order Status – as defined on each individual WO
- Time – the number of hours worked by users on that work order
- A checkbox on the right side indicates that the WO is billable. So if you have multiple WOs in a project you can select the WO you want to invoice. You can invoice one, or multiple WOs at a time.
- Work Orders listed in gray have been archived
Click on any work order in the list to view the work order.
Note: If a work order is assigned to an Un-Assigned technician or has no dates in the date field, it will appear at the top of the Work Order History list. – New in 10.0208
The Invoices button is where you can create and view invoices associated with this project. The number on the button indicates how many invoices have been created already. The pop-up window shows the details of each invoice, including the Invoice number, the date created, any work order reference, and the total and status of the invoice.
- Click on any invoice to view the invoice in the accounting module.
- Click the green Create New Invoice button to start the process of creating a new invoice. You will be allowed to add any expenses, time, or added parts that have been added to the project.
- If the customer associated with this project has any unsubmitted invoices, you can choose to add this invoice to an existing invoice. Choose an invoice from the dropdown list and a new Add to Selected Invoice button will be displayed.
The Project Invoice process is detailed in the Accounting module.
Prevailing Wage Item – If this project is governed by a prevailing wage agreement, set the prevailing wage item here. In government contracting, a prevailing wage is defined as the hourly wage, usual benefits, and overtime, paid to workers. Any time entries created on a work order associated with this project will be flagged as Prevailing Wage using the Wage Item defined here.
PO Number – this is the customer’s purchase order number for this project.
Default Labor Phase – Setting a default labor phase will automatically set that phase for all related work order check-ins by technicians. New in 9.0608
Description & Notes is a notepad of sorts where you can add notes. These notes will also transfer to the General Description field on the Work Order. The Full Screen link enlarges the description field so you can see more than the initial preview.
Alerts (tab) – Any notes you place on the Alerts tab can be displayed in a pop-up window by checking one of the following boxes.
Project Enter – check this box to display the Alert anytime someone opens a Project.
Project Check In – a check in this box displays the Alert when someone clocks into the Project using the green Check In button on the Time tab of the project.
WO Enter – this box causes the alert to display when a user opens an associated Work Order.
WO Check In – check this box to display the Alert when a user checks in to an associated Work Order.
Milestones
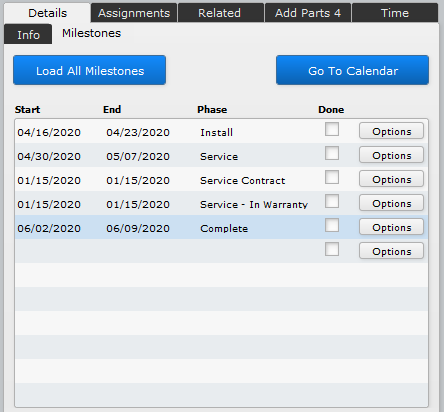
Project Milestones generate a Gantt style chart on the calendar. By default, the milestones are empty.
- You can either load the default Milestones by clicking the blue Load All Milestones button. You will be prompted to enter a project start date. The system will then add the Milestones as entered in Settings > Pop Up Lists > Project Phase.
- The very last milestone is empty. Here you can manually enter your own Milestone, choosing the start and end date and Phase.
- You can also edit any existing milestone on the list by clicking on the various elements to modify dates or phase names.
- The Options button opens a pop-up window where you can enter a more detailed Description or delete the milestone.
.
.
.
.
.
.
Assignments
Assignments are iPoint’s internal “To-Do’s” for you and your co-workers to track things that need to be completed. For example, your customer may have called and would like to talk about a bigger television than the one specified on this sales order. By creating an Assignment for the salesperson, you make it easy for them to refer directly to this Sales Order when they view the Assignment. For a more detailed description of using Assignments in iPoint, visit the Assignments portion of this manual.
In the Assignments Portal here on the Sales Order you can see:
- Assignment Details – what is being requested
- Created – Who created the assignment and when was it created
- Staff – the User assigned to completing this assignment
- Status – is this assignment Not Started, In Progress, On Hold, or Completed
- Category – the customizable category field can be used to group assignments together in the Assignments module
- Priority – how urgently does this assignment need to be completed?
- Due – when does this assignment need to be completed?
Clicking on any individual Assignment line opens a popover window where you can get adjust the assignment and get additional details, including:
- Tags
- Followers
- Notes
- Attachments
- Checklists
- Log
Related
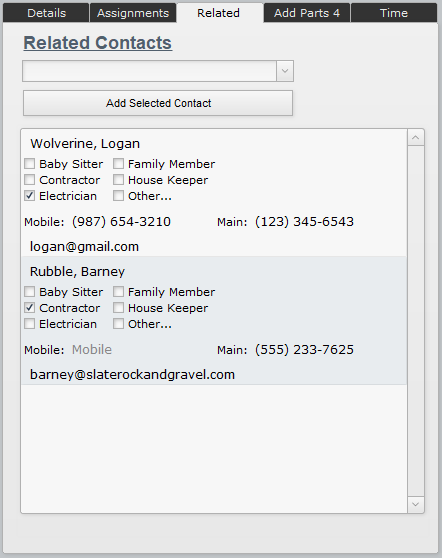
The Related tab allows you to link other Customers or Contacts from the CRM module to this Project.
For example, if you have the name of the General Contractor as a contact in the CRM, you can add them to the Project here. This will make it easier to find contact phone numbers or email addresses.
Clicking on a Related Contact opens up a window with more details where you can
- Edit the Relationship using the dropdown menu
- Delete a Relationship by clicking the X next to the relationship in the window
- Email the Related Contact by clicking the Email link
- Delete the Relationship link by clicking the Setting Gears in the top right corner of the window
- Go to the Contact Record where you have full editing capabilities, provided you have the correct permissions.
.
.
.
.
.
.
.
.
.
.
.
.
.
Add Parts
This list shows any added parts to the project. Typically, these are parts that a technician added to their work order to complete the job. But project managers can also add parts here so they are available to add to a future work order. If the Project is part of a Sales Order, these parts are available to add to a Change Order, modifying the scope of the sales jobs. Stand-alone or Service Projects will have these parts added to the invoices as they are generated.
A number in the tab indicates the number of parts that have already been added to the Project.
The list of parts provides:
- Part Number
- Quantity added to the project/work order
- Ext Price the dollar amount of the part as sold to the customer.
- Ordered the quantity of parts that are on an un-received Purchase Order.
- Allocated the number of parts that have been staged for the customer and are ready for delivery.
- Delivered the number of items that have been marked delivered to the customer.
- Memo is any note added to the item when it was added to the job.
- Serial Number is where the serial number will display when it is scanned or entered.
If the part was added to an invoice, this dollar sign will be displayed. Hover over the $ to see invoice details
The black check indicates that a task was created for this part

As stated earlier, parts that have been added to associated work orders will display on this list. But if you need to add a part directly to the project, click the Add New Part button.
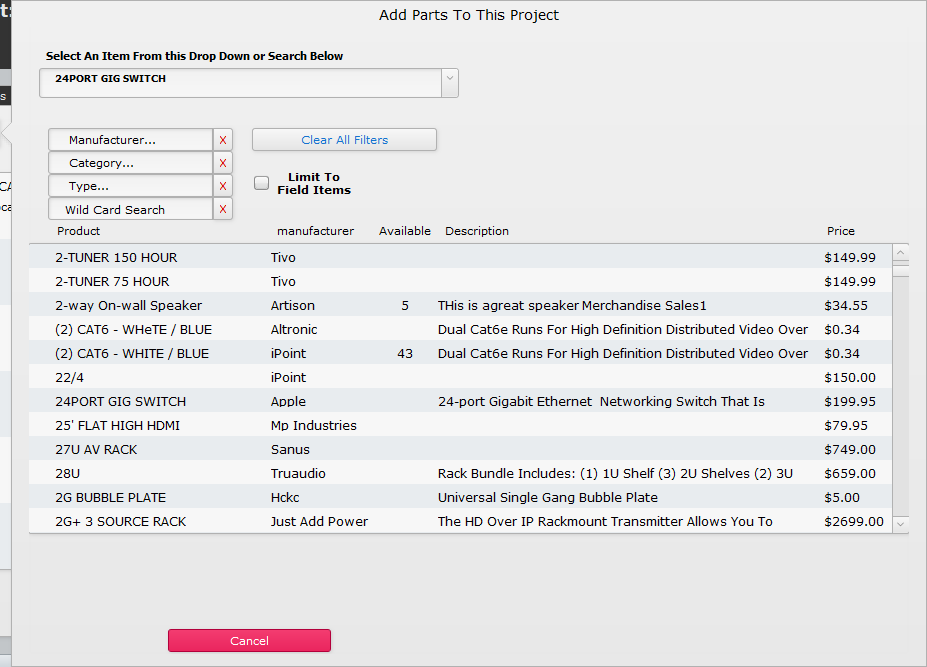
In the pop-up window, find the part you want to add by:
- selecting it from the dropdown list of parts. You can also type the part number here if you know it.
- using the Manufacturer, Category, or Type filers
- entering a Wild Card Search
check the Limit To Field Items to reduce the list only to items typically stored on service vans
- The list of parts displayed will be filtered based on the search criteria entered above
- Click on the part you want to add to the project
The list of parts display
- Product name
- Name of the Manufacturer
- The quantity Available in inventory – New in 9.1028
- A Description of the part
- The sale Price
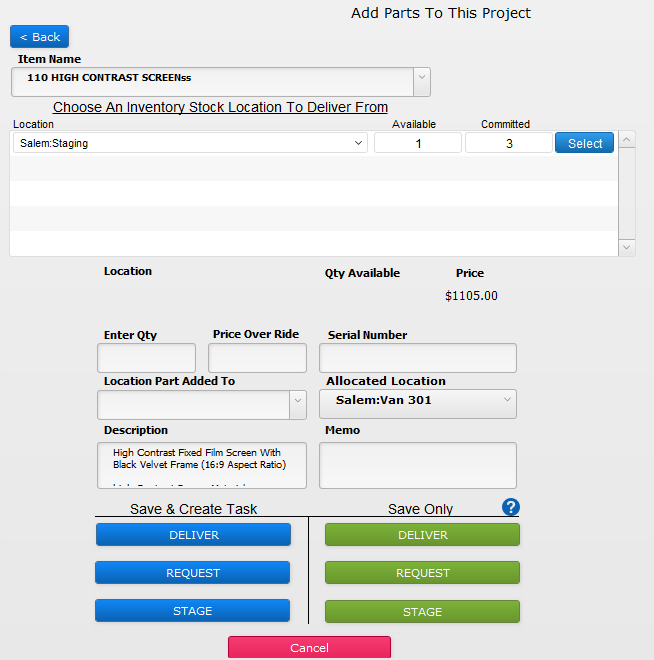
Once the part has been chosen, you’ll see a new window
- Choose an Inventory Location where you will be pulling the part by clicking the blue Select button
- Enter Qty – define how many of the parts you are adding
- Price Over Ride – enter a value if you want to change the price charged to the customer
- Serial Number – manually enter the serial number of the item, if available
- Location Part Added To – define where the part will be added using the dropdown menu to pick a predefined location or manually typing in the name of the location.
- Allocated Location – this tells iPoint where the part is being staged (like a van or staging area)
- Description – the part’s description is displayed. You can edit it if you like.
- Memo
The blue buttons are going to add the part and create a task for a technician to complete at a later date. The green buttons will only add the part, with no task.
- Deliver – moves the part out of inventory and delivers it to your customer
- Request – Use this when you don’t have inventory available. The part will be added to the job and to the Purchase Request Manager, notifying the purchasing agent that the part needs to be ordered or allocated from existing stock.
- Stage – moves the part out of Available inventory and allocates it to this project. This will keep the part from being used on another job. This puts the part in the queue to deliver to your customer at a later date.
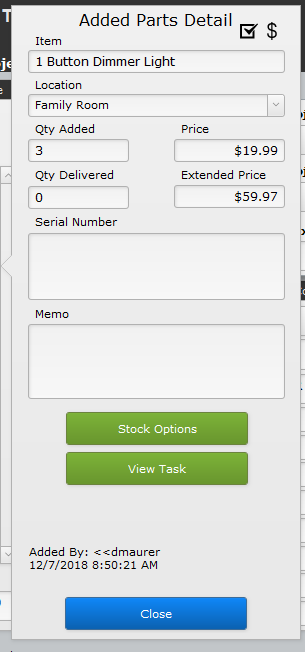
Once parts have been added to the project, you can click on the item name in the added parts list to open a pop-over window with more details about the part.
- The icons at the top of the window indicate:
a task was added to the project with the item
the item has been added to an invoice
click the trashcan to delete the item.
- Item Name
- Location (this can be modified here)
- Qty Added – this number reflects the quantity added to the project. The quantity can be manually changed if one of the following scenarios is met.
- Reduce – the quantity requested can be reduced to the number of items ordered + staged + delivered. For example, 25 wall plates were added to the project. 5 plates have been allocated, 5 plates have already been delivered, and 5 have been placed on a purchase order. That is a total of 15 plates that have been ordered, staged, and delivered. You can reduce the number of plates added by changing the 25 to a 15. However, iPoint will not let you change the quantity to a number lower than 15. – New in 10.0609
- Increase – you can always add to the number of items requested. So if you have delivered 3 widgets, you can go back and increase the Qty Added to 7. – New in 10.0609
- Price (this can be modified here with the correct permissions and if the part hasn’t been billed already)
- Qty Delivered
- Extended Price
- Serial Number (you can manually enter serial numbers in this field)
- Memo (you can add or modify existing memos here)
- Stock Options button – opens more details about the available stock and stock transactions for the item.
- View Task button – takes you to the task on the Tasks/Parts window.
.
.
Time
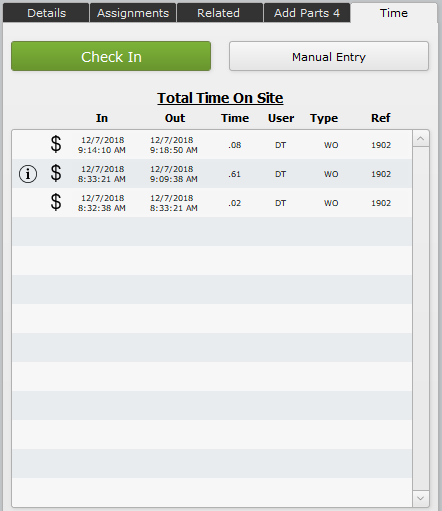
The Time tab is where all of the time tracked for the Project is displayed. This included time entered by technicians on Work Orders as well as time entered by your project management staff entered here.
Time on Site is displayed by entry, including
– this icon indicates a memo has been entered on the time entry
– this icon means that the time has been added to an invoice
- In The start date and time of the time entry
- Out The end date and time of the time entry
- Time The total time between in and out entries
- User The initials of the individual who clocked the time
- Type Where the time entry took place
- WO = Work Order
- Project = Project
- Ref The reference number of the work order

To track time on a project, simply click the Check In button to open a pop-over window where you can select the Labor Phase. The check-in button will turn into a Check Out button and the time will start accumulating. When you are done working on the project, click the Clock Out button to stop tracking time.

Another time entry option is to manually enter your time. First, you’ll need to pick a Resource (name of the user) and a Labor Phase. And if you want, you can enter a Memo, too.
- Option 1 – Choose a Start Date and Time using the entry fields. iPoint will calculate the amount of time you spent.
- Option 2 – Enter the number of minutes you spent working on the job. iPoint will add that amount of time on an entry for today.
- Option 3 – Pick a preset Quick Time Entry to add that amount of time to today.
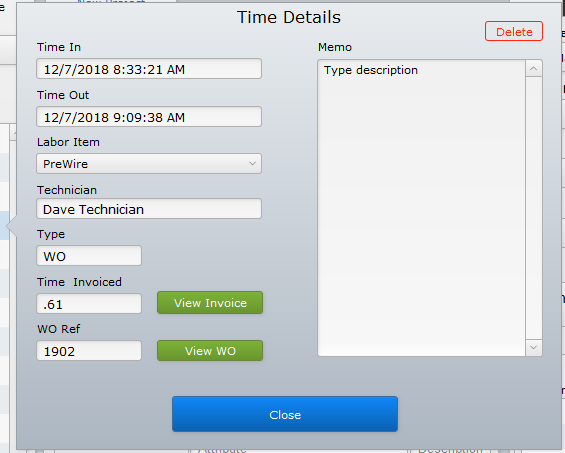
Click on any time entry to open the Time Details window. From here you can, with the correct permissions, modify
- Time In
- Time Out
- Labor Item (also knows as Labor Phase)
- Technician (view only)
- Type (view only) of time entry
- Time Invoiced (view only) – if the time was added to an invoice, you’ll see the quantity of time put on the invoice
- View Invoice button will open the invoice. If there is no invoice, there will be no button.
Not Billable – before the time entry being invoiced you have the option to mark this box to keep the time from being included on an invoice in the future.
- WO Ref (view only) – lets you know what work order the time came from
- View WO button will open the work order where the time entry was created. If there is no work order, you won’t see the button.
- Delete button deletes the time entry. You must have appropriate permissions to see this button.
- Memo
Center Section
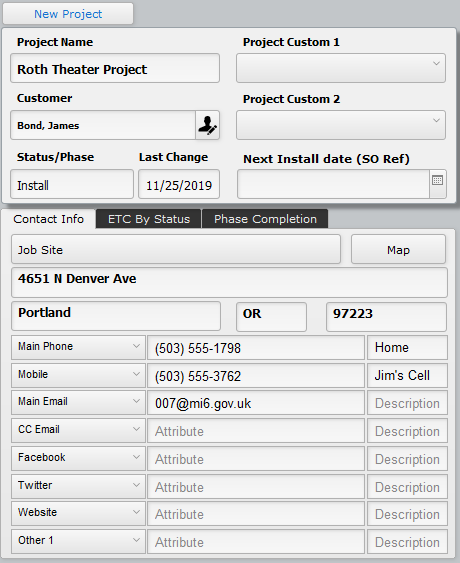
The center portion of the Project Details screen gives access to customer and job-related details.
- Project Name – this is the name of the project and can be modified here. If this project is tied to a sales order, the name will typically be the same as the associated Sales Order.
- Customer – the name of the customer that is being billed for this project. Clicking the edit button (
) opens a pop-up window where you can see all of the customer contact information in one place. This is also where you can quickly navigate to the customer record in the CRM module.
- Status/Phase – Change the status of the Project using this field. These statuses are set by a system administrator in Settings > Pop Up Lists > Project Phase.
- Last Change – Any time the Status/Phase is changed, the date will be updated to reflect when the change occurred.
- Project Custom 1 and Project Custom 2 – iPoint may be missing details that you want to track for your company. The custom fields are available for you to track other aspects of your business, and can be set up by a system administrator in Settings > Module Settings > Project and Settings > Pop Up Lists > Project Custom 1 & 2.
- Next Install Date – this field is tied to the Sales Order field of the same name.
Contact Info
This tab displays the customer address and contact details.
- Address Type click the button to display a list of available addresses, like the billing address vs. the job site address.
- Address the matching address to the type selected above.
- Map button – click this button to open the address in your favorite web browser map app.
- Contacts Methods – the list of contact methods is defined by a method type (dropdown), an attribute (the contact details), and a description (a memo field for the contact). The contract type is defined by the software so that they tie to QuickBooks contact fields. While you can change the order they appear, you cannot add other types of contacts.
Note: Editing the contact information in this section changes the master customer record in CRM.
ETC By Status
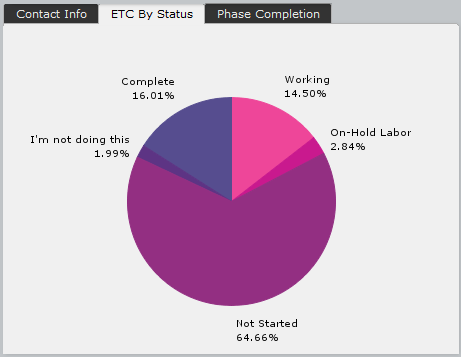
The Estimated Time to Complet by Status tab provides a graphical representation of the project tasks and their status. The total estimated time to complete all tasks is displayed as a pie chart. The total ETC of all tasks in each status is displayed as a separate slice of the pie. Unfortunately, this is not Pie à la Mode, so no ice cream is included in this graphic.
As a reminder, statuses are defined in settings and assigned to tasks by technicians as they work through the job.
.
.
.
.
.
.
Phase Completion
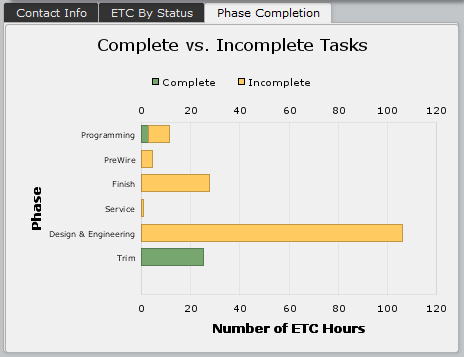
The Phase Completion graph is another way to see the progress of the project. Each phase is broken out into a separate bar reflecting the amount of time needed to complete that phase. As tasks are completed, the bar will fill in with a green color to reflect the time completed. This chart will also adjust as new tasks are added from the sales order.
.
.
.
.
.
.
.
.
.
.
Right Section
The right section of the Project Details provides specific information about the company side of the job.
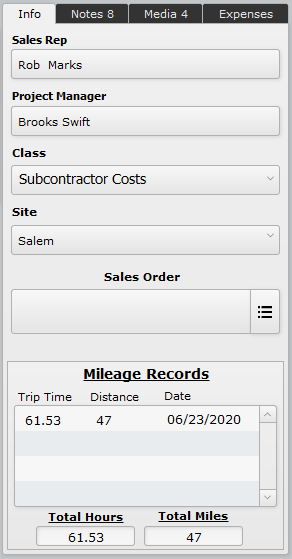
- Sales Rep – this is the name of the user assigned as the sales representative on the job. To change the Sales Rep, click on the name to open a pop-up window where you can select a new user.
- Project Manager – this works just like the sales rep above and is the name of the user who is assigned to manage the project.
- Class – if your company uses classes in QuickBooks to report on various segments of business, you can choose the appropriate class here. Your system administrator may have made this a required field, forcing you to make a selection when you create a new Project.
- Site – this field is visible when you have multiple sites for your company. You can assign this Project to a specific site, which also affects how inventory is pulled for this project. Companies that do not use multiple sites will not have this option.
- Sales Order – This field displays the associated Sales Order name. Stand-alone service projects will not have a Sales Order reference.
- Click the details button (
) to open a pop-over window where you can
- Clear Sales Order Reference – use this to remove the project from a sales order
- View Sales Order – this is a quick navigation link to the sales order
- If the Sales Order reference is blank, click the details button to open a list of available sales orders where you can Link to the project.
- Click the details button (
- Mileage Records – this portal will display any mileage records associated with the project. Mileage is added in the Autos module and appears both here on the project and on the associated work order.
.
.
.
.
.
.
.
.
.
.
Notes
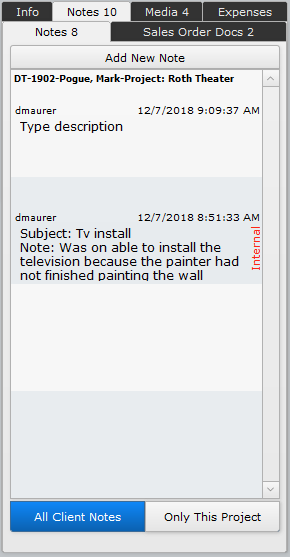
Notes from throughout the system are displayed here on the Notes portal. These notes can come from CRM, work orders, projects, or sales orders and help capture customer details that might be useful now and in the future to help provide better service to your customers. The notes are displayed with the most recent note at the top of the list. If the project has notes included, the tab will show you how many notes there are ( e.g. Notes 10 )
The portal will display a synopsis of each note, describing
- Note Source – the work order reference will tell you what work order was used to create this note
- User – the user who entered the note
- Date and Time – this is when the note was first entered
- Subject – if the note had a title entered, it will display here.
- Note – the text of the note itself.
- Internal – if the note has been marked to be internal only, it will be flagged as such.
Notes entered into the system can be printed on a couple of different reports throughout iPoint. As such, you should figure that any note you enter is client-facing. Sometimes, though, there are notes you want to capture internally. Internal notes are not included on reports the customer will see.

Creating a new note is as simple as clicking the Add New Note button. Then just add the note and check the Internal Flag checkbox, if needed. iPoint will automatically enter the time stamp and your user information.
By default, the message portal is going to show only notes that are associated with this Project. Those could come from a Project Manager adding comments here or from a technician adding a note when he clocks out of the work order. Additionally, a technician might have documented a special hook-up note or the fact that the owner has a big Doberman Pinscher.

However, you might need some information about a service call that was made a couple of years back on a completely different project. Click the All Client Notes button will load notes for this customer no matter where they were entered in iPoint. The Only This Project button will toggle the view back to only those notes associated with this project.
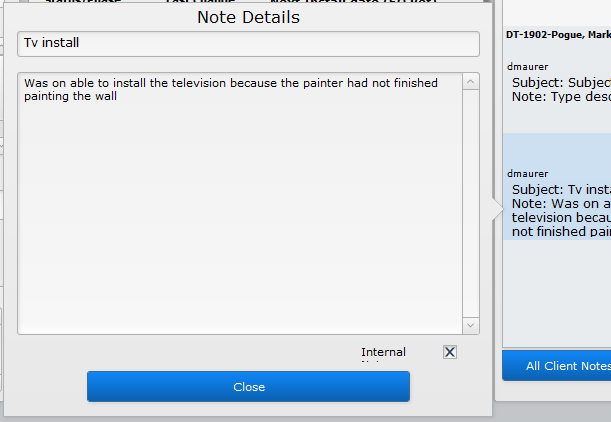
You may notice that the Note Portal doesn’t have a lot of space for a lengthy note. But never fear, you can read the entire note by clicking on an individual note to open a Note Details window. And from here, with the correct permissions, you can edit the Subject, Note, and even change the Internal flag.
.
.
.
.
.
.
.
.
.
Sales Order Docs
Similar to the Notes, you can look at documents that have been added to the Sales Order. This might include drawings, product details, or photos added by the sales staff to the sales order. The Document Portal shows:
- Document thumbnail
- Description field
- Preview button – no surprise here, this button will open the document in the associated software, Acrobat Reader for PDFs, Microsoft Word, for Word documents, and so on.
In order for Sales Order documents to be accessible on the Project, it must be marked as Viewable on Project/WOs on documents tab of the Sales Order.
Media
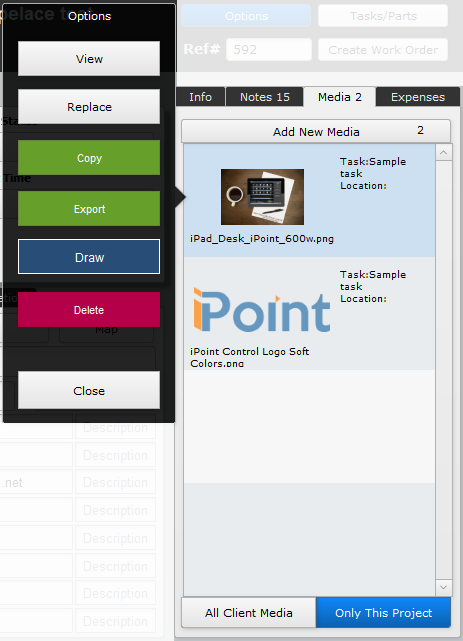
The Media tab works just like the Notes tab except it is for pictures. As pictures are uploaded for this customer on work orders, CRM, and even here on the project, they will be visible on this tab. Pictures are displayed in date order, with the most recent images at the top of the list. Each image displays:
- Image thumbnail – click on the image thumbnail to open a larger view of the media.
- Image Name (if it has one)
- Task – the name of the task where the picture was uploaded
- Location – the location or room where the picture was designated
- Draw button – this is a legacy feature that is no longer supported by iPoint. So ignore it. This is not the button you were looking for.

To add a new picture, click the Add New Media button to open a new window. Right-click in the image field and choose “Insert Picture…” to open a browser where you can navigate to the picture on your computer to upload. You can also drag the picture from your computer into the image field to upload the picture.

Just like in the notes section, the default media displayed are images associated with this specific project and its associated work orders. If you would like to see all of the images uploaded for the customer, click the All Client Media button to change the view. The Only This Project button will toggle back to showing only the Project’s media.
Clicking on an individual photo or media file reveals a new pop-over window with multiple options available: – New in 9.1201
- View – causes the image to be opened up a full resolution for better viewing
- Replace – opens the Insert File dialogue so you can navigate to a location on your computer and upload a replacement file or image
- Copy – saves the media file into your computer’s clipboard so you can paste it into another application
- Export – opens your computer dialogue so you can save the image to your hard drive.
- Draw – draw shapes, lines, arrows, and input text on an image with the draw feature. Note: This only works on images, not PDF files. Drawing is a legacy feature that is no longer supported.
- Delete – is how you get rid of the picture from iPoint.
- Close – closes the Options window
Expenses
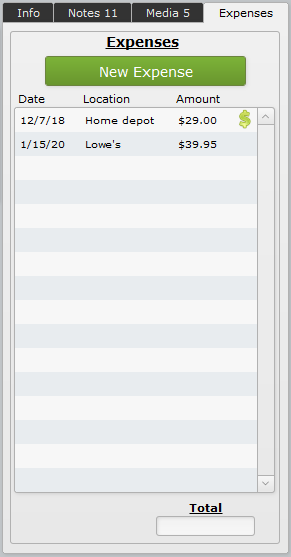
The Expenses tab holds all of the expenses your staff has incurred during the job. An expense is something where the technician, for example, had to pick up some miscellaneous parts at the hardware store because he didn’t have the appropriate parts in his van. Expenses can be charged to your customer on a change order (for sales jobs) or an invoice (for service jobs). Expenses are only used for a product that has to be purchased in the field. The product that is taken from any inventory location would be handled on the Add Parts tab described earlier on this page.
The expense list shows
- Date of purchase
- Location where the goods were bought
- The Amount of the purchase
If the expenses have been charged to a customer, you will see a green dollar sign.

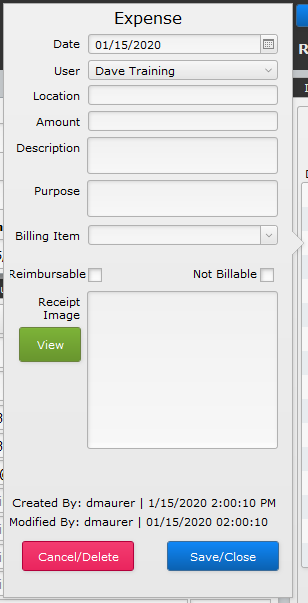
Most expenses are added by technicians on a work order. But if you need to add expenses here on the project, you do so by clicking the New Expense button to open the Expense Details window.
- Enter the Date of the purchase
- Pick the User who purchased the expense
- Location – enter the name of the store where the goods were purchased
- Amount of purchase (in dollars)
- Description of what was purchased
- Purpose – why did you buy the stuff?
- Billing Item – if the item you purchased is something you normally carry in inventory, you can select the iPoint inventory item here.
Reimbursable – a tick in this checkbox adds the expense to the user’s expense report so that the office can pay them back for the purchase.
Not Billable – a tick here will keep this expense from appearing on an invoice to the customer.
- Receipt Image – right-click in the image box to load a picture of the receipt. Gone are the days of accounting asking for a receipt, because you can tie it right here. Note: If you are using iPoint on an iOS device, click in the receipt image box will activate the camera on your phone so you can take a picture of the invoice!
- View button – If you have an image of the receipt, this button will give you a larger view of the receipt thumbnail.
- Created By: This is the user name along with the date and time when the expense was created
- Modified By: If someone has adjusted the expense, you can see the user’s name and date that the data was last changed
.
.
.
.
.
.
.
.
.
.
.
.
.
.









 click the trashcan to delete the item.