Portal is a third-party, online tool used to streamline order processing, among other things. iPoint has partnered with the good folks at Portal to make their vendor item database available for you to import into iPoint. And if you send your dealer agreements to Portal, they will also track your pricing for you so that you can maintain a list of items and current prices in the iPoint database.
The Portal button in iPoint opens a new window where you can search for items to include in your iPoint database.
Importing Items
To find specific items or manufacturers, enter a search term in the Search Portal field. The results will be displayed in the list below.
The X at the right side of the search field will clear the text you entered.
Use the Favs Only, In Stock, and Authorized search toggles to refine the search a bit more.
- Favs Only – displays only items you have marked as favorites on the Portal.io website.
- In Stock – will only show products that are listed as in-stock by their appropriate vendors.
- Authorized – will limit the list to items you are authorized to purchase through Portal.
Directly under the search toggles are several available filters.
- The Top Categories section lists a breakdown of items into deeper categories. Searching for LED, for example, will return categories such as TVs, Cameras, Dimmers & Switches, Monitors, and so on. The numbers following these categories represent the number of items in each category. Click on any Top Categories to restrict the list of items displayed to items from that category. For example, clicking TVs in our LED search will limit the list to show only televisions.
- Next, you will see a Top Brands filter where you can filter the list to only show Samsung products.
- You can un-select any filter by re-clicking the filtered name.
- With any filter selected, you will see a Clear All Filters button – which returns an un-filtered list.
The list of products in the central part of the screen will display Manufacturer, Model number, Description, Cost (based on the dealer agreements Portal has on file for you), and Sell Price. Next are the Select and Camera buttons. The camera button will display the image Portal has on file for the particular items.
The grey Select button will turn orange when you’ve selected a particular item.
Across the bottom of the item list, you may see a series of numbers.

These numbers represent multiple pages of product matching the search, toggles, and filters you’ve selected.
- Use the << and >> arrows to navigate between pages.
- Or click on the numbered page you want to open.
- Clicking the … ellipsis will advance the list ten pages at a time.
Choose the items you want to import into the iPoint database from Portal by clicking the appropriate select buttons. Then, you can navigate between pages of items without losing the items you’ve selected.
Once you’ve selected the items you wish to import, click one of the import buttons at the bottom of the screen.
- Import Selected will pull the items you chose into the iPoint database. We sync all the fields of information available. Just be aware that not every manufacturer has all the details we utilize in iPoint. So it is best to review the information to make sure it matches your expectations.
- If you’ve only selected a single item, you can choose the Import & Edit button. This will open the item details window after import, where you can quickly adjust any of the information Portal is syncing to your database.
*Important*: When you click import, iPoint will first check to see if there is an existing item in the iPoint database that matches either the Item Name or the Part Number. If either of those fields matches precisely the item you are importing from Portal, iPoint will link the new Portal item to the existing iPoint item. If there are no matching items in the iPoint database, iPoint will create a new item with the information from Portal.
When we say “matches exactly,” we are talking about punctuation and spacing, too. So if you have an XBR-75×950h in iPoint, but Portal lists it as an XBR75×950h (notice the missing hyphen), iPoint will consider them to be two different items.
At the top of the item list are two helpful buttons:
All will select every item on the current screen.
None will de-select every selected item on the current screen.
Updating Items
When viewing the list, you may notice that some items have an In Library button instead of the Select button. This means that you have previously imported that item into iPoint.
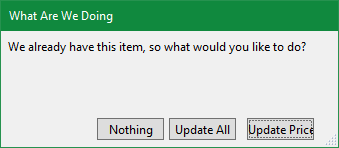
Selecting the In Library button will change it to an orange Update button. Clicking Import Selected at the bottom of the Portal window now presents you with some new options.
- Nothing cancels the import process.
- Update All will change any field in the iPoint database to match the current field in Portal.
- Update Price will only update the purchase cost and sales price in iPoint to match the current Portal values.
There are options in Settings > Integrations > Portal that allow you to determine which fields are pulled from Portal. You can also choose to have iPoint automatically update specific fields without user interaction.


