
The Item Details options button provides three tabs:
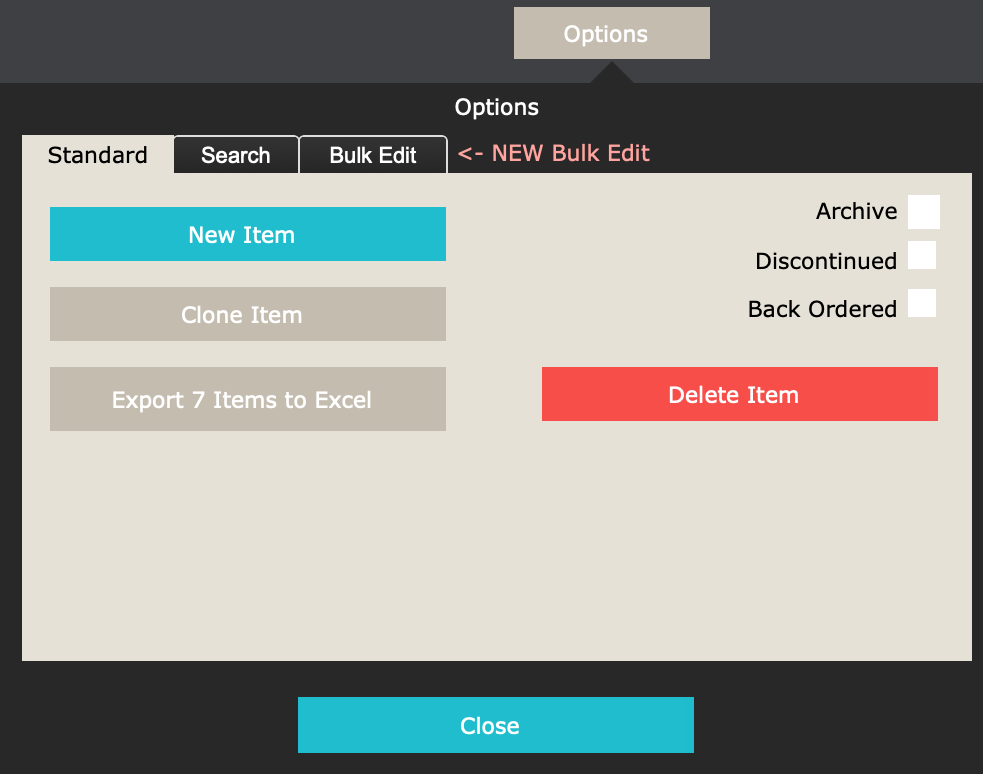
Standard Options
- New Item – press this button to create a new blank item that you can fill out details to make a new item. It’s like magic!
- Clone Item – this button makes a copy of the current Item. The new clone will have the word (Copy) after the item name.
- Export ## Items to Excel – use this button to export the current found-set of items into an Excel spreadsheet.
- The button label indicates the number of item records that iPoint will export
- Navigate back to the Items List
- Use the Options button on the Items List to search and filter the list
- Additionally, you can use the Wild Card Search field to search for specific items
- Once you’ve filtered and sorted the list, the number of items showing is displayed on the top left corner of the Items List
- You will note that this number matches the number on the Export ### Items to Excel button
- Delete Item – the button deletes the displayed Item and may not be available if you do not have the appropriate permissions.
![]() Archive – placing a check in this box causes the Item to be hidden from the list view so that users cannot find it for use in future proposals, work orders, or invoices. Keep in mind that archived items will still be visible on existing documents where they are used.
Archive – placing a check in this box causes the Item to be hidden from the list view so that users cannot find it for use in future proposals, work orders, or invoices. Keep in mind that archived items will still be visible on existing documents where they are used.![]() Discontinued – a check in this box informs users that the part added is discontinued. Use this box if an item is no longer available from a vendor, but you have existing inventory that you want to sell through.
Discontinued – a check in this box informs users that the part added is discontinued. Use this box if an item is no longer available from a vendor, but you have existing inventory that you want to sell through.![]() Back Ordered – a check in this box will inform users that the part added is back ordered.
Back Ordered – a check in this box will inform users that the part added is back ordered.
 Item Search Options
Search Options
- Enter Find Mode – this button opens a blank Item Details screen.
- Click the Enter Find Mode button, and you’ll see a blank Item Details screen.
- Any field with a magnifying glass is searchable. Either type text in a field or use the dropdown list to select a value.
- Continue entering data until you have all the search criteria you wish to enter.
- Click the Options button > Search tab > Perform Find button
- You will be taken to the first Item that matches your search criteria.
- Use the << or >> arrows at the top of the window to scroll through the list of matching items, displayed as ## of ## items.
- Alternately, to exit the find functionality, click Options button > Search tab > Cancel Find button.
- Search with Barcode – click this button to perform a search using your optional barcode scanner
- Show Omitted – press this button to show all of the items that are not in the found set using the Enter Find Mode button.
.
.
 Item Detail: Bulk Edit Options
Bulk Edit Options
Use the Bulk Edit tab to change the details on multiple items simultaneously.
Showing ## Items – this shows the number of items that will be edited.
- Go to the Items list and find a particular list of products using the Options and Wild Card Search. Note the number of items in the top left corner of the item list
- Open the Options > Bulk Edit and confirm that the number of items matches the Showing ## Items
- Step 1 Select Field – use the dropdown to choose which item detail field you want to edit in the found set.
- Refer to the Item Details description and the Item Details > Additional Settings in the manual to understand how each field option is used.
- Step 2 Select New Value – enter the value desired for the field selected in step 1
- This will either be a dropdown of available options for the field
- Or, a text field so you can manually enter a value
- Step 3 Execute the Change – press the Perform Bulk Edit button to perform the bulk edit.
iPoint will go through every Item on the found list of Items and make the changes you defined.
iPoint Version:
10.0916
Last modified:
13 Feb 2023