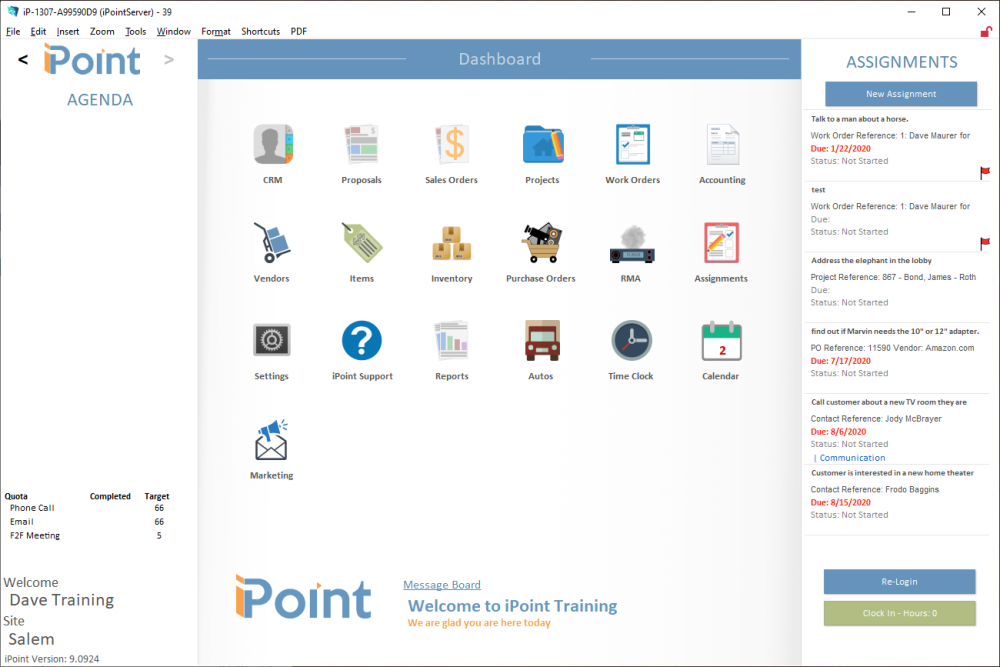
The dashboard is the home screen for all iPoint activities. Here you will find details for completing your work and navigational tools to help you get to specific information within iPoint.
Left menu
Navigation
At the top of the screen, you will find navigation arrows to the left and right of the iPoint logo. These arrows are displayed on nearly every screen and help with forward and backward navigation.
- <: The back arrow will take you to the screen you viewed before accessing the current screen.
- >: The forward arrow is active after navigating backward.
If either arrow is unusable, meaning there is no place to go forward or backward, a pop-over box will display “Nowhere to go…” when you hover the mouse over it.
.
.
.
Agenda
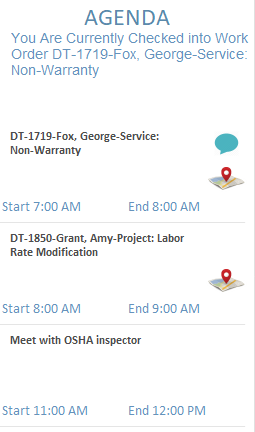
The Agenda displays the things you need to accomplish today.
- First, you will see the work order in which you are currently checked. Clicking on the work order will load that specific work order for you.
- Next, you will see a list of what you need to accomplish. This list could be work orders or appointments from the iPoint calendar. The entry shows:
- work order or event name – click on the title to open that work order or appointment.
- start and end time
- thought bubble displays if there is a description on the work order or event – click on the bubble to read the description
- map icon is clickable to open the address of the work order or appointment on your favorite map website.
.
.
.
.
.
.
.
Activity Quotas
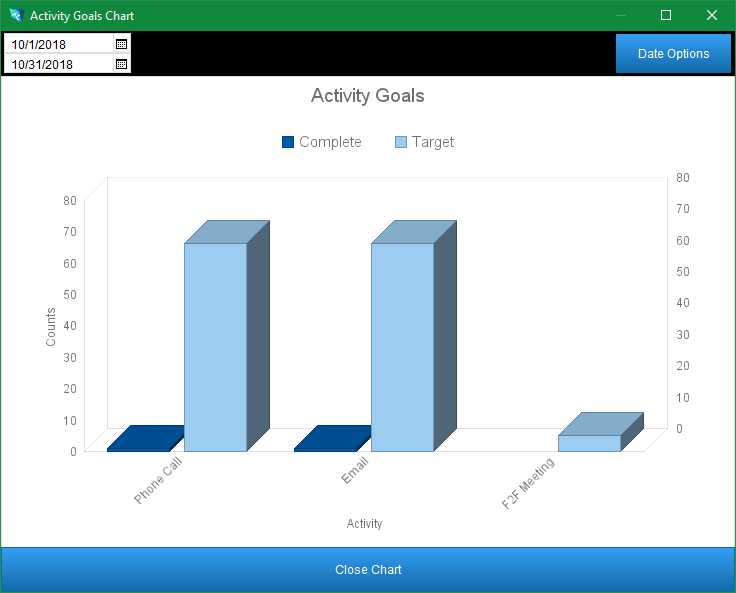
Activity quotas display various employee activities goals. Typically used for sales personnel, the activities can help staff members make sure they are accomplishing a prescribed number of sales tasks in a given period. (Setup of activities and quotas are accomplished in Settings > Pop Up Lists > Activity List and Settings > Users > Goals.)
- Activity: shows the specific activity type
- Completed: displays the number of activities that have been completed during the prescribed time frame.
- Target: shows the number of activities you should complete. The prescribed time frame is calculated using User Settings and the Activity Goals.
Clicking on the Activity Quotas will open a pop-over Activity Goals Chart. Here you can set date ranges and options for information being displayed. A system administrator sets the actual quotas per user in the Settings module.
- Date Range: In the top left corner, enter a start and end date to specify a particular range.
- Date Options button: You can choose preset date ranges and set the default for your displayed activities here.
- click Go to Default Options to load a previously set default date range.
- next, select a predefined date range: current month, last month, current week, last week, today, or yesterday. You can also set a specific number of days by entering a number and clicking the Set button.
- to save your choices as the default view, click Copy to Default Options. When you log in to iPoint, these settings will stick for the logged-in user. You can also revert to this default by clicking the Go to Default Options at the top of the window.
- Close button will close the Date Options pop-over.
- Close Chart when you are done setting options and looking at various date ranges.
User Info
The bottom of the left menu displays the currently logged-in user’s name.
If your company utilizes Multi-Site Inventory (companies with more than one physical location), the dashboard will display the location to which you are logged in. Clicking on the Site name opens a pop-over window where you can choose another physical location, provided your system administrator has permitted you to access other sites.
It also displays the iPoint software version number.
Modules
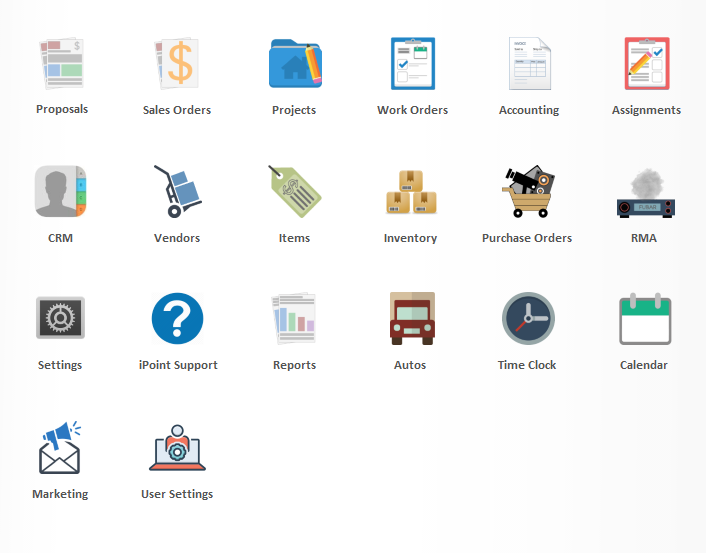
The center of the dashboard houses the links to each specific module.
Modules are displayed based on the permissions set by your system administrator. So some modules may not be visible to all users.
Additionally, the module display order is user-definable. Click here to learn how to customize your module order.
Here is an alphabetical listing of available iPoint modules with a brief description of how you’ll use them. Click on the module name to be directed to that portion of the iPoint Online Manual.
- Accounting – invoices, requests for payments, gift cards, payments, and recurring invoices all take place here.
- Assignments – this is our list of internal communication to your coworkers relating to jobs and processes in iPoint.
- Autos – track mileage and maintenance for your vehicles.
- Calendar – display work orders and events assigned to individuals.
- CRM – this is the repository for your customers and contacts. Start here to see documents attributed to a particular contact.
- Inventory – manipulating the inventory is done here, from purchasing and transfers to physical inventory and reporting.
- iPoint Support – gain access to the iPoint Support team as well as helpful tools like University Videos and the iPoint Manual.
- Items – everything you sell is displayed here, from parts and packages to labor and miscellaneous charges.
- Marketing – create campaigns and manage email lists to simplify mass communication with your contacts.
- Projects – labor, in iPoint, comes through a project, whether work on a sales job or service-related labor.
- Proposals – these are the quotes you are providing your customers.
- Purchase Orders – the documents used to buy products from your vendors. This module is also where the warehouse staff will receive products.
- Reports – print a variety of reports about how your business is running.
- RMA – track customers’ equipment that is pulled for repair in the Return Material Authorization module.
- Sales Orders – proposals become sales orders when the customer agrees to the purchase. The Sales Order becomes the hub of activity for sales-related activity.
- Settings – set details and finetune how iPoint works. Note: You’ll need to be set up as a system administrator to access this module.
- Time Clock – time entries for payroll.
- User Settings – in this module you can change your personal iPoint settings.
- Vendors – the list of vendors where you buy parts.
- Work Orders – this is where technicians will learn what they are scheduled to do and what parts they are to deliver. Job time tracking is also handled here.
At the bottom of the dashboard is a Message Board where system administrators can leave company-wide messages. Just click in the message space to change the verbiage.
Right menu
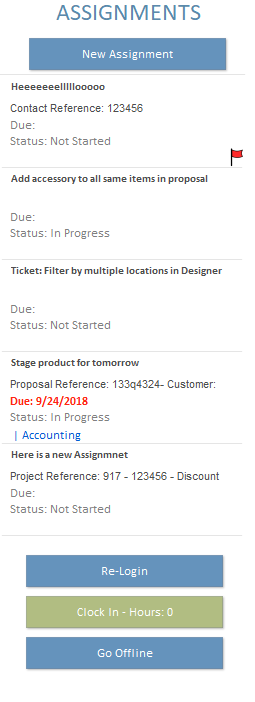
Assignments
Assignments are your internal to-do list and are displayed on the right side of the dashboard. Assignments are created in the Assignment Module and on nearly every module in iPoint and are used to ensure team members are aware of critical activities. Unread assignments are displayed at the top of the list and are labeled with a red flag. Once the assignment has been opened, it joins the rest of the assignments at the bottom of the list. Assignments are sorted based on the Assignment Sort set in the Assignments module.
Each assignment displays:
- Description: This is the specific task or action requested.
- Reference: displays what module or document this assignment is related to.
- Due: the date when you should complete this assignment. The date displays red if it is due today or past due. A yellow date indicates a date in the future.
- Status: shows the status of the assignment.
- Tag: if the assignment has a tag, it will be displayed.
- Red Flag: indicates that the assignment has not been opened.
Clicking on any assignment opens a pop-over window with more details about the Assignment.
More information about assignments is detailed in the Assignments portion of this manual.
Buttons
- Re-Login: this button lets you change the user logged in to iPoint.
- Pro User Tip: If your permissions have been changed, you can click the Re-Login button and then click the Sign In button without re-entering your credentials. iPoint will automatically relog you in with your existing credentials but your new permissions, without re-type in your Account Name and Password.
- Clock In/Out: click this button to track overall work hours, typically used for payroll or daily time tracking. The time clock should not be confused with Work Order time tracking. This button is available for hourly employees (set in Settings > User > Settings).
.
.
.
.


