In the Documents section, you can view documents that have been added to this customer’s record, such as contracts, signed proposals, etc.
View the Documents List
At the top of the Documents window are three valuable tools.

Use the wildcard Filter to find documents that contain a specific alphanumeric text string. The filter looks in the filename and Description for matching records.
- Use the red X to clear the search field.

The Bulk Import button opens a search window.
- Find the folder containing the documents you want to import
- Once imported, you’ll see the documents from the computer director you chose
- Click on the edit button next to each document to add title, description, and restriction details

- Jump to the Add a New Document section of this page for detailed instructions.
For each document, you can see:
- Document Thumbnail – a small picture reflecting the document type
- Title – you can give each document a title. Think of this as a subject line
- Filename – the actual name of the document as it was named on your computer
- Description – there is a description field where you can provide details about the document
- Created – the user’s name who added the document as well as the date and time they added the document
- URL* – each document can store a website address. You might use this to show where the document originated.
– click this edit icon to adjust the document’s details
Documents with restricted access will say Restricted along the left edge of the document.
Add a New Document
To add a new document:
- Click the New Document button at the top of the Documents window
- Alternately, the + button in front of the Documents menu header in the left side menu also opens the new document window
- Choose a document file from your computer and click the Insert (Mac) or Open (PC) button
- In the pop-up window, enter a Title and Description for the document
Use the Gears icon at the top left corner to
- Delete the images
- Enable Restricted Access
The Plus button at the top of the window creates a new, blank document window
- Note: You can right-click in the empty document space to open a dialogue box where you can Insert a file directly
- Click the Done button to save the new document to the customer’s document list
.
.
.
.
.
.
Edit a Document
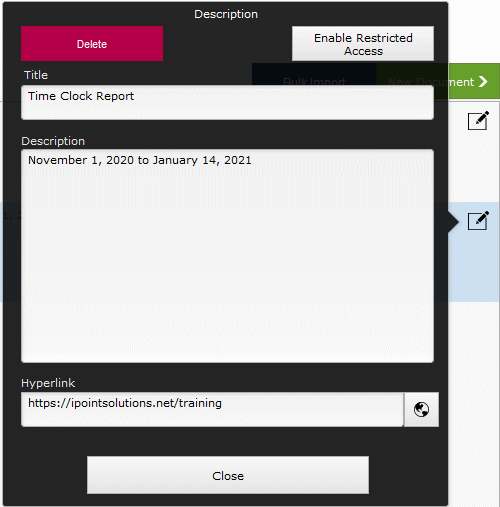
Click the edit icon at the far right of the document information to open a pop-over edit window:

Click the Delete button to delete the document from iPoint.

- Click the Enable Restricted Access button to turn on view and edit restrictions for this document. Restricted documents are not visible to users unless they are granted access in Settings > Permission Sets > Customers > Docs Full Access.
- On a restricted document, this button will change to Remove Restricted Access, which removes the restriction, granting access to all users.
Description Fields
- The Title field is the name of the document subject as defined within iPoint. Click in the field to change the Title.
- The Description field is a text field where you can enter a brief synopsis of the document.
- Use the Hyperlink field to store a web address.
- Click the Close button to save and close changes
.
.
View Document Options
While viewing the list of documents, you can click on the document thumbnail to see a list of available options for this document:
- View – opens the document in its native application on your computer
- Replace – you can change out the document without having to modify the document details
- Enable/Remove Restricted Access – turn on restricted access for the document so that only users with the appropriate permission sets will be able to view it (or turn off restrictions for a document with restricted access enabled)
- Export – save the document to a directory on your computer
- Copy – make a copy of the document to paste it into another location
- Email – send the document by email
- Draw – if you attach an image, such as a floor plan, you have the added option of a Draw button in the options menu. Draw shapes, lines, arrows, and input text in the image with the draw feature (note that you can only draw on images, not PDF files) Note: drawing on an image uses a legacy drawing feature no longer supported in iPoint. But we’ve left it here for those who still use it.
- Generate Preview – when you have a PDF loaded, it might show a thumbnail of a generic PDF document. Click the generate preview button to convert the pdf image into a thumbnail of the first page of the PDF.
- Delete – delete the document if you have the appropriate permissions
.


