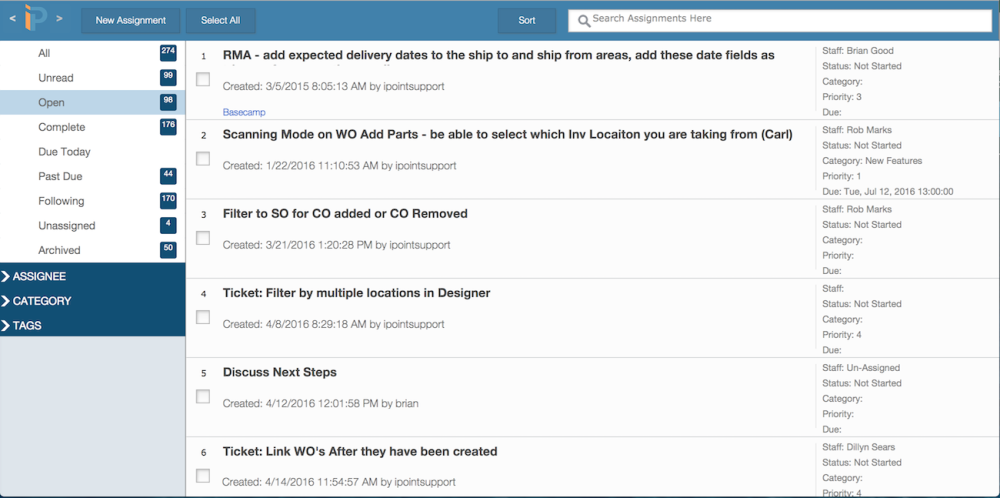
The Assignments Module is used to view, edit and filter assignments in iPoint. This module is permission-based in Settings >Permission Sets. You can view your assignments, along with any assignments assigned to other co-workers. You can access the Assignments Module from the Dashboard > Assignments.
There are four tools in the header of the assignment list.
- New Assignment opens a window where you can create a new assignment. Pretty snazzy, huh?
- Select All will place a checkmark in the box in front of all displayed assignments. Scroll to the bottom of this page for details on Assignment Options.
- When all of the assignments are checked, the Select All buttons changes to De-Select All.
- The Sort button allows you to display the list of assignments. Click here to get more details about the sort function.
- Search Assignments Here is the wildcard search. Type in a word or phrase to quickly find specific assignments.
When looking at the list of assignments, there are several visual queues.
- Active assignments are displayed in black text.
- Unread assignments will show a red flag.
- Completed assignments are displayed in gray text.
- At the far right of each assignment, next to the date, recurring assignments will display blue text stating what recurring cycle is used (i.e., Weekly, Monthly).
- Archived assignments will display a red ARCHIVED.
Assignment Groups
You can display assignments in several different views. These are listed at the top left of the assignment window. In addition, a blue box indicating the number of assignments in that particular view is to the right of each view. The number in these blue boxes will reflect assignments matching the various filters if filters have been applied.
- All – Displays all assignments, regardless of status, for all users you have permission to view, based on the Assignee(s) you have selected in the “Assignee” dropdown. (see below).
- Unread – Displays only unread assignments
- Open – Displays only open assignments
- Complete – Displays only assignments that have been completed
- Due Today – Displays only assignments due on the current date Assignments will be displayed regardless of status.
- Past Due – Displays only Assignments that are past their due date
- Following – Display all Assignments you are listed as a follower to
- Unassigned – Displays all Assignments that are not assigned to a specific user
- Archived – Displays Assignments that have been archived
Assignment Filters
Below the list of assignment views are three distinct filters. Clicking the arrow to the left of each filter expands that section.
Assignee
The Assignee is the name of the person who is responsible for a specific assignment. The list of users comes from Settings > Users and is defined by a system administrator.
To the right of each user is a blue box stating the number of open assignments assigned to that particular user.
Clicking on a user’s name highlights the user and displays their assignments in the assignment list. You can click on multiple names to include assignments from more than one person.
Click a user name a second time to un-highlight it, removing those assignments from the list.
You’ll notice that the Assignee section header displays the users that have been included. So even if the header is collapsed, you can quickly see which users are included in the filter.
Note: The list of assignees will show all iPoint users if you have the correct permissions. Users may only have permission to see their own assignments based on Settings > Permission Sets.
.
.
.
Category
Expand the list of categories by clicking the arrow in the Category header to reveal additional filters.
Click on a category to highlight it and display assignments that match that category. You can click multiple categories to filter the list of assignments by more than one category.
The number of open Assignments in each Category will be shown in the blue box to the right of each Category name.
- Use the
pencil icon to Edit an existing Category.
- Create a new Category by clicking the New Category text.
Note: Categories are edited here and not in the Pop Up Lists in Settings. This is one of the few exceptions in iPoint where a defined list is not created in settings.
Tags
Tags function just like Categories and are used to refine the Assignments even further.
Click on a type to highlight it and display matching assignments in the list. Click a highlighted type to de-select it.
- To add a new Tag, click the New Tag text in the Tag window and enter the new tag.
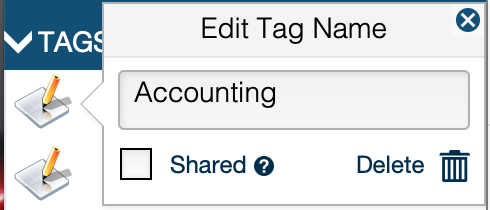
- Again, the
the pencil icon is used Edit an existing Tag. Tags can be user-specific or shared with all iPoint users. Click the Shared checkbox to make this tag visible to any iPoint user. Leave the checkbox empty to make the tag specific to the user who is logged in.
Assignments > Module > Edit Tag
.
.
.
.
.
.
.
Assignment Options
On the list of assignments, there is a checkbox in front of each assignment. Placing a check in this box activates some option buttons across the top of the screen. These buttons allow you to perform a variety of actions on one or multiple assignments simultaneously.
- Re-Open changes the assignment status from Complete to In Progress.
- Reassign opens a window so you can pick a new iPoint user name to change who is responsible for the assignment. This will also move the assignment to the dashboard of the new user.
- Recategorize opens a window where you can change the Category by choosing a new one in the dropdown menu.
- Archive hides the assignments from the active view. You can still see archived assignments by clicking the Archived selection in the left menu.
- When you select Archived assignments, you’ll notice two new buttons are available:
- Restore will un-archive or make the assignment active.
- Delete permanently removes the assignment. This is not recommended as we prefer to keep historical documentation available.
Sort Options
Clicking the Sort button opens a pop-over window where you can select the type of sort you want to perform.
- Assignment – this is the text in the body of the assignment. In the list, this is the bold text.
- Priority – the priority as defined on each assignment
- Date Due – the date and time the assignment needs to be completed by
- Date Completed – the date completed is generated by the system when a user marks the assignment as Complete.
- Completed – this will sort the list of finished tasks
- Tags – users can tag assignments with a searchable word or phrase. This sort will organize assignments based on the first tag given.
- Assigned – the person who is supposed to complete the assignment. Choosing this option sorts by the assignee’s last name.
- Date Created – the system generated timestamp applied to all new assignments
- Category – sorts the list of assignments based on the category.
- Status – Each assignment will be marked as “Not Started,” “In Progress,” “On Hold,” or “Complete.”
To the right of the Sort dropdown is an arrow. Click on the arrow to toggle between ascending or descending sort order.
Once your selections are complete, click the Sort button to reorganize the list of displayed assignments. Remember, the displayed assignments are modified by selecting different categories, tags, or other characteristics in the left-hand menu.
Note: The Assignments Sort also affects the order in which assignments are displayed on the dashboard and within the CRM.


