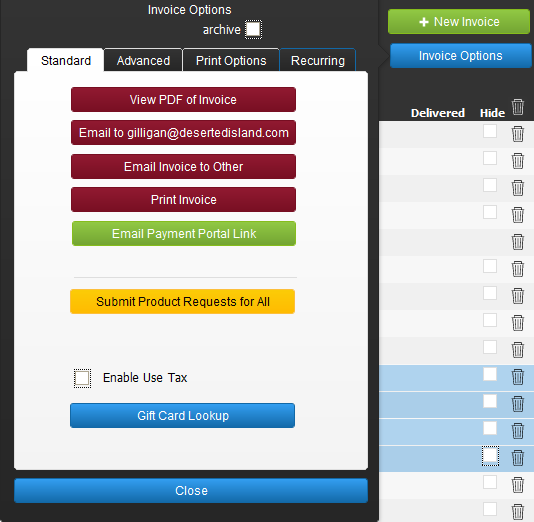
Standard
Archive – a check in this box removes the invoice from the standard list view. You can always see it later by choosing to show archived.
- View PDF of Invoice button – this button generates a PDF of the invoice and displays it onscreen
- Email to – if the customer has an email address defined in CRM, the button will display their address. Press this button to attach a PDF copy to an email in your default email program pre-addressed to your customer.
- Email Invoice to Other – this also generates a PDF and attaches it to an email. However, you will have to populate the email address manually.
- Print invoice – prints the invoice using your computer’s print dialogue
Note: Each option generates the PDF using the options from the Print Options tab described below. - Email Payment Portal Link – this button sends an email to your customer containing a credit card payment link and an attached PDF of the invoice. This option is only available if your system administrator has activated credit card processing in Settings > Integrations > Credit Card Processing Settings.
- Submit Product Requests for All – this button is primarily used in a retail Point-of-Sale environment. Once the product has been placed on the invoice, click this button to send the purchasing and warehouse team a request to order and/or allocate items to fulfill this sale.
Enable Use Tax – if your company is tracking use tax, this checkbox will be available. Checking it will cause the resulting invoice to process Use Tax.
- Gift Card Lookup – click this button to open a window where you can enter a gift card to see its available balance. Keep in mind that gift card payments are made in the Payment portion of the invoice.
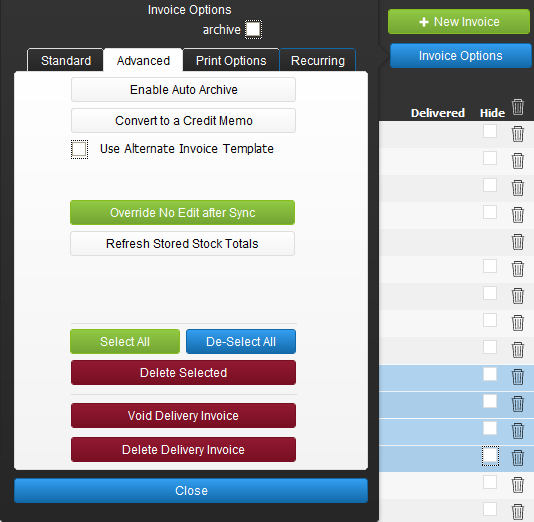
Advanced
- Enable/Disable Auto Archive – the enable button will cause the invoice to be archived when the full payment is received. Obviously, the disable button will cause the invoice not to be archived when paid in full.
- Convert to a Credit Memo – in the rare circumstance that you want to have the invoice as a credit memo, you can use this button.
Use Alternate Invoice Template – checking this box uses an alternate graphic header. Once checked, a new button appears:
- Email Payment Portal Link – if your company is utilizing the credit card payment option directly in iPoint, this button will allow you to send the payment portal link to your customer so they can pay their invoice online.
- Override No Edit after Sync – there is an option in Settings [ Invoice Lock if Synced to QB ] that restricts the modification of invoices once they have been synced to QuickBooks. If that option is checked, this button is visible to administrators and will allow the admin to change the invoice even after it was synced. Just be sure to resync it to QB!
- Refresh Stored Delivered Totals – items marked as delivered are stored in a separate field so that the invoice displays faster. Sometimes there is a delay between displaying the invoice and pulling in this data. This button allows you to update the file on demand to ensure the actually delivered quantities match the displayed quantities. – New in 10.0108
- Select All – click this button to select every line item on the invoice. You will notice that selected lines turn blue on the invoice preview. Click here for an alternate method of selecting individual lines. – New in 10.0804
- De-Select All – this button causes any selected lines to be de-selected. – New in 10.0804
- Delete Selected – click this button to delete all selected items on the invoice. – New in 10.0804
- Void Invoice – some accounting professionals don’t like to delete transactions, keeping the paper trail of modifications that have been made. If you fall into that camp, use the Void Invoice button to clear “remove” an incorrect invoice, leaving it for future reference. A voided invoice will be marked with the word *VOID*%(color-red)% directly above the QuickBooks button. Voided invoices are also marked as archived automatically.
- Delete invoice – this option is available by permission [ Settings > Permission Sets ] and will cause the invoice to be deleted.
Print Options
The options on this tab affect how the PDF of the invoice appears when printed, emailed, or otherwise generated.
- Accessories – an accessory is visible on the invoice as an indented item. Additionally, the invoice will display the line number in orange instead of black.
- Hide All – marks all accessories as hidden. The price for the hidden accessories is rolled into the price of the parent item. Alternatively, you can check the Hide checkbox on individual lines on the invoice to hide specific parts.
- Show All – clears all the hidden checkboxes so that all items print.
- Labor Items – any stand-alone labor line can be hidden. If hidden, it is included in a subtotal at the bottom of the invoice.
- Hide All – causes the hidden checkbox to be marked on every labor line.
- Show All – unchecks the hidden box on each labor line
- Print as Summary Only – selecting this option will cause the printed invoice to only show a total at the bottom of the invoice with no line item detail.
- Print as Hybrid – this option shows every line item without any line item pricing. The total price is still displayed at the bottom of the invoice.
- Summarize Same Items – if you have a large invoice with multiples of the same part on separate lines, this option will cause those lines to be condensed into one line. For example, if you have one Apple TV on one line and 3 Apple TVs on another line, the printed invoice will show a single line for Apple TVs and show quantity 4.
- Print as Line Item – this button causes each line to be displayed with price details. Note: Hide/Show Accessories and Labor Items are still useable options when printing line item detail.
The green dot will be displayed on the print option applied to this particular invoice.
Note: You can set a default invoice type in Settings > Module Settings > Invoices > Default Print Mode.
Recurring
The Recurring tab is where you define the recurring pattern for this invoice. For example, you would use this to create monthly billing for security monitoring or quarterly invoices for a service contract.
This process is detailed here.
.
.
.
.
.
.
.
.
.
.
iPoint Version:
10.0804
Last modified:
10 Sep 2021


