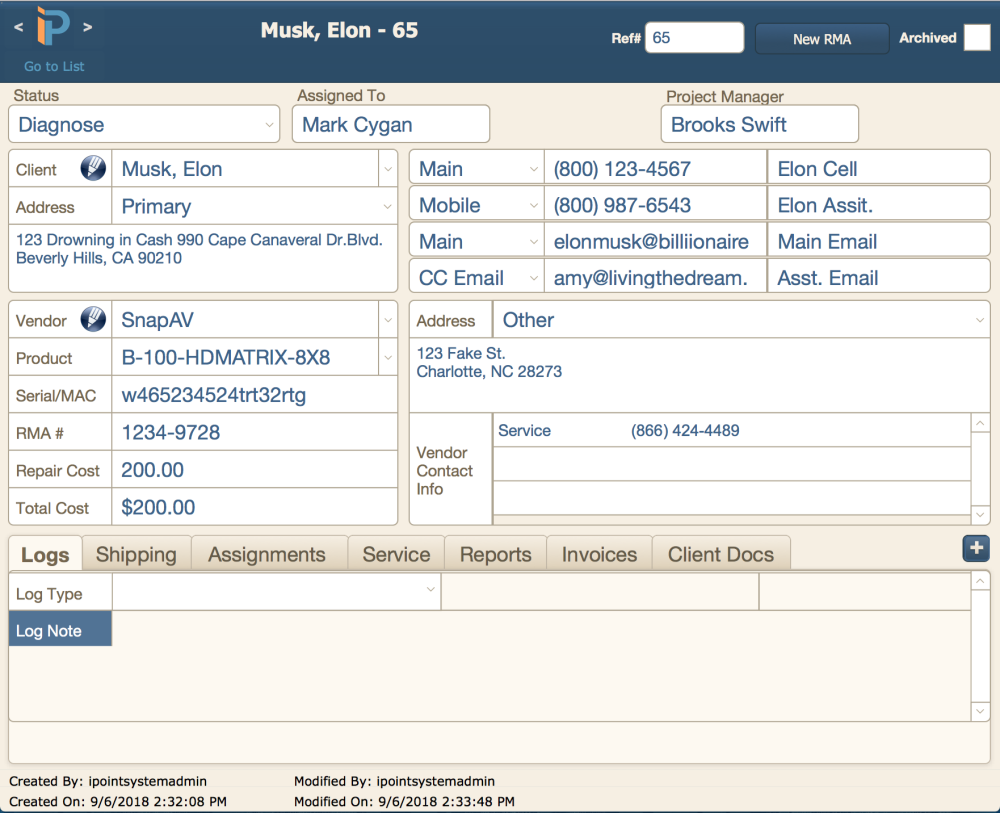
The RMA module is where you track a product that has been returned for repair or replacement.
Sort Dropdown
The RMA header contains familiar list navigation options if you’ve spent time in any other iPoint modules. Choosing an option displays the RMAs in the order of the sort name you choose.
- Assigned To – this is the user name who is currently assigned to the RMA
- Date Created – is the date that someone created the RMA on a Work Order, in the CRM, or here in the RMA module.
- Name – this is the customer’s name.
- Product – use this option to sort on the product that is being returned.
- Project Manager – the name of the project manager assigned to the RMA
- Site Name – if you use multiple site locations, you can sort the list based on where someone created the RMA.
- Status – shows the RMAs based on the progress through the RMA process as defined by status.
- Vendor Name – sort the list by the vendor’s name listed on the RMA.
Options Button
Show Archived – click the button to reveal RMAs that have been archived. This is a toggle that switches to Hide Archived button that will make the archived RMAs hide.
Export to Excel – some folks find it helpful to have the RMA details in a spreadsheet. Here is the button to make that happen.
- Click Export to Excel
- Fill in the Excel Options. These are optional fields
- However, you might find it helpful to check the Use field names as column names in first row checkbox.
- Click Continue…
- On the Specify Field Order for Export window, choose which fields you want to be exported. This is a description of each field available:
- archived – an archive RMA will display a “1” while an active RMA will have no value in this cell
- AssignedTo – the name of the user assigned to the RMA
- client_id_FullName – the name of the customer
- Date Created – the date and time someone created the RMA
- Name – the name of the RMA is the customer’s name, followed by the RMA reference number
- Product – the name of the item being returned
- productSerialNumber – the Serial/MAC field
- ProjectManager – the name of the iPoint user listed as the RMA’s Project Manager
- QuickFind | iOS – this field is used to make the system work but is not useful in an excel export
- Result Label Plural – this field is used to make the system work but is not useful in an excel export
- rmaNumber – the vendor’s RMA number
- Site Name – if your company uses Multi-Site Inventory this field displays which site the RMA is associated with
- Sort List Key – the status of the RMA
- Sort Selection – the sort field used on the list of RMAs when the export took place
- Status – this field is used to make the system work but is not helpful in an excel export
- totalRMACost – is the Total Cost field on the RMA
- vendorName – the name of the vendor associated with the RMA
- Globals::URL – this field is used to make the system work but is not helpful in an excel export
- Click the Export button, and the data will open in Excel on your computer.
New RMA button – No surprises here! Push the button – get a new RMA.
Wild Card Search helps you find a previously created RMA based on a string of text. We’ll search, Customer, Vendor, and Item name.
New RMA
Here is a description of each of the fields in the RMA
- Status is used to sort and filter RMAs by the Status of the RMA. This list is customizable in Settings > Pop-Up Lists
- Assigned To refers to the employee responsible for completing the return and repair of the product.
- Project Manager can be used to select the employee that needs the product after the return or repair is completed.
- Client refers to whom the Item belongs. Use the drop-down list to select the customer for this RMA. The system will fill the address and phone numbers in based on the customers’ information.
- Vendor refers to the company that will be handling the return or repair of the product. Often this is the Manufacturer of the Item. However, you can set up repair centers or service centers in Dashboard > Vendors. Use the drop-down list to select the company responsible for handling your repair or return.
- Serial/MAC field is used to track the Serial Number or MAC address of the Item being repaired or replaced.
- RMA# refers to the RMA number you may have received from the vendor.
- Repair Cost can be used to enter the price you are paying to have the item repaired.
- Total Cost is the combined repair cost + shipping charges entered in the Shipping tab.
There are also Tabs at the bottom of the page that you can use to help document the Items return, replacement, and re-installed.
Logs
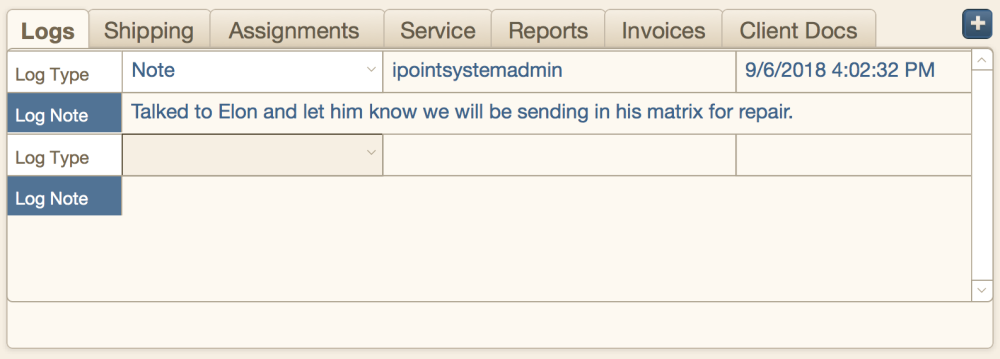
Logs can be used to document phone calls or other notes related to the Item. The options are as follows:
- Action
- Call
- Note
Selecting the type of log you create will help keep the activity log accurate and available to everyone viewing the RMA. There will be a blank log as soon as the RMAs are made. However, if you need to create a new Log entry, you can use the “+” on the far right side to create a new Log entry. After entering a note in the log, your username, and date & time of the log entry are stored.
Shipping
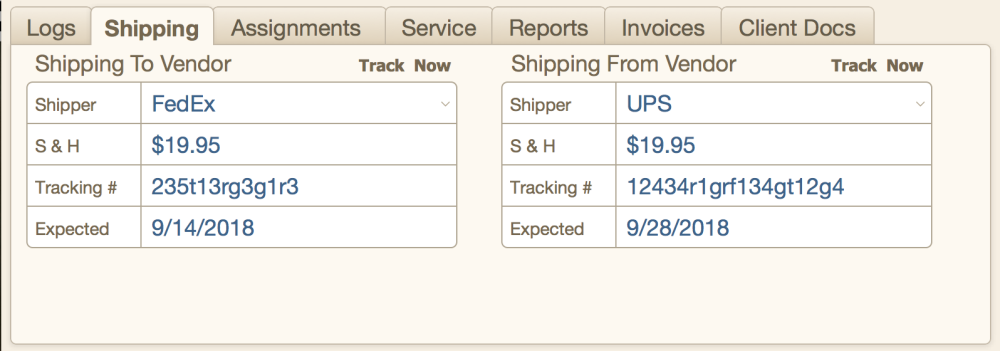
This table can be used to enter the Ship-To Vendor, Ship From Vendor, and any associated shipping costs incurred. Select the Shipper from the drop-down list, or use Other as your carrier. S+H is used to enter the shipping cost in this field. If you select a vendor that gives you a tracking number, it can be entered in the Tracking # Field. The Expected field is used to select the date indicated by your shipping carrier your product should arrive at the Vendor.
The Ship From table is used to define shipping back from the vendor. Enter the Shipper, any S+H charges, Tracking #, and the expected date using the information given to you by the Vendor.
If you are using one of our pre-set carriers (such as UPS, USPS, or FedEx), you will see the “Track Now” button above each table after entering the tracking number. This text is a hyperlink to the carriers tracking website and will enter the tracking number for you, giving you quick access to the package’s status.
Assignments
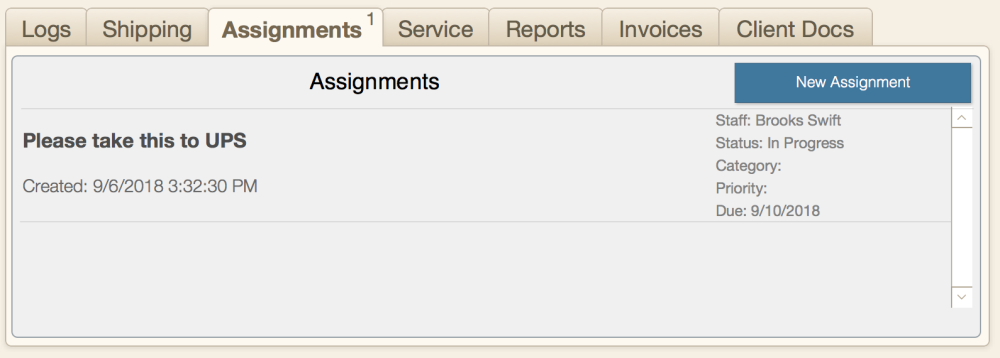
Assignments can be created directly from the RMA module, using the Assignments tab.
- Click the New Assignment button to open the assignment window
- For more information on creating an assignment, visit Dashboard > Assignments.
- After creating assignments, they will be listed on the Assignments tab.
.
.
.
Service
You can use the Service tab to schedule Work Orders directly related to the RMA.
- Click the New Work Order button.
- A Work Order opens with the customer’s prepopulated.
- For more information on creating Work Orders, visit Dashboard > Work Orders.
- All Work Orders associated with this RMA will be displayed here on the Service tab.
Reports
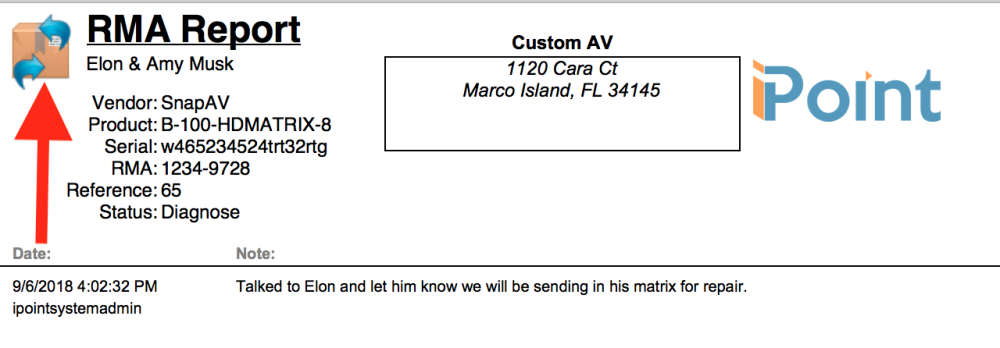
The Reports tab is where you can prepare a printed report about the RMA.
- Click the Printable RMA link
- Click the File menu in the FileMaker menu area
- Note that you can modify many of the fields on the report before printing it. Click on the text you want to modify and make your changes. Editing a field does, however, modify the actual RMA record as well.
- Choose Print to send the report to your printer
- Click the box with the two blue arrows at the top left corner of the report to return to the RMA
Invoices
The Invoices tab is where you generate an invoice for the customer.
- Click the New Invoice button
- A new invoice opens prepopulated with the customer’s name and address details
- For specific instructions on creating invoice, visit Dashboard > Accounting > Invoices.
- Previously generated invoices are also displayed here.
Docs
The Docs tab is where you store documents associated with this RMA.
- Right-click on the Add Content Here button to Insert files, a picture, or paste a document
- Click in the Doc Desc field to type details about the document
- Note: These documents do not appear on the customer’s documents in CRM. They are only stored here on the RMA
- The Delete button on the right-hand side removes the document from the RMA
- The Preview button opens a full-size preview in a new window, allowing you to view or print the file.
- Store as many documents as you like. They’ll all be listed here!
Notifications
iPoint can be set up to send an email or text to your staff members as the RMA progresses through the process. Notifications are set up in Settings > Notification Builder.
The notification shows:
- Customer Name
- Date of Change
- New Status
- Who changed the status
- Name of Vendor
- Name of Product
- Work Order number (if any)
- Transactions Logs


