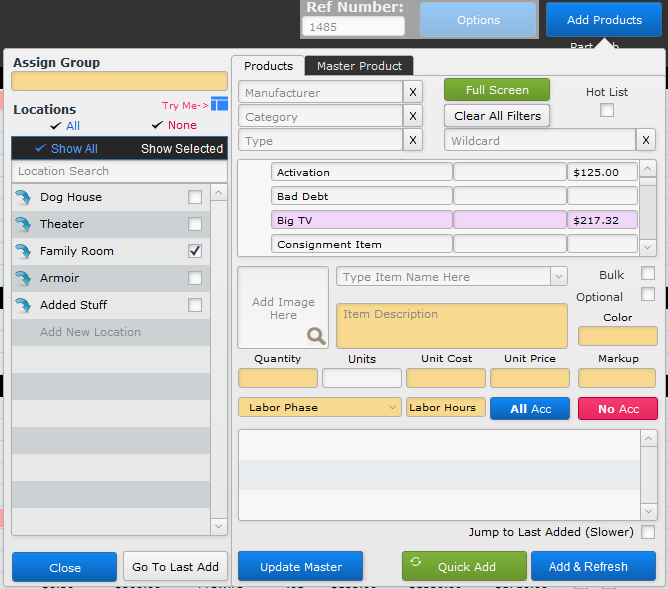
Adding products to the Designer is done by clicking on the blue Add Products button at the top right corner of the designer. This opens a pop-up window where you choose a product to be added to specific locations in your design.
Product Selection
The Products tab is where you pick the product. This can be done using a number of methods.
- Scroll through the Parts List – The center section of the Products tab displays the list of every active part in the iPoint database.
- Scroll through the list to find the specific part you want to add.
- Click on the item to populate the bottom half of the Products screen
- Items highlighted in green indicate that existing inventory is available.
- Items highlighted in purple are Packages comprised of multiple parts.
If this icon is displayed in front of an item, you know it has been discontinued.
- Filter the list – Using the Manufacturer, Category, and/or Type fields at the top left of the Products tab will reduce the number of parts visible in the Scroll List.
- Enter “Samsung” in the Manufacturer field, for example, and the scroll list will only display Samsung manufactured products.
- Enter “Display Devices” in the Category field to only show televisions, monitors, and projects.
- Enter “LCD” in the Type field to show only LCD monitors.
- Use all three filters simultaneously to narrow your list even further.
- Wildcard search – Enter a word or number in this field to only show parts that include that string of characters. Entering “HDMI”, for example, will show cables, televisions, and receivers. That is because the TV description may include, “There are 3 HDMI inputs on the back of this TV.” Wildcard searches the product name, number, and description fields.
Hot List – Your system administrator may have identified a few key items as hot list items, products that you sell regularly. Placing a check in this box will limit the items in the scroll list to those that have been defined as a hotlist item.
- Manually enter an Item Name – Directly below the scroll list is a field that displays the Item Name of the part you selected using one of the above methods. Alternatively, you can manually type an item name in this field to quickly identify the part.
Use the Full Screen button to open the Add Products pop-over into a full-screen window. This is especially useful when you have multiple monitors. Move the Add Parts to your second monitor giving you an unobstructed view of your designer.
The Clear All Filters button removes all filters with one button push. Alternatively, you can click the X at the end of a specific filter to remove just that option.
Product Details
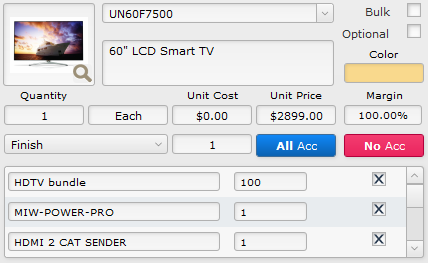
Once a product is selected, the details are displayed in the center of the Products tab. Item details include:
- Item Image
- Item Name
- Item Sales Description
Bulk – if this is a bulk item
Optional – checking this box makes the item an optional part of the proposal and is displayed in orange, but not included in the total price of the proposal.
- Color – of the item
- Quantity
- Unit of Measure
- Unit Cost
- Unit Price
- Margin
- Associated Labor Phase (dropdown)
- Labor Time (in hours)
- List of Accessories – if the item has been set up with accessories (on the Item Master in the Item module), they will be listed here. Each accessory has a checkbox to the right of the quantity field. If a check is in the box, it will be added to the designer as an accessory. Remove the check and that particular accessory will not be added to the designer.
- Use the blue All Acc button to check all accessory checkboxes.
- The red No Acc button clears the checkboxes for all listed accessories.
Fields in the Product Details screen that are blank will be highlighted in yellow to help draw your attention to the fact that some important information is missing.
Group and Location
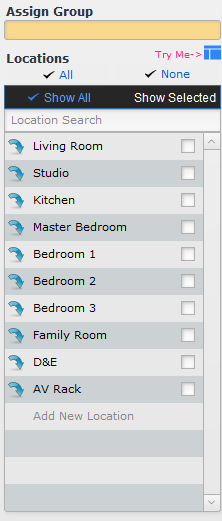
To the left of the Product (tab) is a section that allows you to set the group and location for each part selected.
Assign Group – if the part selected has a Default Proposal Group assigned on the Item Details Master, it will display here. You can manually override the default by choosing a group from the dropdown. Or, you can enter a new group by manually typing in a new Group name. iPoint will add the new group to this proposal only. This does not affect the master group list for the software.
Locations – all of the Location specified in the Proposal Setup will be displayed here. Check the boxes next to the individual location(s) where you want this product added. Feel free to choose one or multiple locations. If you do NOT choose a location, the part will be added to an empty location on the proposal.
- Show All – this link will display all of the locations as defined in the proposal setup.
- Show Selected – will display only the locations that have a checkmark.
- All – will place a checkmark in the box for each location.
- None – clears the checkmarks next to all locations.
The Master Location List icon opens a larger window that displays all locations at once. This is useful when dealing with large jobs that have more locations than will fit in the scrollable location list. [ Watch Video ]
- Add New Location – if the location is not listed, you can enter it manually at the bottom of the location list. This new location is only available on this proposal and will not update the customer’s master location list.
The Arrow icon before each location name will take you directly to that section on the designer.
.
.
.
.
.
.
Buttons

- Close – closes the Add Parts popover window.
- Go to Last Add – This button will take you to the last item added to the Designer. This is particularly helpful if you have many items on your design and want to adjust the item you just added.
- Update Master – If you have appropriate permissions, this button will update the Item Master (in the Items Module) with the modifications you made to the part, including Quantity, Unit of Measure, Cost, Price, Labor Phase and Time as well as the Description. This button will be blue if no changes have been made and will turn red if modifications can be applied to the Item Master.
- Quick Add – The Quick Add button works just like the Add & Refresh button, except that the screen is not refreshed and the parts are added “behind the scenes.” Experienced users may find this method speeds up proposal creation.
- When the last part has been added using Quick Add, click the small recycle icon in the top left corner of the button to refresh the screen, showing all the parts that have been added to the proposal.
- Add & Refresh – Once you have selected the item and defined group and location settings, push this button to add the part to the proposal’s design. This button simultaneously refreshes the designer screen so you can see the parts you’ve just added.
Jump to Last Added (Slower) – When this option is checked, you will be taken to the position in the designer where the last part was added. You might use this option if your design has hundreds of items. You would want to see the item so that you could click on it to provide additional customizations. This checkbox functions similarly to the Go To Last Add button described above, except that it happens automatically after every part is added.
Note: Using this function will slow down the speed of adding items to the Designer.
Master Product tab
The Master Product tab is where you can see (and edit) all of the master product information for an item.
Note: Users must have appropriate permissions to edit these details.
Manufacturer: The item’s manufacturer
Category: The item category
Type: The item type
Item: The item name
Part #: The item’s part number
Quantity: The default quantity for this product (for example speakers might come in a set of 2)
Unit dropdown list: The unit of measure for this product, such as “Each,” “Ft,” “Hour”
Unit Price: The price your customer will see for this product, including markup
Margin: The percentage of profit in the unit price (automatically calculated based on hard cost and unit price)
Hard Cost: The Unit Price (the actual cost per item)
Mod Type dropdown list: The modified cost type, either a percent or a dollar amount
Mod Amount: The modified cost amount
Mod Cost: This field is calculated automatically as the Hard Cost plus the Mod Amount. The Mod Cost is the new Unit Cost listed on the proposal for the item.
Labor Phase: The default labor phase for the item
Labor Hours: The default number of install hours for this item
Bulk Wire checkbox: This checkbox will be ticked if the item is bulk wire/cable
Description: Item description
Close button: Click the button to close the Add Products popover window
Open Master button: Click the Open Master button to view this product in the Items Module.
New Product button: Click the New Product button to add a new product to the Items database.


 The Master Location List icon opens a larger window that displays all locations at once. This is useful when dealing with large jobs that have more locations than will fit in the scrollable location list. [
  The Arrow icon before each location name will take you directly to that section on the designer.