
 Inventory Dashboard: PRM
The Inventory Dashboard: Purchase Request Manager displays a list of parts that have been requested from various locations in iPoint. The requests could come from Sales Orders, Projects, Work Orders, or Invoices. You’ll see the:
- Created – the date when someone created the request
- Created By – the name of the user who created the request
- Required By – the date the part requested is needed
- Memo – if the project manager entered a note on the purchase request, it will be displayed here
- Originated – each line shows the name of the sales order from which the request originated.
Clicking on any line items will open the Purchase Request Manager (PRM) filtered by that specific request.

Clicking the Go To Purchase Request Manager button will open the full, unfiltered PRM.
 Purchase Request Manager
The Purchase Request Manager or PRM is the dashboard for your purchasing and warehouse managers to allocate and buy the items you’ve sold to your customers. Parts appear on this list when requested through a Sales Order, Project, Work Order, or Invoice. First, let’s look at the various sections.
PRM Headers
The list shows all of the parts and is broken down into five colored categories. The various category headers may or may not be displayed based on how the list is filtered under the Options button.
- A yellow header is used to summarize the Class assigned to the jobs where the part is requested.
- An orange header displays the Sales Orders name where the project manager requested the parts.
- The black header displays the Vendor who sells the requested products.
- The teal header shows the Manufacturer of the items.
- The tan header shows the Part Number, Item Number, or both. This line also displays the total number of items required, received, ordered, on-hand, or available throughout the company.
- The white section shows the individual parts needed for various jobs, each on a separate line.
Clicking on the headers will provide various levels of additional information.
 PRM: Vendor Details
Vendor Header Details
Clicking on the black Vendor header opens a shortcut button to Go To Vendor details in the Vendors module.
.
.
.
 PRM: Item Details
Item Header Details
Click on the tan Part header to open details about the individual part. These details come directly from the Item master in the Items module, and changing any information here also updates the master record.
- manufacturer is the name of the manufacturer who makes the part
- category is the category filter assigned to the product
- type is a secondary filter assigned to the part.
- item is the name of the item as it will appear on sales documents
- Part Number is the manufacturer’s part number that will appear on purchasing documents.
- Inventory Type tells you if the item is inventory or non-inventory. This field is not modifiable here.
- Color is the color of the item.
- Vendor Name is the default vendor where you typically buy the part.
- Unit Cost reflects the cost listed on the Item master record.
- Unit Price is the amount that the part sells for to our customer. Note this is the master price and not necessarily the price the item was sold for on an individual sales order, project, or invoice.
- Sold, Received, and On Order are a quick visual indicator regarding the status of inventory that has been sold to the customer, received from a purchase order (this includes staged/allocated parts), and the quantity on unfulfilled purchase orders.
Note: This information is also available by clicking on the individual items listed under a job. The difference is that the quantities reflect the separate line (rather than the collective parts across all jobs). This view also provides details about re-order and maximum stock levels and amounts available and on hand. These numbers are typically used for staging products, which we’ll discuss soon.
 PRM: Job Details
Job Header Details
To reveal details about the project where the part is requested, click the job name in the white section of the list.
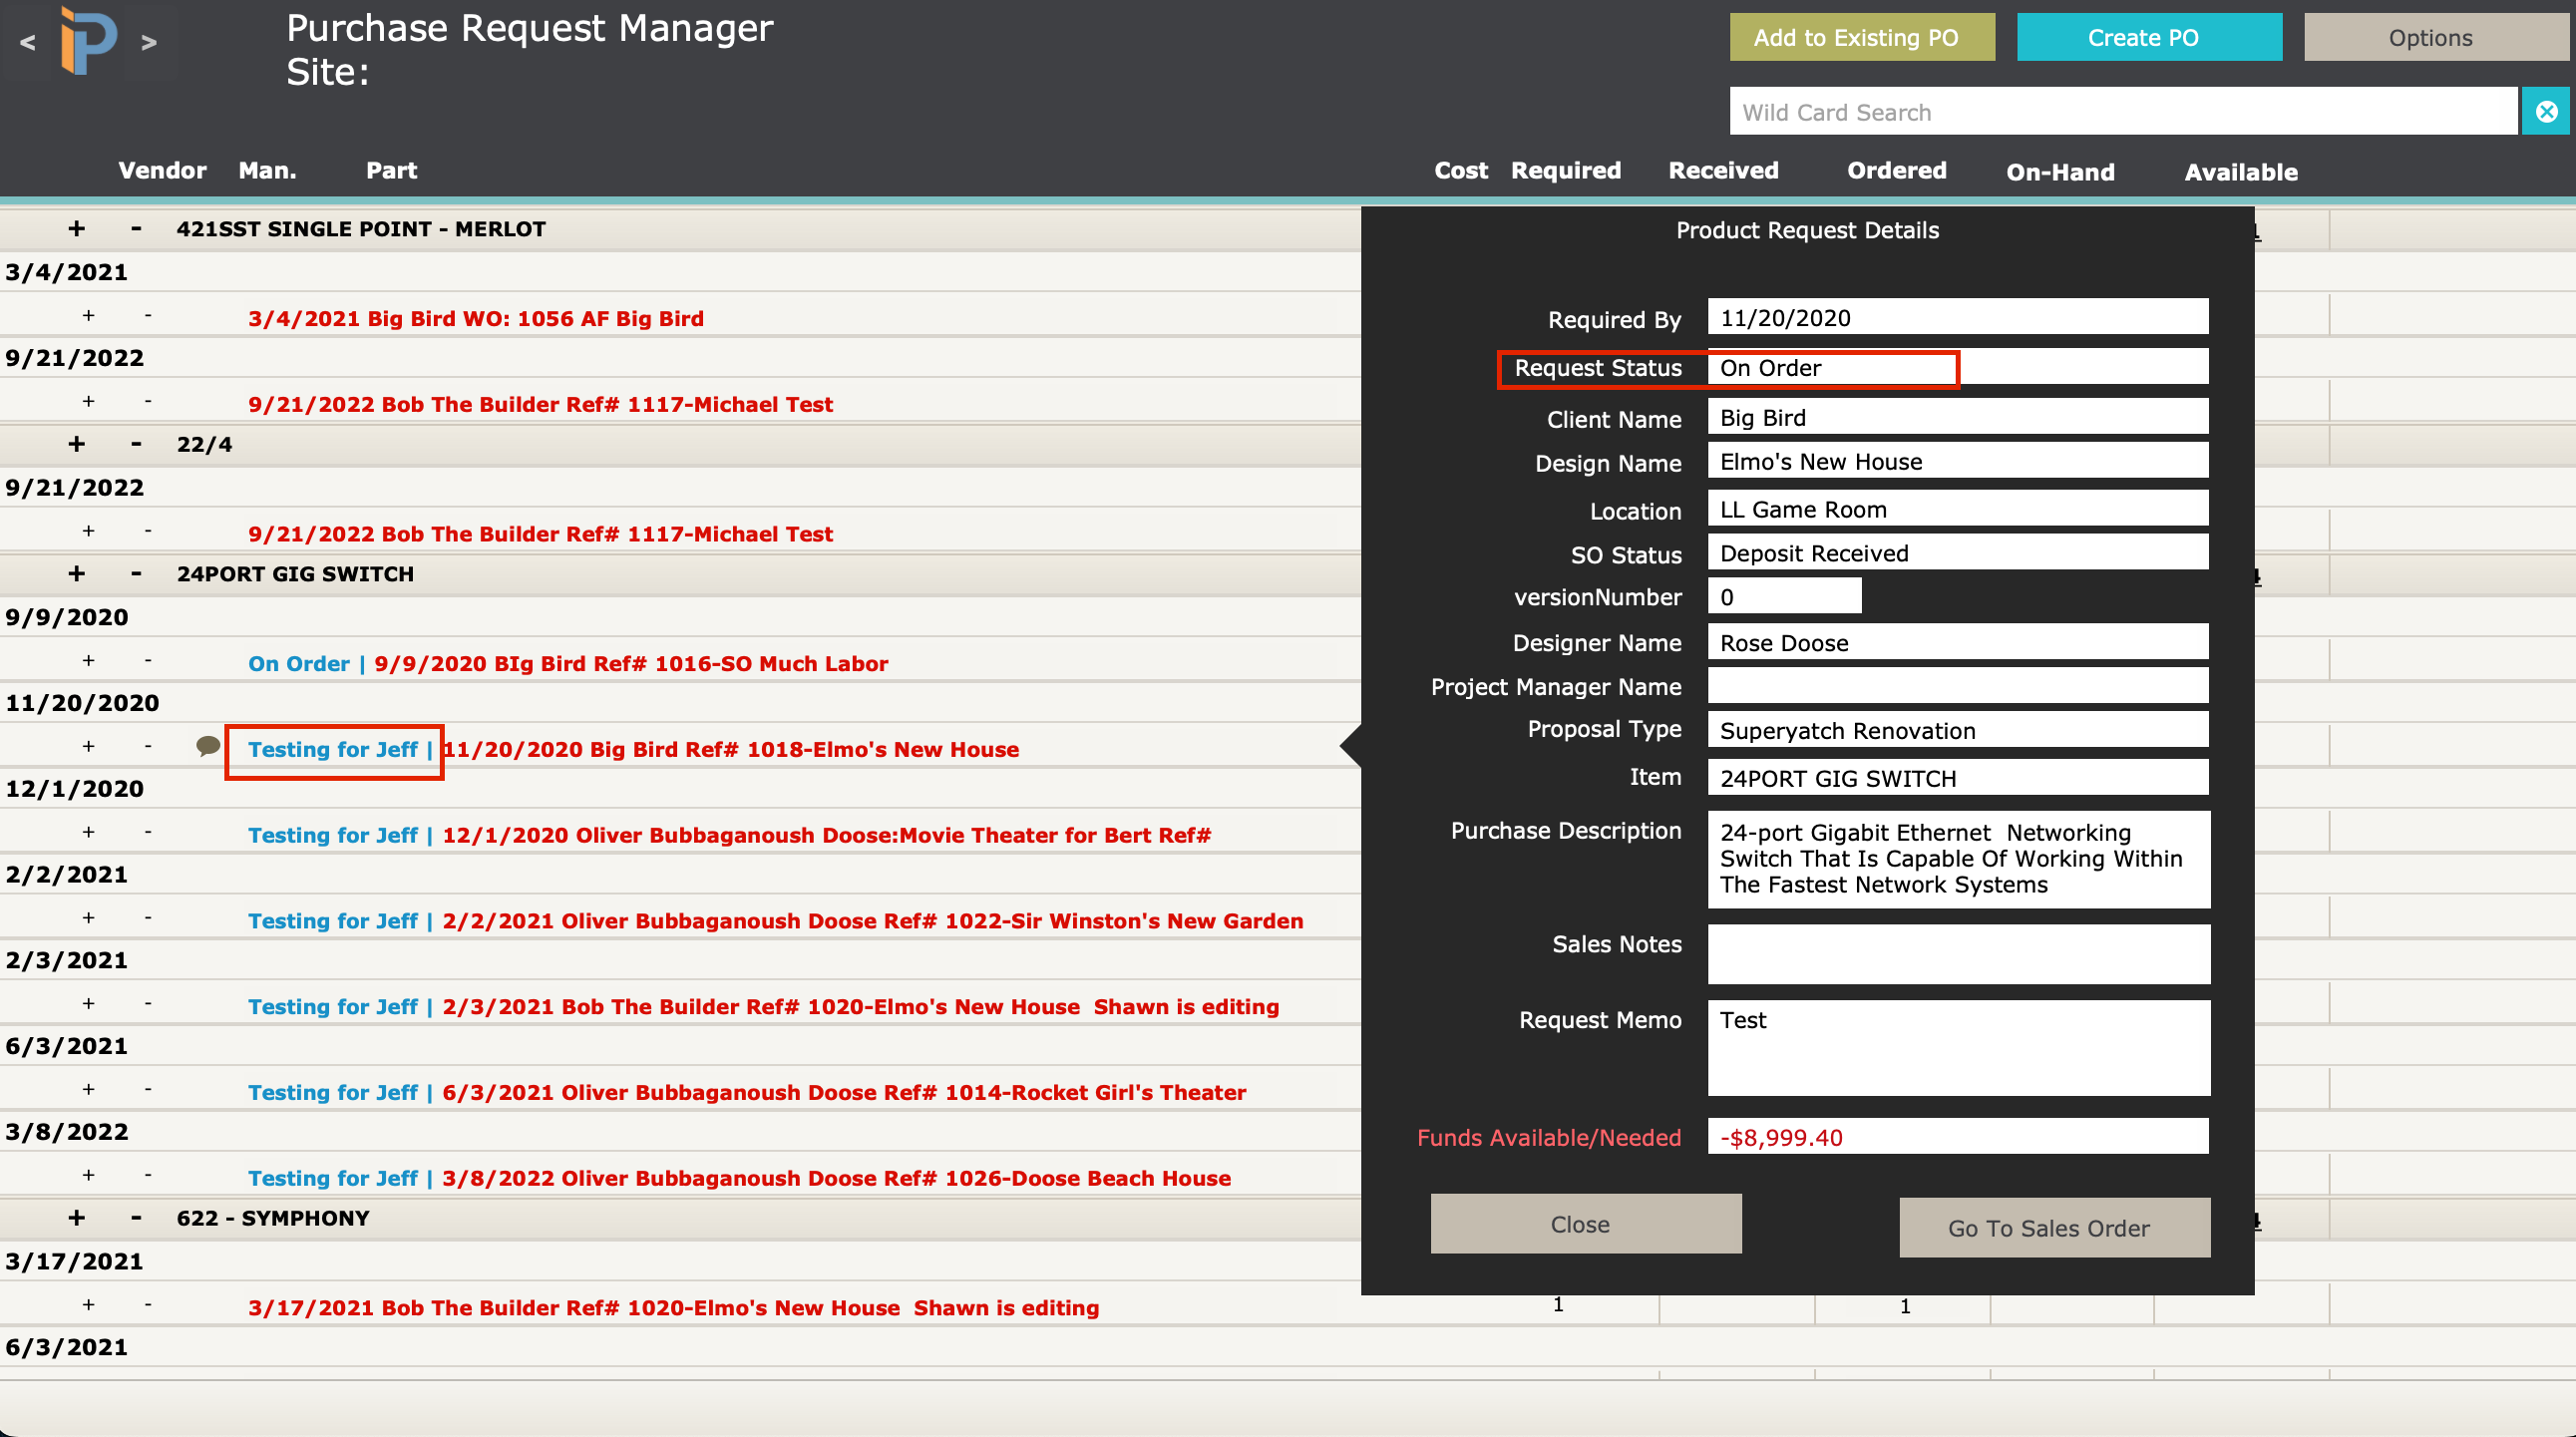
If the job is a sales order, you’ll have these fields available:
- Required By is the date that the item is needed as defined by the salesperson or project manager on a sales order.
- Client Name is the name of the entity buying the product.
- Design Name is the name of the sales order
- Location lists where the item is being installed – this comes from the assigned location of the part on the Proposal/Sales Order.
- Status shows the Sales Order Status as defined on the Info tab of the sales order.
- versionNumber represents the revision number of the sales order and is determined by which proposal revision was used when someone converted the proposal to a sales order.
- Designer Name is the Sales Staff Name on the sales order.
- Project Manager Name comes from the Project Manager on the sales order.
- Proposal Type reflects the Proposal Type field on the proposal. This sticks to the sales order when converted, although it is not editable on the sales order.
- Item is the *Iten Name*from the item master.
- Purchase Description comes from the purchase description field on the item master.
- Request Memo is entered by the salesperson or project manager when they requested the part from the Product Manager of the sales order.
- Funds Available/Needed refers to the money received via RFP invoices compared to what has been delivered. This field is helpful to see if you’ve been paid for the items ordered or not.
- Go To Sales Order button is your shortcut to the Sales Order.
If someone requested the part from a Project, Work Order, or Invoice, your available fields are slightly different.
- Required By is the date that the item is needed. The project manager sets this on the project or the technician on a work order.
- Client Name is the name of the person or company buying the item.
- Ref # is the Project Ref#.
- Location is the name of the room or location where the product is installed.
- Purchase Description comes from the item master where there are three item descriptions, one of which is the Purchase description.
- Request Memo is entered by the individual who requested the part.
- Go To Project, Go To Work Order, or Go To Invoice buttons take you to the individual document where a user requested the item.
Item Details

The displayed job names will have one of three colors.
- Black – indicates a current product request.
- Blue – indicates the product request is due today.
- Red – indicates that the due date for this item has passed.
Each item shows the:
- Date Required – when the part needs to be on-site as defined by the person requesting the product.
- The Customer/Job name – where the part is needed
- The job Name – this might be a work order, project name, or sales order reference.
- The Cost of the item – as determined by the Item record in the Items module.
- The number of items Required – to fulfill the job. This number is the quantity sold minus any amount that has been delivered.
- The quantity Received represents the number of items allocated or delivered to the customer.
- Ordered reflects the quantity of the item on a Purchase Order and has not yet been received.
- On-Hand reflects the number of items that are physically in one of the warehouse locations. This information is helpful because you might need to steal an item from a job not being installed for a while to use on a job installed right away.
- Available tells you the number of items that are available to sell to your customer. They are in the warehouse(s) and not allocated to a particular job.
 PRM: Options
PRM Options

The Options button, like other places in iPoint, gives you the ability to adjust the list of items on the Purchase Request Manager.
Filters tab
The Filters tab helps you adjust the displayed list of items to quickly find the products that need to be ordered or staged in your company.
- Summarize By gives you the ability to display the list in nearly 40 different ways. Each option adds another layer of information. Let’s take a look at an example.
Ven / Man / Part / Due / Line separates all requested parts by vendor first. Then, under each vendor, you’ll see the various manufacturers you purchase from that vendor. Under each manufacturer are listed the parts requested. The due option segments the parts into the dates when the products are needed. Finally, you’ll see the line detail, which displays the individual product request.
Now that you see how the summary can be nested let’s look at each option in detail.
- Class – classes are used to provide an additional layer of categorization, often used for reporting in QuickBooks.
- Vendor – is the company that sells you the product and might be a distributor or the manufacturer of the equipment.
- Manufacturer – is the company that makes the part
- Part – the item being sold
- Due – the date that the product is needed to be
- Line – is the actual product line on the associated sales order, project, work order, or invoice where someone requested the product
- Requested – indicates that the part was requested for a specific job and did not come from an inventory re-order or transfer request
- SO – groups product request by the name of the originating sales order
Choose the summarized sequence option that makes it most manageable for you to work with the product requests.
- Filter by Class lets you choose a specific class of products to be displayed. Classes are set in Settings > QuickBooks > Lists.
- Filter by Due Date shows only parts that have been requested by the date entered. The list will not display any future dated requests.
- Filter Stock Requests can show or hide stock requests. Stock requests are items that increase available inventory levels and are not associated with a sales order, project, work order, or invoice.
- Show Only gives you the ability to filter out products based on their order status.
- Show All – shows every product request
- Needs Ordered – shows items not allocated from existing inventory or included on a purchase order.
- On Order – displays only things that are on purchase orders.
- Pending Transfer – shows only items that are being transferred from one location to another. On a Stock Transfer/Request Form.
- Available Stock – shows only requested, in-stock items and is designed for warehouse staff to use any existing inventory to fulfill product requests.
- No Available Stock – requested products that are not in inventory appear in this sort. Use this filter to find things that need to be ordered.
- View Item Name or Part Number is where you decide what part number information is displayed on the PRM list.
- Item Number – will display the sales name as defined on the Item Master.
- Part Number – displays the Manufacturer Part Number as entered on the Item Master.
- Both – displays both the Item Name and Part Number.
- Filter by Sales Order Ref # – lets you look for all the requested products for a particular sales order. The dropdown list shows all active sales orders sorted by customer name/job name.
- Filter Selected – is where you can Show Only items that you’ve checked on the item list. You can also Hide the things you’ve checked.
- Sites – use this dropdown to display parts needed from a specific store/site. This option is used by companies with multiple stores in multiple locations.
![]() Show On Order Red Color When PO No Submitted – with this option selected, the quantity on order will display red numbers if the purchase order has not been marked Submitted.
Show On Order Red Color When PO No Submitted – with this option selected, the quantity on order will display red numbers if the purchase order has not been marked Submitted.
Advanced tab

The Delete button removes any request that has been checked. This button does not delete the items on the list. It simply deletes the part request. So, if a user requested the item on a Sales Order Product Manager, the requested box will be unchecked. However, the part stays on the sales order for requesting at a later date.

This button updates the information on the PRM list of items. There are several places in the software where the product can be requested, added to purchase orders, etc. A programming script updates the PRM list with changes made in other modules. However, some changes can take place in the minutes between the update script firing. If you believe that the numbers displayed on the PRM are inaccurate, click this button to force the script to run now instead of waiting for the coded time.

Allocating Product
Before you order any items on the PRM, you may want to allocate existing inventory available in your warehouse. You will know you have a product available to distribute by looking for quantities in the Available column of the PRM.

- On the Purchase Request Manager, select the Options button
- Choose any of the Summarize By items that have the / Line option. The line option is where you can allocate specific items
- Click on the Stock Options box next to the quantity required on a single line to open the Stock Options window where you can allocate the item from existing inventory. The Stock Options window provides many other details about the part, too. – New in 10.0912
![]()
- Note: The Stock Options box is only available on the individual line, not on a project or part header.
Processing Orders
Using the Purchase Request Manager is pretty simple. This tutorial will walk through the process of adding items from one distributor to a purchase order.
In front of each line, you see a + and – button. Use these buttons to select or de-select items individually or in bulk.
Clicking the + on a Manufacturer line, for example, will select all items associated with that manufacturer.
Clicking the – on a Part line will de-select all of that part for all job requests in the system.
- Select the items from the vendor you want to purchase by checking one + or – by vendor, manufacturer, job, or individual product.
 Once the items you want to order from your vendor are selected, click the Create PO button.
- iPoint will prompt you to verify the vendor where you are placing the order.
- Now iPoint will create the Purchase Order for the vendor chosen and the selected items. – We go into more details on the Purchase Order itself here.
 Once the items you want to order from your vendor are selected, click the Create PO button.
 Add to Existing PO
Alternately, you can add the selected product to an existing purchase order by clicking the  . This button opens a pop-up window displaying all the available Purchase Orders for a particular vendor.
- Choose the desired vendor from the Select Vendor dropdown.
- All available purchase orders are available as long as they are not marked as Submitted, which is the iPoint indicator that the PO has been sent to the vendor.
- Click the Add to PO button, and the system will add the selected items to the PO you just chose.
- Clicking the red View PO button opens the PO without adding the selected items.
Request Status
From the Purchase Request Manager the Status can be set by clicking on the request line.
OR Selecting a group of requests then Options->Advanced->Define Status and then apply.
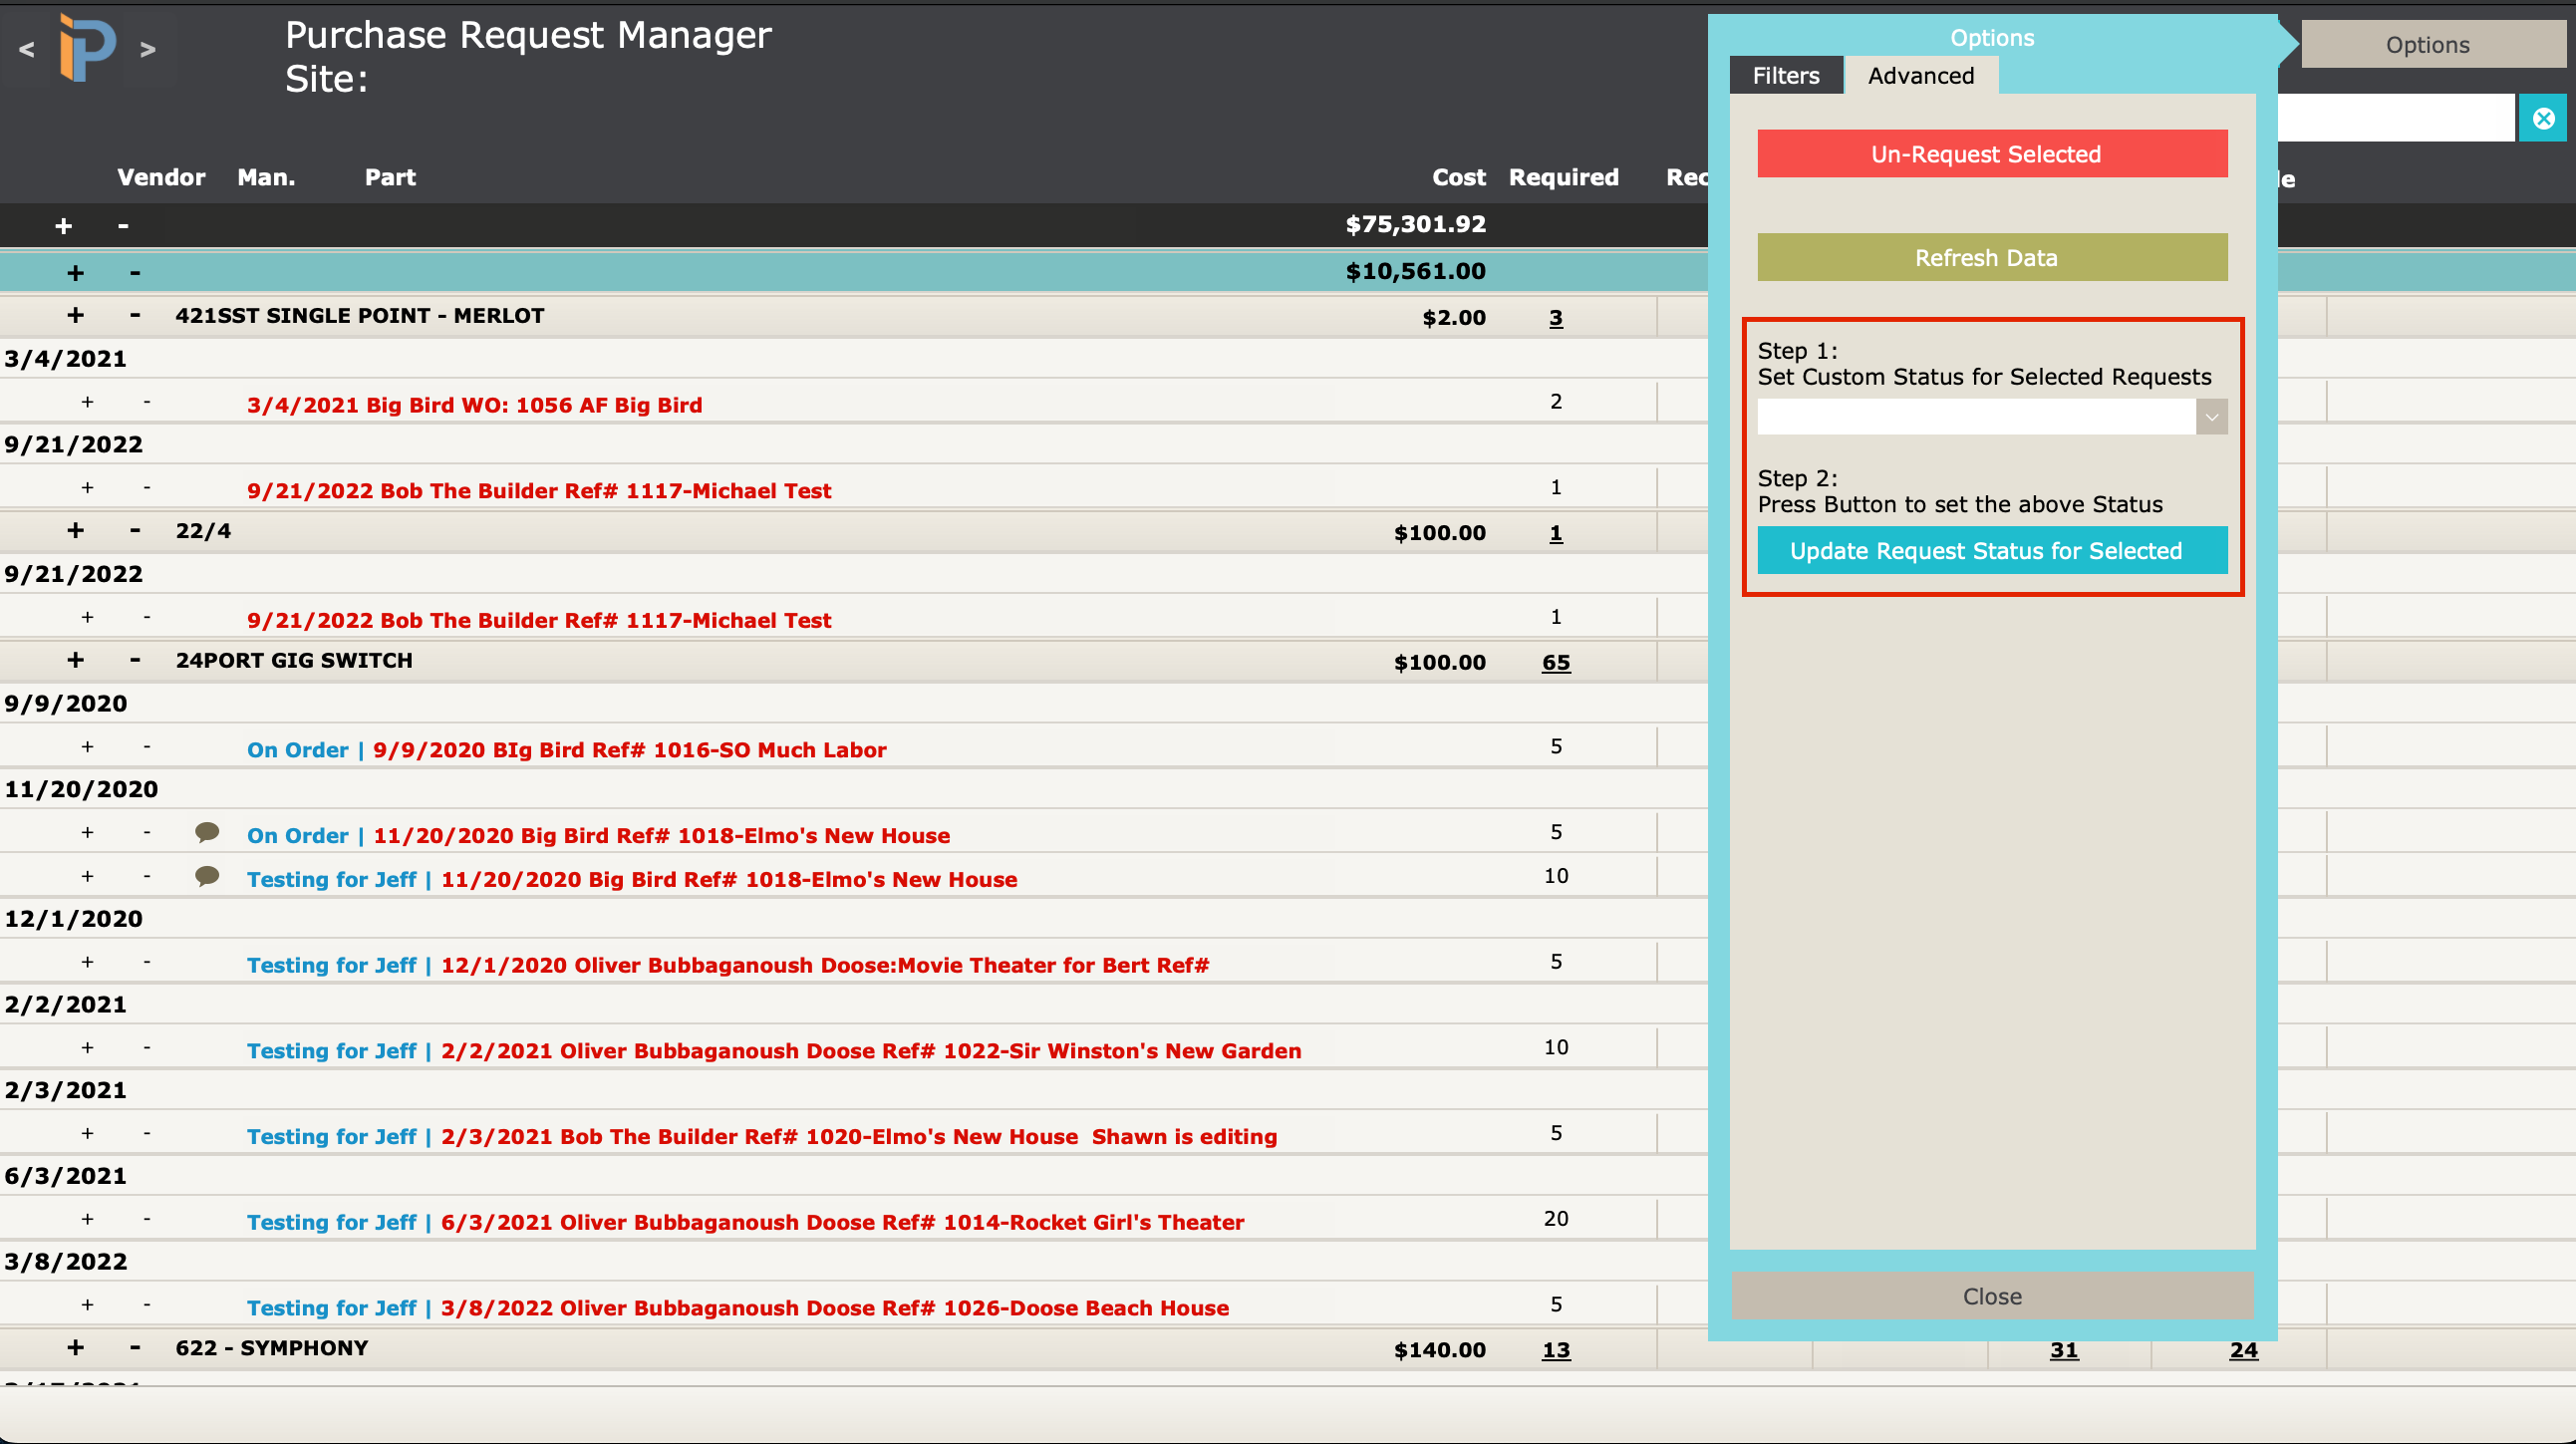
These statuses can be adjusted in Settings > Pop Up Lists > Purchase Request Status
Select Sales Order
You can select a certain Sales Order in the PRM to filter by so that you only see requests from that Sales Order. This is done by going to Options > Select Sales Orders. You can also select more than one Sales Order to see more than one at the same time.

.
.
.